In this tutorial, you will learn how to use the Excel AutoFit feature to make cells, columns or rows expand to fit text automatically.
Microsoft Excel provides a handful of different ways to change column width and adjust row height. The easiest way to resize cells is to have Excel automatically determine how much to widen or narrow the column and to expand or collapse the row to match the data size. This feature is known as Excel AutoFit and further on in this tutorial you will learn 3 different ways to use it.
Excel AutoFit - the basics
Excel's AutoFit feature is designed to automatically resize cells in a worksheet to accommodate different sized data without having to manually change the column width and row height.
AutoFit Column Width - changes the column width to hold the largest value in the column.
AutoFit Row Height - adjusts the column width to match the largest value in the row. This option expands the row vertically to hold multi-line or extra-tall text.
Unlike column width, Microsoft Excel changes the row height automatically based on the height of the text you type in a cell, therefore you won't really need to auto fit rows as often as columns. However, when exporting or copying data from another source, row heights may not auto adjust, and in these situations the AutoFit Row Height opting comes in helpful.
When resizing cells in Excel, either automatically or manually, please bear in mind the following limits to how big columns and rows can be made.
Columns can have a maximum width of 255, which is the maximum number of characters in the standard font size that a column can hold. Using a bigger font size or applying additional font characteristics such as italics or bold may significantly reduce the maximum column width. The default size of columns in Excel is 8.43.
Rows can have a maximum height of 409 points, with 1 point equal to approximately 1/72 inch or 0.035 cm. The default height of an Excel row varies from 15 points on a 100% dpi to 14.3 points on a 200% dpi.
When a column width or row height is set to 0, such column/row is not visible on a sheet (hidden).
How to AutoFit in Excel
What I particularly like about Excel is that it provides more than one way to do most things. Depending on your preferred work style, you can auto fit columns and rows by using the mouse, ribbon or keyboard.
AutoFit columns and rows with a double-click
The easiest way to auto fit in Excel is by double-clicking the column or row border:
- To autofit one column, position the mouse pointer over the right border of the column heading until the double-headed arrow appears, and then double click the border.
- To autofit one row, hover the mouse pointer over the lower boundary of the row heading, and double click the border.
- To autofit multiple columns / multiple rows, select them, and double click a boundary between any two column / row headings in the selection.
- To autofit the whole sheet, press Ctrl + A or click the Select All button
 and then, depending on your needs, double click a border of any column or row heading, or both.

AutoFit columns and rows by using the ribbon
Another way to make Excel cells expand to fit text automatically is by using the following options on the ribbon:
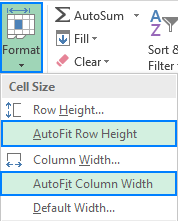
To AutoFit column width, select one, several or all columns on the sheet, go to the Home tab > Cells group, and click Format > AutoFit Column Width.
To AutoFit row height, select the row(s) of interest, go to the Home tab > Cells group, and click Format > AutoFit Row Height.

AutoFit column width and row height using a keyboard shortcut
Those of you who prefer working with the keyboard most of the time, may like the following way to auto fit in Excel:
- Select any cell in the column/row you want to autofit:
- To autofit multiple non-adjacent columns/rows, select one column or row and hold down the Ctrl key while selecting the other columns or rows.
- To autofit the entire sheet, press Ctrl + A or click the Select All button.
- Press one of the following keyboard shortcuts:
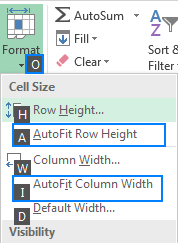
- To AutoFit column width: Alt + H, then O, and then I
- To AutoFit row height: Alt + H, then O, and then A
Please pay attention that you should not hit all the keys together, rather each key/key combination is pressed and released in turn:
- Alt + H selects the Home tab on the ribbon.
- O opens the Format menu.
- I selects the AutoFit Column Width option.
- A selects the AutoFit Row Height option.
If you are not sure you can remember the whole sequence, don't worry, as soon as you press the first key combination (Alt + H) Excel will display the keys to access all options on the ribbon, and once you open the Format menu, you will see the keys to select its items:

Excel AutoFit not working
In most situations, the Excel AutoFit feature works without a hitch. There are times, however, when it fails to auto size columns or rows, especially when the Wrap Text feature is enabled.
Here's a typical scenario: you set the desired column width, turn Text Wrap on, select the cells of interest, and double click a row separator to autofit the row height. In most cases, rows are sized properly. But sometimes (and this may happen in any version of Excel 2007 to Excel 2016), some extra space appears below the last line of text as show in the screenshot below. Moreover, the text may look correctly on the screen, but gets cut off when printed.

By trial and error, the following solution for the above problem has been found. At first sight, it may seem illogical, but it does work :)
- Press Ctrl + A to select the whole worksheet.
- Make any column a fair amount wider by dragging the right boundary of the column heading (because the entire sheet is selected, all the columns will be resized).
- Double-click any row separator to auto fit the row height.
- Double-click any column separator to auto fit the column widths.
Done!
Alternatives to AutoFit in Excel
The Excel AutoFit feature is a real time saver when it comes to adjusting the size of your columns and rows to match the size of your content. However, it's not an option when working with large text strings that are tens or hundreds of characters long. In this case, a better solution would be wrapping text so that it displays on multiple lines rather than on one long line.
Another possible way to accommodate long text is to merge several cells into one big cell. To do this, select two or more adjacent cells and click Merge & Center on the Home tab, in the Alignment group.
This is how you use the AutoFit feature in Excel to increase cell size and make your data easier to read. I thank you for reading and hope to see you on our blog next week!
 by
by
36 comments
Thanks for helping me out. It really a great website to solve our excel problems and make our life easy. Thank you once again.
Hei, is the shortcuts different from different language? since for me i needed to press Alt+H, then AF to find the format menu.
Very helpful, thanks a lot!
Helped a lot, thanks!
thank you it's was very hepful
thank you
amazing article. It helped me a lot
how do i make the auto adjust work to where when i type in a entry longer than the preset width of the column, the column automatically without me having to do any further steps make the entire column that size?
I have the opposite problem.
How do I autofit content to automatically scale to the size of the cell?
Use wrap text or Alt + H, then W
My excel sheet has two issues:
Some text is long and it changes the height of the columns so much that I can only see on row and even then can't see the whole box. Is it possible that when I copy and paste stuff (text from word into a column) it stays as a small size so that it does not become two big?
Second when I paste something in a box and if it has paragraph etc in text it paste some of it into the cell that I want it to but then pastes rest in the cell below which need up creating confusion as info =becomes part of the cell below and row below where it does not belong, if you understand what I mean?
Please educate me.
Dr Syed
Data entry on our excell feeds multiple worksheets, one is out of room. How do we expand that worksheet to have more permanent lines without disturbing the links and formulas on that sheet? Our accountant who set it up died unexpectedly. Thanks!
I have .csv files and when I autofit the worksheet all cells expand as expected. I then save the file, close and reopen it to find the cells have been collapsed again. How can I maintain the full "autofit" column width? Thank you.
.csv files are text files and will not retain formatting. To save formats, save the file as an Excel Workbook.
Without a reef, there will be no beautiful waves; without setbacks, there will be no magnificent life
how autofit columns to be in one print layot page?
How to auto fit row and column in excel where data entry automatically.
Thanks for the help. I just wanna recall what I learned before. So far, your instrucions were helpful!I got to press the shortcut keys as you instructed.
I cannot make it to work in my excel. Does this has something to do with merged cells? because i still can't auto fit.
The solution for auto fit row height and it's alternate does not seem to work on my spreadsheet. - the row height to fit the contents, double-click the boundary below the row heading does not work.
I am facing one issue .
issue : I made a web Portal and deployed on IIS. I am using Javascript button to export datatable into excel but after the export when file opened the formatting did not same as like on web portal. So tell me any solution how to retain the formatting of table as like on web portal.
I've created a "form" in excel.
One of the cells, A4 uses data validation from a list. Users select their item and the cell automatically adjusts to their selection. No problem; autofit works here.
The user's selection then, triggers a lengthy sentence to appear, (using a VLOOKUP) in the same row, (row 4) but in column Z (Z4). autofit row height has no effect on the row when the VLOOKUP returns the lengthy sentence.
I suspect excel is treating the autofit function on a first come, first serve basis. In other words, the first cell to autofit sets the size for that row. If I double click the row, of course it autofits, but I'd like it to occur automatically for the user.