The tutorial shows different ways to change row height and resize cells in Excel.
By default, all rows on a new workbook have the same height. However, Microsoft Excel allows you to resize rows in different ways such as changing row height by using the mouse, auto fitting rows and wrapping text. Further on in this tutorial, you will find full details on all these techniques.
Excel row height
In Excel worksheets, the default row height is determined by the font size. As you increase or decrease the font size for a specific row(s), Excel automatically makes the row taller or shorter.
According to Microsoft, with the default font Calibri 11, the row height is 12.75 points, which is approximately 1/6 inch or 0.4 cm. In practice, in Excel 2029, 2016 and Excel 2013, row height varies depending on the display scaling (DPI) from 15 points on a 100% dpi to 14.3 points on a 200% dpi.
You can also set a row height in Excel manually, from 0 to 409 points, with 1 point equal to approximately 1/72 inch or 0.035 cm. A hidden row has zero (0) height.
To check the current height of a given row, click the boundary below the row heading, and Excel will display the height in points and pixels:

How to change row height in Excel using the mouse
The most common way to adjust row height in Excel is by dragging the row border. It allows you to quickly resize a single row as well as change the height of multiple or all rows. Here's how:
- To change the height of one row, drag the lower boundary of the row heading until the row is set to the desired height.

- To change the height of multiple row, select the rows of interest and drag the boundary below any row heading in the selection.

- To change height of all rows on the sheet, select the entire sheet by pressing Ctrl + A or clicking the Select All button
 , and then drag the row separator between any row headings.
How to set row height in Excel numerically
As mentioned a few paragraphs above, Excel row height is specified in points. So, you can adjust a row height by changing the default points. For this, select any cell in the row(s) you'd like to resize, and do the following:
- On the Home tab, in the Cells group, click Format > Row Height.
- In the Row height box, type the desired value, and click OK to save the change.

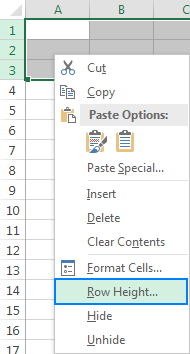
Another way to access the Row Height dialog is to select a row(s) of interest, right-click, and choose Row Height… from the context menu:

Tip. To make all rows on the sheet the same size, either press Crtl+A or click the Select All button to select the entire sheet, and then perform the above steps to set row height.
How to AutoFit row height in Excel
When copying data into Excel sheets, there are times when a row height does not adjust automatically. As the result, multi-line or unusually tall text is clipped like shown on the right-hand part of the screenshot below. To fix this, apply the Excel AutoFit feature that will force the row to expand automatically to accommodate the largest value in that row.
To AutoFit rows in Excel, select one or more rows, and do one of the following:
Method 1. Double-click the lower boundary of any row heading in the selection:

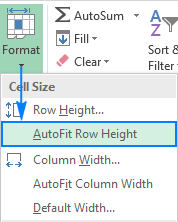
Method 2. On the Home tab, in the Cells group, click Format > AutoFit Row Height:

Tip. To auto fit all rows on the sheet, press Ctrl + A or click the Select All button, and then either double click the boundary between any two row headings or click Format > AutoFit Row Height on the ribbon.
How to adjust row height in inches
In some situations, for example when preparing the worksheet for printing, you may want to set the row height in inches, centimeters or millimeters. To have it done, please follow these steps:
- Go to the View tab > Workbook Views group and click the Page Layout button. This will display the rulers showing the column width and row height in the default measurement unit: inches, centimeters or millimeters.

- Select one, several or all rows on the sheet, and set the desired row height by dragging the boundary below one of the selected row headings. As you do this, Excel will display the row height in inches like shown in the screenshot below:

Tip. To change the default measurement unit on the ruler, click File > Options > Advanced, scroll down to the Display section, select the unit you want (inches, centimeters or millimeters) from the Ruler Units drop-down list, and click OK.
Excel row height tips
As you have just seen, changing row height in Excel is easy and straightforward. The following tips might help you resize cells in Excel even more efficiently.
1. How to change cell size in Excel
Resizing cells in Excel boils down to changing column width and row height. By manipulating these values, you can increase cell size, make cells smaller, and even create a square grid. For example, you can use the following sizes to make square cells:
| Font | Row height | Column width |
| Arial 10 pt | 12.75 | 1.71 |
| Arial 8 pt | 11.25 | 1.43 |
Alternatively, to make all cells the same size, press Ctrl + A and drag rows and columns to a desired pixel size (as you drag and resize, Excel will display the row height and column width in points / units and pixels). Please keep in mind that this method can only show square cells on the screen, however, it does not guarantee a square grid when printed.
2. How to change the default row height in Excel
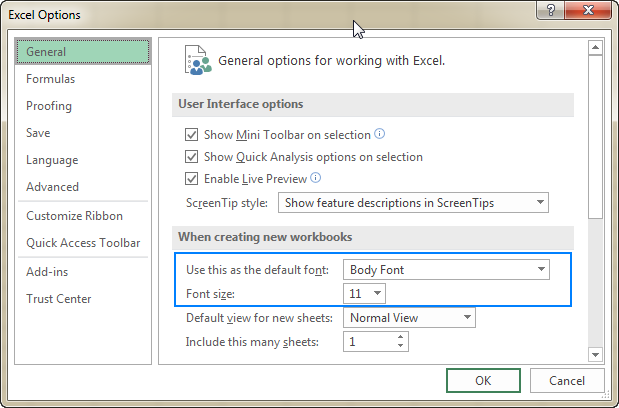
As mentioned in the beginning of this tutorial, the row height in Excel is dependent on the font size, more precisely, on the size of the largest font used in the row. So, in order to increase or decrease the default row height, you can simply change the default font size. For this, click File > Options > General and specify your preferences under the When creating new workbooks section:

If you are not quite happy with the optimal row height set by Excel for your newly established default font, you can select the entire sheet, and change row height numerically or by using the mouse. After that, save an empty workbook with your custom row height as an Excel template and base new workbooks on that template.
This is how you can change row height in Excel. I thank you for reading and hope to see you on our blog next week!
 by
by
38 comments
I write a lot of huge Excel programs (larger than 25 MB each).
I only use Colibri 11 for all fonts.
All rows are of constant height: 12.75 or 17 pixels.
Every few weeks, all of my programs or worksheets suddenly change for some unknown reason.
My first page had rows 1 through 48, and the second page followed with rows 49 through 96, and so on.
But, a few weeks later, the first page now has rows 1 through 49 instead, and so on.
This is very bothersome, as every 2 pages in my program should reflect one calendar day.
As I press Page Down twice, I should see only day 2, not day 2 plus part of day 3.
Why does this happen and how can I eliminate this problem.
Sometimes, this problem does not show its ugly head until months or years later.
Thank you so much.
Peeter
Hi
Did if ever figure out this issue? I am having the same problem.
Which font and size default in ms excel
What version(s) of Excel is this article written for. AutoFit directions do NOT appear to work in Excel 365?
Thank you so much ??
I wonder if you or anyone can help solve this problem. I need the row height to change automatically depending in the length of the contents of the cell. I have a formula which retrieves information from another sheet depending on an option selected in a different cell.
So the cell i want to auto correct height could have anything from 1 word to say 25 words. If i make the row height enough to accommodate the 25 words, it just wastes space when the contents are 0 or less than 25 words.
How do i get the cell to adjust its height automatically every time the contents change?
I am struggling with the same issue. Please let me know if you have found a solution. At this point I am having to type instructions for someone to perform the auto height adjustment daily, but still may have problem rows existing between updates. Google sheets easily handled this task.
simple macro...
Sub AdjRowHeight()
Cells.Select
Selection.Rows.AutoFit
End Sub
More detailed information found here: https://www.ablebits.com/office-addins-blog/autofit-excel-columns-rows/
Hi,
I'm looking to set the standard row height as 20 pixels or 0.53cm for the entire workbook.
I would also like the autofit to be in increments of this.
Any thoughts?
i have a situation where four to five columns are merged in order fit the text in it. after that i have to use mouse for adjusting the row height. is there any shortcut to do it faster and accurate, as i have to do it on large scale. kindly give me some suggestions.
Hi I have an excel sheet with TWO columns.
Column-1 has a drop-down menu. Text in the cells of Column-2 is automatically populated [based on the selection of item from the drop-down-menu in column-1].
My question is: Is there any way that based on my selection from dropdown menu, the text/Row-height is also adjusted automatically of column-2?
This is needed as some selected items has more text so row height of the cell needs to be increased/decreased accordingly).
Any help is greatly appreciated.
Hi svetlana
i would like to Know How to prevent Y axis from changing in dynamic data. o have got graph i need it to Maintain same range even when the data chances.
Can't seem to autofit row height when cells are wrapped. Is there a way around that?
Seem weird that i can't.
Kind regards
Dennis
I have an excel worksheet with 6,000 rows containing multi lines,single, double or any number. How to adjust the row heights as per the number of lines in the cell automatically or with minimum efforts so that there is no clippings? If a single row height is fixed for all rows, say suitable for 5 line cells, then single lined cells have a large gap which does look nice and unnecessarily increases number of pages.
Hi,
I am trying to change my row height numerically, I type in 13 press okay, I see the rows move, but when I check the row size manually it has rounded the number to 12.75. How can I change this?
Thank you,
Bee
Hello,
I have the question. The problem is that there is the limit how big cell height you can do. Maximum 409. My question is - is it possible to make height bigger? Becaue my text do not fitting. I merget cells.
Zoom to 100% fixed it for me...
MS should focus on fixing these bugs not making pretty millennial focused menus that we waste our time re-learning each new version...
this worked for me too, but is really annoying. Why does auto height work no matter what zoom with most rows, but then I have to switch to 100% to get a few stubborn cells?
I have a sheet with a dozen columns (various widths) and over 10,000 rows which were originally autofitted as to height. Something happened the other day (I probably pressed or clicked something by mistake), and immediately all rows and columns "autofitted" to exactly DOUBLE their automatic height and width!
It was easy enough to manually adjust the column widths back to normal, but I have still been unable to restore the autofit height of 10,000+ rows. One cell in each row has a varying number of lines of wrapped text (Calibri 10), so this usually determines the overall height of the particular row. So if such a cell has (say) 10 lines of text, then the cell will also contain 10 blank lines.
I can manually adjust any individual row height back to normal, but then it won't expand or contract with changes in the text. AND, if I do another autofit after a manual height adjustment, the height goes right back to double!
Only this one sheet in the workbook is affected. If I copy the contents of the sheet to another sheet and then autofit the height, it seems to adjust normally. Ultimately, this may be what I have to do (make a copy and then autofit the height). However, I will not know: 1) what I did to cause this problem, hence 2) how can I avoid causing the same problem again, and 3) how to fix it if I do (without having to make copies of the sheet).
Keep in mind that BOTH row and column sizes doubled at the same time. Column width was not a major problem (just an annoyance) as the columns were manually adjusted in the first place and there are only twelve to be re-adjusted.
Have you seen this problem before, or can you suggest a cause or solution?
Thanks in advance.
I have Excel 2016. Autofit for Row Height is not working. Whether I double-click to adjust to auto, or use the drop-down for formatting, neither works. There are no merged cells in my row. I am baffled.
Lee:
Are there merged cells in the row? Merged cells won't auto size.
Are you at 100% zoom? If not, go to 100% and see if that works. If it does you should be able to go back to the other zoom level and the fix will stay.
Try Auto sizing the column. That sometimes works.
Thank you for sharing the handy stuff.
yes svetlana!! I am also wait if new article publish on this site. I always keen get new learning in excel. You are awesome
Thank you for your feedback, Rohan! I am delighted to hear that our articles are helpful.
Oh, Svetlana,it is pretty good. I check everyday this site for new post, when found its being pleasure for me.Thanks for ur selfless effort.
Question: is it possible to setup row/column height in pixel?& how?
Hi Imran,
Thank you for your comment!
You can setup the row height /column width in pixels by dragging the boundary of the row/column heading. As you do this, Excel will display the row height both in points and pixels (please see the very first screenshot in this tutorial). If you want to resize multiple or all rows/columns at a time, select them, and then drag any heading boundary in the selection.
Yeh,I know what have u described.But I was actually want to know, is it possible to setup row/column height in fractional pixel. Suppose, 1.3 pixel?
Hi Imran,
A pixel is a minute area of illumination on a screen, which is why it's not possible to use fractional pixels. According to the information from this Microsoft forum, when you set the row height in points, Excel actually sets it in pixels using this calculation:
1 pixel = 72 / 96 points= 0.75 points
Meaning, you can only change the row height in increments of 0.75 points. For more details, please see the above link.
Thank's Svetlana,for your cooperation.may God bless you.
I love you, You are good professional in Excel
Thank you for your kind words, Zeeshan! It's a pleasure to share my findings and a joy to hear that my work is helpful.