Generate random numbers, dates, passwords
Random Generator will help you get the type of random data you need in your Google sheet. Fill cells with numbers, Booleans, dates, passwords, etc. in three simple steps: select the cells, choose the type of data, and click Generate. Please see the detailed instructions below.
Before you start
Random Generator also processes cells in filtered & hidden rows & columns.
How to use Random Generator
Start the add-on
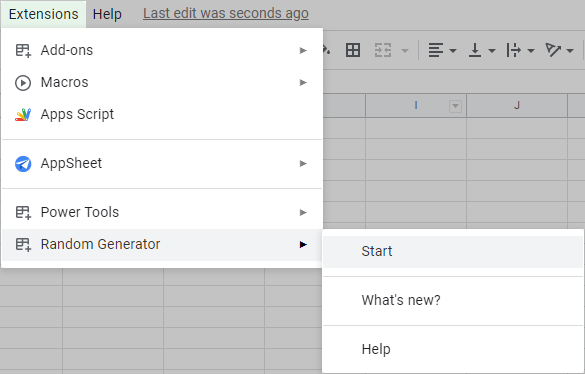
Select the range you want to fill in your sheet and open the add-on from Extensions > Random Generator > Start:

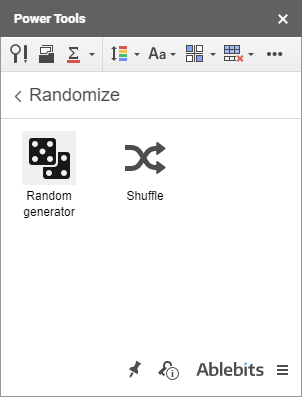
- Run Power Tools and access the Randomize toolset:

- Click the Random generator icon on the Power Tools sidebar:

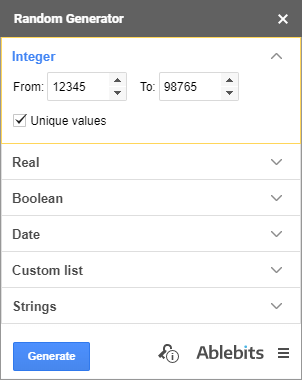
You will see the add-on sidebar with six possible types of values to generate: Integers, Real numbers, Dates, Custom lists, Booleans, or Strings.
How to generate random integer numbers
- Expand the Integer group on the add-on sidebar:

- Use the From and To fields to change the default range of integer numbers to be picked. You can enter any negative or positive number.
Note. The From and To fields cannot be empty. If you delete a value, the default one or the one you entered previously will appear in the field.
- Have only unique integers generated by ticking off the Unique values checkbox. Otherwise, the range will be filled with random integers that can be repeated.
- Click on the Generate button and get random values in your selected range.
How to generate random real numbers
- Click on the Real group to open it:

- Use the From and To fields to change the default range of real numbers to be picked. You can enter any negative or positive number.
Note. The From and To fields cannot be empty. Delete a value, and the default one or the one you previously entered will appear in the field.
- To generate only unique real numbers, check the Unique values option. Or leave it unchecked to fill the range with random real numbers that can be repeated.
- Click Generate and see the range filled with real numbers randomly.

How to generate booleans at random
- Go to the Boolean section on the add-on sidebar:

- The Value drop-down list has the TRUE/FALSE option selected by default. Change the value to YES/NO if necessary.
Tip. The add-on will remember the latest chosen option.
- Click Generate to fill the selected cells with these values at random.
How to generate random dates
- Expand the Date group on the add-on sidebar:

- Change the dates by picking a day in the calendar that pops up when you click on the From and To fields.
Tip. The add-on will remember the latest entered dates.
- Choose to generate only Weekend or Workday dates by selecting the corresponding checkboxes.
Tip. Tick off both options and the add-on will populate your range with both weekend and workday dates.
- Select the Unique values checkbox and have only unique dates generated. Otherwise, the range will be filled with random dates that can be repeated.
- Click Generate and get random dates within your selection.
How to generate values from custom lists
- The Custom list group allows you to work with a permanent set of custom values:

- The add-on comes with two default lists that let you generate Months and Weekdays at random. Pick the one depending on the values you want to get.
Or you can create and use your own lists instead:
- Create and select the range of values you want to add as your custom list.
- Click on the New list button.
- You will see a field with the range address where the add-on automatically picks up your selected data. If necessary, you can alter it by picking another data range right in the sheet or by typing the correct one in this field.
One more way to identify the range is to click the Select range icon. A special pop-up will then appear inviting you to select the range on the sheet, or type it in the range, or hit Auto select to automatically take the entire used range (all data till the first empty row & column):

- Use the Enter a name field to describe the series of entries; otherwise, you'll see its first record as its name:

- Click OK to save the list.
Tip. You can remove any obsolete list by selecting it and clicking the Delete button. - If you want to have random custom list records without duplicates, tick the Unique values checkbox and all the generated entries will differ.
- Press Generate to populate the cells with the items from your list randomly.
How to generate random strings
- Use the Strings group to generate passwords:

- There are several possible character sets that can be used: A-Z, a-z, punctuation marks, 0-9, space, hexadecimal, as well as your custom characters.
- Select the checkboxes next to the necessary character sets, the add-on will remember your choice: A-Z, a-z, 0-9, punctuation marks, space, and hexadecimal.
- If you choose Custom character set, enter the chars you need there. Otherwise, default characters will appear in this field.
- To generate strings by length, select the String length radio button and enter the number of characters you want in a line.
- To generate random values By mask, either select from default patterns in the drop-down list, for example, (????)-????-?????, or enter your own mask using the question mark for one random character and any repeating symbols.
Note. Make sure to enter at least one character in this field.
The last checkbox will make sure to generate only unique values whatever character sets you selected.
- Click Generate to fill the selected range with passwords or strings according to your settings.
Responses
Good day. I would like to find out if duplicate numbers can occur when generating unique numbers on different days. In other words, can a duplicate number ever be generated from a person's account?
Hello Lara,
Thank you for your comment.
Please check the Unique values option if you want just unique numbers to be generated. Also, if you need to check your list for duplicates, you can use our Remove Duplicates tool.
If you have any other questions or need further assistance, please feel free to email us at support@ablebits.com.
Hi,
I'm wondering if the key license work on multiple devices and multiple Google account? I'm purchasing for company.
Thank you.
Hi Jin,
Thank you for your question.
Please note that a subscription for the Google Sheets add-on is account-based. If the product is going to be used under different Google accounts at the same time, you need to have several subscriptions, so there is one for each account. However, we don't impose any limitations on the number of devices or people who can work with the add-on at the same time, as many of your colleagues as you need can use the add-on under the same account on different PCs.
Please email us at support@ablebits.com with the subscription plan you'd like to get and the number of users who need access to the add-on. We'll provide you with the pricing details and a direct link to the purchase order form. Thank you.
Dear Support Team,
I would like to use this Plugin to generate random but unique identifiers to my customers. However with random strings I cannot set that the new values should be unique. Do you have any solution how to avoid duplicates?
Thank you for the answer.
Dear Reka,
Each group of values (except Boolean and String) offers this option – Unique values. All you need to do is tick it off and no duplicates will be generated. The String group generates unique records by default.
I kindly ask you to look through the instructions closely, you will find the text description of the option and will see it on the screenshots.
I purchased this by mistake! Is there any way I can cancel and get a refund for my subscription?
Hello, Moriah,
Thank you for contacting us. I'm sorry you've encountered this problem.
Please email us to support@ablebits.com with your order ID and the email address you purchased the subscription for.
We'll do our best to assist you.
Thank you.
Post a comment
Seen by everyone, do not publish license keys and sensitive personal info!