Last week we explored a few techniques to convert Excel spreadsheets to HTML. But nowadays when everyone seems to be moving to the cloud, why not we? The new technologies of sharing Excel data online are a way simpler and provide a handful of new opportunities that you can benefit from.
With the emergence of Excel Online, you no longer need cumbrous HTML code to export your tables to the web. Just save your workbook online and access it literally from anywhere, share with other users and work on the same sheet all together. With Excel Online you can also easily embed your worksheet on a web site or blog and let your visitors interact with it to find just the information they are looking for.
Further on in this article, we are going to investigate all these and many other capabilities provided by Excel Online.
How to move Excel spreadsheets online
If you are new to the cloud in general, and Excel Online in particular, the easiest way to start is sharing your existing workbook using the familiar interface of Excel desktop.
All Excel Online spreadsheets are stored on OneDrive web service (formerly, SkyDrive). As you probably know, this online storage has been around for a while, but now it is integrated in Microsoft Excel as an interface option accessible in a click. In addition, your invitees, i.e. other user users that you are sharing your spreadsheets with, no longer need a Microsoft account to view and edit the Excel files you've shared.
If you don't have a OneDrive account yet, you can sign up now. This service is easy, free and definitely worth your attention because most Office 2013 and 2016 applications, not just Excel, support OneDrive. Once you are signed in, proceed with the following steps.
1. Sign into your Microsoft account
Make sure your are also signed into your Microsoft account from within Excel. On your Excel workbook, look at the top right-hand corner. If you see your name and a photo there, you can skip this step, otherwise click the Sign in link.

Excel will display a message asking to confirm that you really want to allow Office to connect to the Internet. Click Yes, and then enter your Windows Live credentials.
2. Save your Excel spreadsheet to cloud
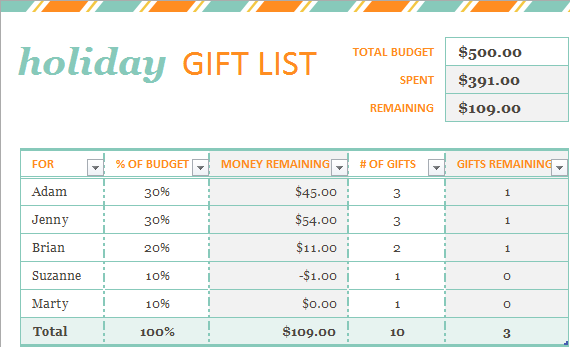
Verify that you have the right workbook open, i.e. the one you want to share online, just to be on the safe side. In this example, I will be sharing a Holiday Gift List so that my family members and friends can view it and contribute : )
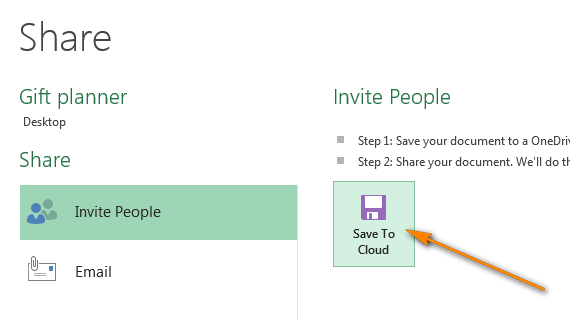
With the correct workbook open, navigate to the File tab, click Share in the left pane. The Invite People option will be selected by default and you click Save To Cloud in the right pane.
After that choose a cloud location to save your Excel file. OneDrive is the first option you will see on the right selected by default, and you simply choose the destination folder in the left pane.
Note: If you don't see the OneDrive option, then either you don't have a OneDrive account or you are not sighed in.
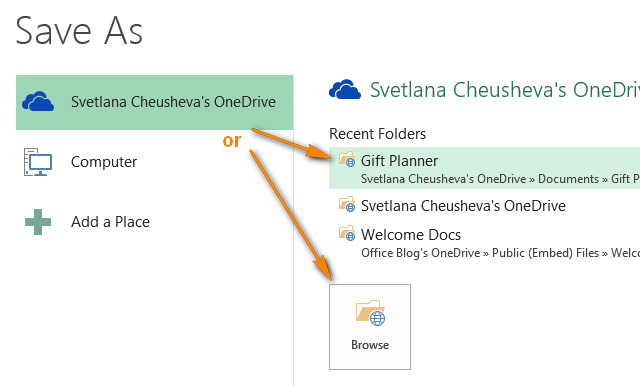
I've already created a special Gift Planner folder and it shows up in the Recent Folders list. You can choose any other folder by clicking the Browse button underneath the Recent Folders list or create a new one in the usual manner by right clicking anywhere within the right part of the Save As dialog window and selecting New > Folder from the context menu. With the proper folder selected, click the Save button.
3. Share the spreadsheet you saved online
Your Excel workbook is already online and you can view it on your OneDrive>. If you wish to share the online spreadsheet with other people, one more step is left for you to do - choose one of the following sharing options:
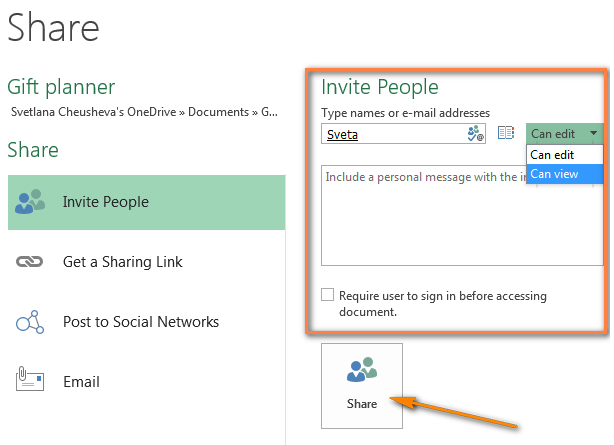
- Invite People (default). Just enter the email addresses of the contact(s) you want to share your Excel worksheet with. As you type, Excel's AutoComplete will compare your input with the names and addresses in your Address Book and display all matches. To add several contacts, separate the names with a semi-colon. Or, click the Search Address Book icon
 to search for contacts in your Global Address list.
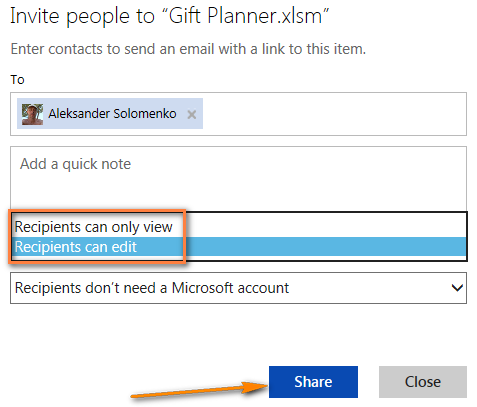
You can set viewing or editing permissions for the contacts by choosing the corresponding option from the drop down list on the right. If you are adding several invitees, the permissions will apply to all, but you will be able to change the permissions for each particular person later.
You can also include a personal message to the invitation. If you do not enter anything, Excel will add a generic invitation for you.
Lastly, you choose whether a user is required to sign-in into their Windows Live account before they can access your online spreadsheet. I don't see any particular reason why they should, but it's up to you.
When done, click the Share button. Each of the invited contacts will receive an email message containing a link to the file you shared. They simply click the link to open your Excel spreadsheet online, on OneDrive.
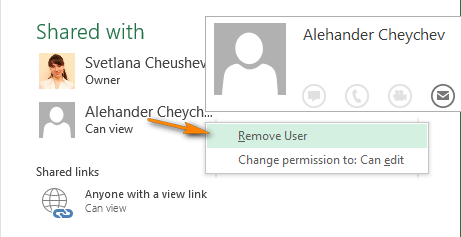
Upon clicking the Share button, Excel will display the list of contacts you have shared the file with. If you want to remove someone from the list or edit the permissions, right click the name and choose the corresponding option from the context menu.
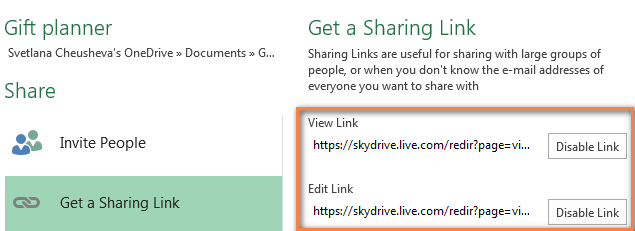
- Sharing Link. If you want to share your online Excel sheet with many people, a faster way would be sending them a link to the file, e.g. using an Outlook distribution or mailing list. You choose the Get a Sharing Link option in the left pane and grab either a View Link or Edit Link or both in the right pane.
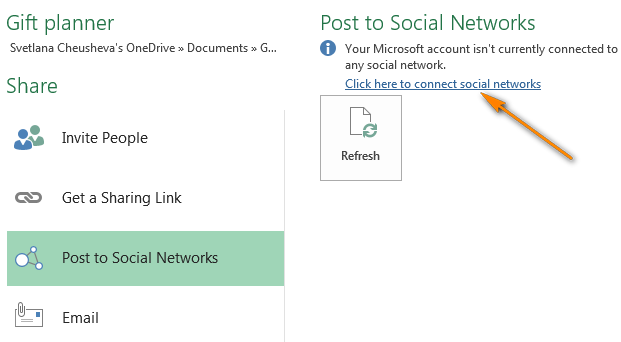
- Post to Social Networks. This option's name is self-explanatory and hardly requires any explanations, maybe just one remark. If you have chosen this sharing option but do not see the list of social networks in the right pane, click the Connect social networks link and you will be able to choose your Facebook, Twitter, Google, LinkedIn and other accounts.
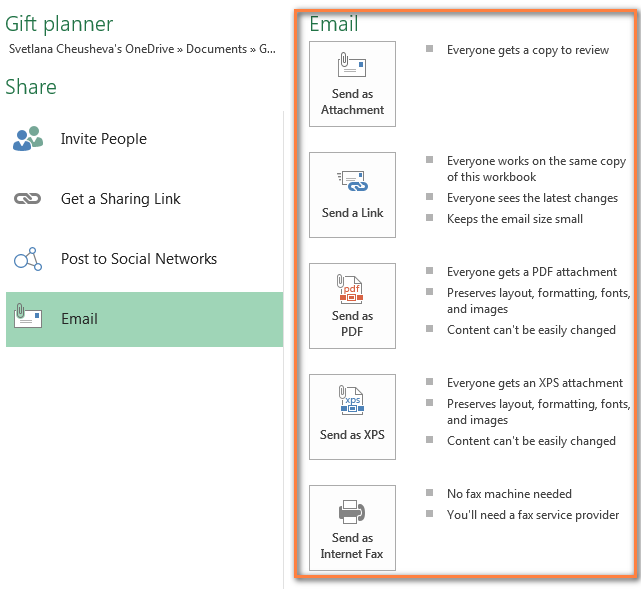
- Email. If you prefer to send your Excel workbook as attachment (a usual Excel file, PDF or XPS) as well as internet fax, choose Email on the left and the appropriate option on the right.
Tip: If you want to limit the areas of your Excel workbook that other users can view, switch to the File > Info and click Browser View Options. You will be able to choose the sheets and named items you want to display on the Web.
That's all! Your Excel workbook is online and shared with other users of your choosing. And even if you are not collaborating with anybody, this is an easy way to access your Excel files virtually from anywhere, no matter whether you are at the office, work from home or travel.
How to create web-based spreadsheets in Excel Online
To create a new workbook, click a little arrow next to Create and choose Excel workbook from the drop-down list.
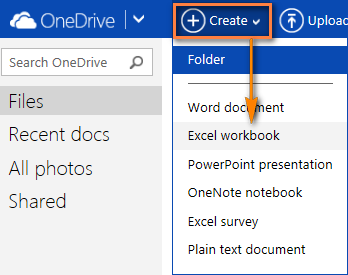
To rename your online workbook, click the default file name and type a new one.

To upload your existing workbook to Excel Online, click on the Upload button on the OneDrive toolbar and browse for the file on your computer.

How to edit workbooks in Excel Online
Once you have the workbook open on Excel Online, you can work with it using Excel Web App almost in the same way you use Excel desktop: enter data, sort and filter, calculate with formulas and present your data visually with charts.
There is only one significant difference between web-based Excel spreadsheets and desktop. Excel Online does not have the Save button because it saves your workbooks automatically. If you've changed your mind about something, press Ctrl+Z and Ctrl+Y to undo or redo, respectively. You can use the Undo / Redo buttons on the Home Tab > Undo group for the same purpose.
If you are trying to edit some data but nothing happens, most likely you are in read-only view. To switch to editing mode, click Edit Workbook > Edit in Excel Web App and make quick changes directly in your web browser.
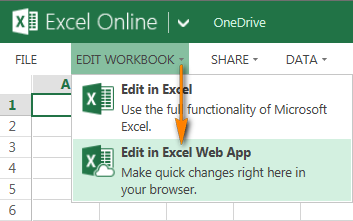
For more advanced data analysis features such as pivot tables, sparklines or connecting to an external data source, click Edit in Excel to switch to the desktop version.
When you save the spreadsheet in your Excel, it will be saved where you originally created it, i.e. in your OneDrive.
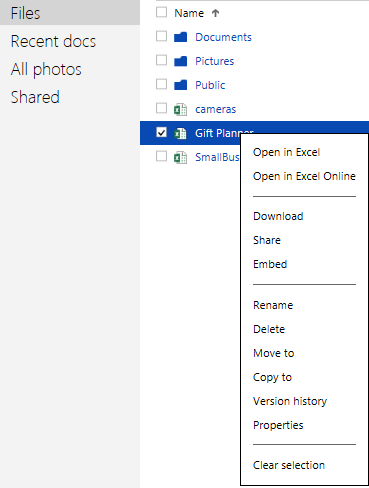
Tip: If you want to make quick changes in several workbooks, the fastest way is to open the list of files on your OneDrive, find the workbook you want, right click it and select the needed action from the context menu.
How to share Excel Online spreadsheets with other users
To share your web based Excel spreadsheet, click Share > Share with People and then choose either:
- Invite People and type the email addresses of people you want to share the workbook with, or
- Get a link to paste it to an email message, web-page or social media sites.
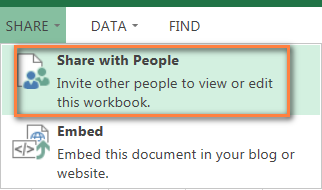
You can also choose whether you want to give viewing or editing permissions to your contacts.
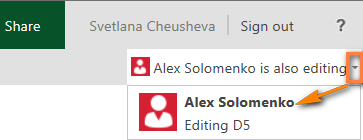
When several people are editing the worksheet at the same time, Excel Online shows their presence and the updates straight away, provided that everyone is editing in Excel Online, not in Excel desktop. When you click a little arrow next to the person's name in the top right-hand corner of your spreadsheet, you can even see which exactly cell is being edited at the moment.
How to lock certain cells for editing in a shared worksheet
If you are sharing your online sheets with a number of people, you may want to limit the editing rights for your team members only to certain cells, rows or columns in your Excel document on OneDrive. To do this, you need to choose the range(s) that you allow to edit in your desktop Excel and then protect the worksheet.
- Select the range of cells that your users can edit, go to the Review tab and click "Allow Users to Edit Ranges" in the Changes group.

- In the Allow Users to Edit Ranges dialog, click the New... button, verify that the range is correct and click Protect Sheet. If you want to allow your users to edit several ranges, click the New... button again.
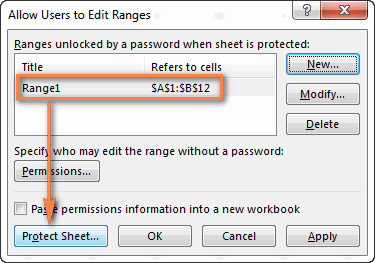
- Enter the password twice and upload the protected sheet to OneDrive.
If you are using the desktop version of Excel, these instructions may come in handy: How to lock or unlock specific areas in worksheet.
Embed online spreadsheet onto a website or blog
If you want to publish your Excel workbook on a web-site or blog, perform these 3 quick steps in the Excel web app:
- With the workbook open in Excel Online, click Share > Embed, and then click the Generate button.
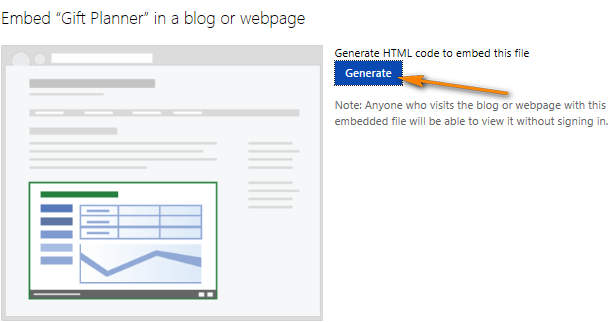
- In the next step, you decide how exactly you want your spreadsheet to appear on the web. The following customization options are available to you:
- What to show section. It lets you embed the entire workbook or its part such as a range of cells, pivot table etc.
- Appearance. In this section, you can customize the appearance of your workbook (show and hide grid lines and column headers, include a download link).
- Interaction. Allow or disallow users to interact with your spreadsheet - sort, filter and type into cells. If you allow typing, the changes that other people make in the cells on the web will not be saved in the original workbook. If you want to a certain cell to be selected when the web page opens, select the "Always start with this cell selected" check box, and then click the cell you want in the preview that is displayed the right part of the window.
- Dimensions. Type a width and height for the spreadsheet viewer, in pixels. To see how the viewer will look with the sizes you've defined, click the "View actual size" link at the top of the preview. Just keep in mind that you can specify a minimum of 200 x 100 pixels and a maximum of 640 x 655 pixels. If you want to use other dimensions outside these limits, you will be able to modify the code later using any HTML editor or directly on your web-site or blog.
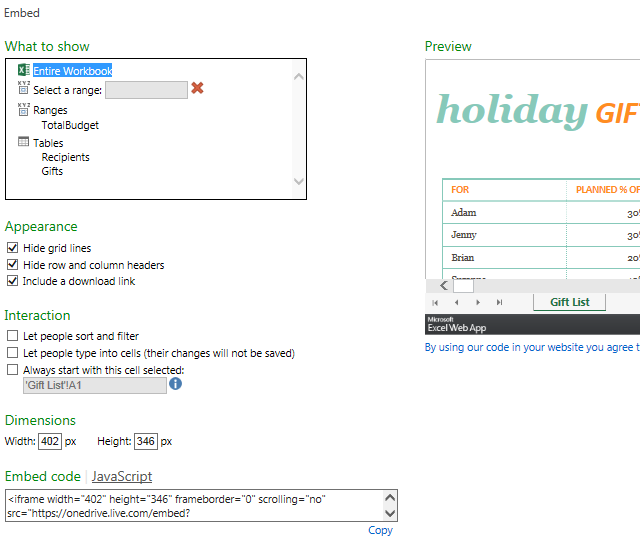
- All that is left for you to do is click the Copy link underneath the Embed code section and paste the HTML code (or JavaScript markup) onto your blog or a web-site.
Note: The embed code is an iframe, so make sure your web-site supports iframes and blog editor allows iframes in posts.
Embedded Excel Web App
What you see below is an interactive Excel spreadsheet that illustrates the technique in action. This "Days Until Next Birthday" app calculates how many days are left until your next birthday, anniversary or other event and shades the gaps in different tints of green, yellow and red. In the Excel Web App, just enter your events in the first column and try changing the corresponding dates to experiment with the results.
If you are curious to know the formula, please check out this article - How to conditionally format dates in Excel.
Excel Web App mashups
If you want to get more interactions between your web-based Excel spreadsheets and other web apps or services, you can use the JavaScript API available on OneDrive to create interactive data mashups.
Below you can see the Destination Explorer mashup created by our Excel Web App team as an example of what web developers can do for your website or blog. This mashup uses the APIs of Excel Services JavaScript and Bing Maps and its purpose is to help the web-site visitors choose a destination where they want to travel. You can choose a location and the mashup will show you the local weather or the number of tourists that visit the area. The screenshot below shows our location :)

As you see, working in Excel Online is simple. Now that you know the basics, you can explore the other features and manage your online spreadsheets with ease and confidence!
 by
by
158 comments
You are really helpful, Thanks!
I have an idea.
Can we integrate a spreadsheet to a website so that users need to login and can enter values into multiple tabs/cells but cant copy the spreadsheet, the formulas or edit the formulas of the cells?
Thanks for free support!
How to move to Excel Web for xisting Excel Workbooks containing External Links to each other ?
Do those External Links need manual updating ? If yes, how?
Thanks Ahead!
Thank you for this; very helpful.
However, regarding the portion "Use Excel Web App to embed the online spreadsheet onto a website or blog.
"If you want to publish your Excel workbook on a web-site or blog, perform these 3 quick steps in the Excel Web App:
"With the workbook open in Excel Online, click Share > Embed, and then click the Generate button."
Regarding last paragraph: When I click Share, then the Embed option does not show - it merely reverts to Share > then options "Share with People" or "Email" as options?
Really very helpful.
well explained to Create web-based spreadsheets in Excel Online
it's very important nowadays for me to find the same thing on the internet and come up with trunao.com which convert your excel sheet to a web-based database, you can share it and do many things with lots of sorting, filtering features
please give it a try
Amazing, Amazing, Amazing webpage!
Just what I needed
Thanks and Greetings from Mx!
How do you select a range when embedding? What do you need to put in the "select range" section so the whole notebook does show and it's not just endlessly scrolling?
I have generated and inserted embedded link to publish excelsheet on my website.
When I am not logged into my microsoft account, my page shows output as "login.microsoftonline.com refused to connect."
Whereas my page shows desired excel sheet output, When I am logged into my microsoft account using same browser.
I want someone without microsoft account should be able to access and edit excel sheet on my website in any browser.
What should I do?
I understand that VBA macros are not supported if I embed a workbook in a website. (Major flaw!) Is there a way to mimic coded VBA facilities with for a workbook embedded in a website or should I look to Google Sheets? I cannot use cell formulae because the calculation time is unacceptable.
Hello. Can I use an (existing) Excel file basically as a data gathering/processing online form? I want to publish one or more spreadsheets, ideally emedded within an existing website, that different users can interact with and use by keying in their own respective data, and have the spreadsheet generate each user's individual results that they can print/PDF (possibly download), and which are ultimately fed back into a separate 'results-collating' sheet. Possibly each individual response would be saved in the cloud - a bit like Google Forms. To be clear, this is not the same as lots of people working collaboratively on the same sheet, which I see a lot about, but each entering their own into a different sheet from a 'master' template. How could I achieve this, and what Microsot or other services would I need to use/buy in to, please? Where would I start? I haven't used any in the past: Any pointers? Thank you.
Hello, thank you for your complete explanation, Excel online is really necessary for work, we at Chechilas also use Excel online to share daily tasks with team members, so there is no need to use paper anymore.
Hello, I just found this website and it has been very helpful. I'm trying to turn an Excel spreadsheet into a web application. Do I need a plug in for that? I don't have the Share option mentioned on this page and when I'm googling about this, I am directed to companies that charge to assist in this. Thank you.
Hello,
When trying to embed an Excel spreadsheet on my website, I'm not seeing the embed option upon right clicking. Has this option been taken away in OneDrive 2020 version?
Thanks!
Hello, I have tried to find same solutions that everyone here are searching for. I have tried different websites and software. You can visit zetexcel.com. They develop high performance applications to Create, Edit, Convert or Print Excel spreadsheet file formats without requiring Microsoft Excel.
Data block
Bilboa Freightlines
required rate of return
present truck new truck Year/Periods
purchase cost (new) $21,000 $30,000 5
remaining book value $11,500 0
overhaul needed now $7,000 0
annual cash operating costs $10,000 $6,500 5
salvage value-now $9,000 0
salvage value-five years from now $1,000 $4,000 5
discount rate 16%
NPV $1,112 in favor of overhauling the old truck
Bilboa Freiightlines, S.A
Total Cost Approach
Net present value claculation
Item Year (s) Ammount of cash flows PV
Overhaul old truck: 0 $7,000 $7,000.00
Overhaul now 0 $7,000 $7,000.00
Annual cash oprating costs 5 $10,000 $4,761.13
Salvage vale in five years 5 $1,000 $476.11
Net present value $19,237
Purchase new truck:
Purchase cost new 5 $30,000 $14,283.39
Salvage value of old truck now 0 $1,000 $1,000.00
Annual cash operating costs 5 $6,500 $3,094.73
Salvage vaue of new truck in five years 5 $4,000 $1,904.45
Net Present Value $20,283
Logic 'IF' statents NPV in favor of overhauling the old truck
Bilboa Freiightlines, S.A
Increamental Cost Approach
Net present value claculation
Item Year (s) Ammount of cash flows PV
Increamental investment- in favour of old truch 0 $9,000 $9,000.00
additional annual cash operating cost 5 $3,500 $1,666.40
lost salvage value in five years 5 $3,000 $1,428.34
lost savage value for old truck now 0 $1,000 $1,000.00
Net Present Value $13,095
Logic 'IF' statents NPV in favor of overhauling the old truck
Please respond back I’m the teacher Layla Jackson and I can’t make worksheets for my students can you please help me somehow I hope you respond back please do it for me I know you can do it now respond back to respond Because if the kids don’t get their education I’ll get fired and I wanna keep my teacher job ?????????
Hi I want to make my own worksheet for my students but I don’t know how to do it Can you please help me please respond back after I send this OK from the teacher Layla Jackson Ok ??
Can Excel worksheet be put on a website so specified persons can DOWNLOAD THE WORKBOOK ,use it on their own data SECURELY without any fear of their data becoming compromised ?
Hi Svetlana,
Greetings!
When I try to publish my excel worksheet as a web page and upload it on sharepoint, the graphs in that web page vanish. Please tell me how can I publish a webpage and save it on share point, so that the graphs in that worksheet are visible to people.
Thanks!
Best regards,
Akshay Dhingra
HI svetlana,
I have published my excel workbook in the internet, but I am unable to see my activex controls and hence the Internert version does not allow the users to click on the macro to extract info as desired. Is ther a solution to this that you can recommend. Your recommendations will be most welcome. Thanking you in advance.
martin Argimon