In this tutorial, we are going to shed some light on one of the most mysterious inhabitants of the Excel universe - the OFFSET function.

So, what is OFFSET in Excel? In a nutshell, the OFFSET formula returns a reference to a range that is offset from a starting cell or a range of cells by a specified number of rows and columns.
The OFFSET function may be a bit tricky to get, so let's go over a short technical explanation first (I'll do my best to keep it simple) and then we will cover a few of the most efficient ways to use OFFSET in Excel.
Excel OFFSET function - syntax and basic uses
The OFFSET function in Excel returns a cell or range of cells that is a given number of rows and columns from a given cell or range.
The syntax of the OFFSET function is as follows:
The first 3 arguments are required and the last 2 are optional. All of the arguments can be references to other cells or results returned by other formulas.
It looks like Microsoft made a good effort to put some meaning into the parameters' names, and they do give a hint at what you are supposed to specify in each.
Required arguments:
- Reference - a cell or a range of adjacent cells from which you base the offset. You can think of it as the starting point.
- Rows - The number of rows to move from the starting point, up or down. If rows is a positive number, the formula moves below the starting reference, in case of a negative number it goes above the starting reference.
- Cols - The number of columns you want the formula to move from the starting point. As well as rows, cols can be positive (to the right of the starting reference) or negative (to the left of the starting reference).
Optional arguments:
- Height - the number of rows to return.
- Width - the number of columns to return.
Both the height and width arguments must always be positive numbers. If either is omitted, it defaults to the height or width of reference.
Note. OFFSET is a volatile function and and may slow down your worksheet. The slowness is directly proportional to the number of cells recalculated.
And now, let's illustrate the theory with an example of the simplest OFFSET formula.
Excel OFFSET formula example
Here is an example of a simple OFFSET formula that returns a cell reference based on a starting point, rows and cols that you specify:
=OFFSET(A1,3,1)
The formula tells Excel to take cell A1 as the starting point (reference), then move 3 rows down (rows argument) and 1 column to the right (cols argument). As the result, this OFFSET formula returns the value in cell B4.
The image on the left shows the function's route and the screenshot on the right demonstrates how you can use the OFFSET formula on real-life data. The only difference between the two formulas is that the second one (on the right) includes a cell reference (E1) in the rows argument. But since cell E1 contains number 3, and exactly the same number appears in the rows argument of the first formula, both would return an identical result - the value in B4.

Excel OFFSET formulas - things to remember
- The OFFSET function in Excel doesn't actually move any cells or ranges; it just returns a reference.
- When an OFFSET formula returns a range of cells, the rows and cols arguments always refer to the upper-left cell in the returned range.
- The reference argument must include a cell or range of adjacent cells, otherwise your formula will return the #VALUE! error.
- If the specified rows and/or cols move a reference over the edge of the spreadsheet, your Excel OFFSET formula will return the #REF! error.
- The OFFSET function can be used within any other Excel function that accepts a cell / range reference in its arguments.
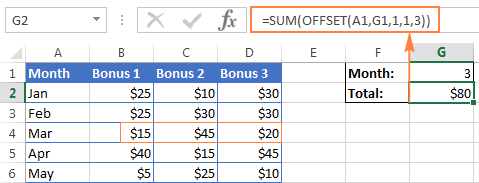
For example, if you try to use the formula OFFSET(A1,3,1,1,3) in pre-dynamic array Excel (2019 and lower), it will throw a #VALUE! error since a range to return (1 row, 3 columns) does not fit into a single cell. However, if you embed it into the SUM function, like this:
=SUM(OFFSET(A1,3,1,1,3))
the formula will return the sum of values in a 1-row by 3-column range that is 3 rows below and 1 column to the right of cell A1, i.e. the total of values in cells B4:D4.
In situation when you wish to base the offset from the current cell, you can use the INDIRECT and ADDRESS functions in combination with ROW() and COLUMN() to get the starting reference. For example:
=SUM(OFFSET(INDIRECT(ADDRESS(ROW(), COLUMN())), 3, 1, 1, 3))
Why do I use OFFSET in Excel?
Now that you know what the OFFSET function does, you may be asking yourself "Why bother using it?" Why not simply write a direct reference like B4:D4?
The Excel OFFSET formula is very good for:
Creating dynamic ranges: References like B1:C4 are static, meaning they always refer to a given range. But some tasks are easier to perform with dynamic ranges. This is particularly the case when you work with changing data, e.g. you have a worksheet where a new row or column is added every week.
Getting the range from the starting cell. Sometimes, you may not know the actual address of the range, though you do know it starts from a certain cell. In such scenarios, using OFFSET in Excel is the right way to go.
How to use OFFSET function in Excel - formula examples
I hope you haven't get bored with that much of theory. Anyway, now we are getting to the most exciting part - practical uses of the OFFSET function.
Excel OFFSET and SUM functions
The example we discussed a moment ago demonstrates the simplest usage of OFFSET & SUM. Now, let's look at these functions at another angle and see what else they can do.
Example 1. A dynamic SUM / OFFSET formula
When working with continuously updated worksheets, you may want to have a SUM formula that automatically picks all newly added rows.
Suppose, you have the source data similar to what you see in the screenshot below. Every month a new row is added just above the SUM formula, and naturally, you want to have it included in the total. On the whole, there are two choices - either update the range in the SUM formula each time manually or have the OFFSET formula do this for you.
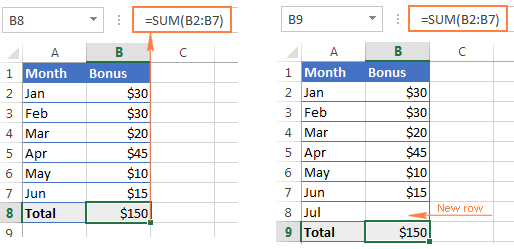
Since the first cell of the range to sum will be specified directly in the SUM formula, you only have to decide on the parameters for the Excel OFFSET function, which will get that last cell of the range:
Reference- the cell containing the total, B9 in our case.Rows- the cell right above the total, which requires the negative number -1.Cols- it's 0 because you don't want to change the column.
So, here goes the SUM / OFFSET formula pattern:
Tweaked for the above example, the formula looks as follows:
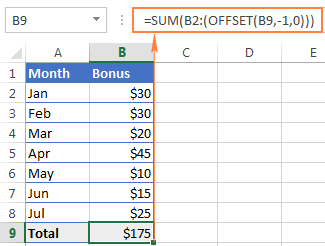
=SUM(B2:(OFFSET(B9, -1, 0)))
And as demonstrated in the below screenshot, it works flawlessly:
Example 2. Excel OFFSET formula to sum the last N rows
In the above example, suppose you want to know the amount of bonuses for the last N months rather than grand total. You also want the formula to automatically include any new rows you add to the sheet.
For this task, we are going to use Excel OFFSET in combination with the SUM and COUNT / COUNTA functions:
=SUM(OFFSET(B1,COUNT(B:B)-E1+1,0,E1,1))
or
=SUM(OFFSET(B1,COUNTA(B:B)-E1,0,E1,1))
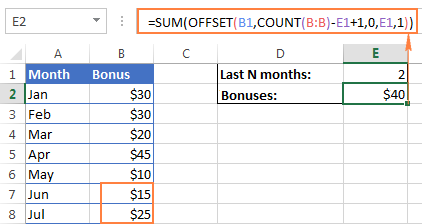
The following details can help you understand the formulas better:
Reference- the header of the column whose values you want to sum, cell B1 in this example.Rows- to calculate the number of rows to offset, you use either the COUNT or COUNTA function.COUNT returns the number of cells in column B that contain numbers, from which you subtract the last N months (the number is cell E1), and add 1.
If COUNTA is your function of choice, you don't need to add 1, since this function counts all non-empty cells, and a header row with a text value adds an extra cell that our formula needs. Please note that this formula will work correctly only on a similar table structure - one header row followed by rows with numbers. For different table layouts, you may need to make some adjustments in the OFFSET/COUNTA formula.
Cols- the number of columns to offset is zero (0).Height- the number of rows to sum is specified in E1.Width- 1 column.
Using OFFSET function with AVERAGE, MAX, MIN
In the same manner as we calculated the bonuses for the last N months, you can get an average of the last N days, weeks or years as well as find their maximum or minimum values. The only difference between the formulas is the first function's name:
=AVERAGE(OFFSET(B1,COUNT(B:B)-E1+1,0,E1,1))
=MAX(OFFSET(B1,COUNT(B:B)-E1+1,0,E1,1))
=MIN(OFFSET(B1,COUNT(B:B)-E1+1,0,E1,1))
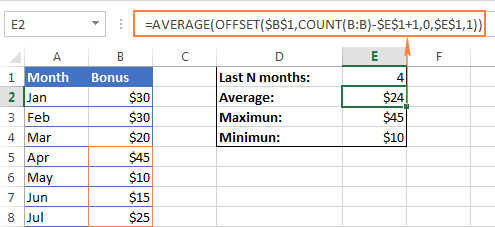
The key benefit of these formulas over the usual AVERAGE(B5:B8) or MAX(B5:B8) is that you won't have to update the formula every time your source table gets updated. No matter how many new rows are added or deleted in your worksheet, the OFFSET formulas will always refer to the specified number of last (lower-most) cells in the column.
Excel OFFSET formula to create a dynamic range
Used in conjunction with COUNTA, the OFFSET function can help you make a dynamic range that may prove useful in many scenarios, for example to create automatically updatable drop-down lists.
The basic OFFSET formula for a dynamic range is as follows:
=OFFSET(Sheet1!$A$1, 0, 0, COUNTA(Sheet1!$A:$A), 1)
Where Sheet1!$A$1 is the topmost cell to be included in the dynamic range. This should be an absolute reference that includes the name of the sheet.
At the heart of this formula, you use the COUNTA function to get the number of non-blank cells in the target column. That number goes to the height argument of OFFSET instructing it how many rows to return.
Apart from that, it's a regular OFFSET formula, where:
- Reference is the starting point from which you base the offset. For example, if your data starts in A1 in Sheet1, the reference is Sheet1!$A$1. If the data starts in column B in row 2, then it'll be Sheet1!$B$2, etc.
- Rows and Cols are both 0 because there are no columns or rows to offset.
- Width is 1 column.
If there is some data above the items (such as column headers), COUNTA will count those non-blank cells, causing OFFSET to add an extra blank(s) at the end of the dynamic range. To avoid this, you can subtract the corresponding number of rows from the COUNTA result. For example, to exclude one header row, set the starting cell as $A$2 and subtract 1:
=OFFSET(Sheet1!$A$2, 0, 0, COUNTA(Sheet1!$A:$A) -1, 1)
Once you've created a dynamic named range with the above OFFSET formula, you can use Data Validation to make a dynamic dropdown menu that will update automatically as soon as you add or remove items from the source list.
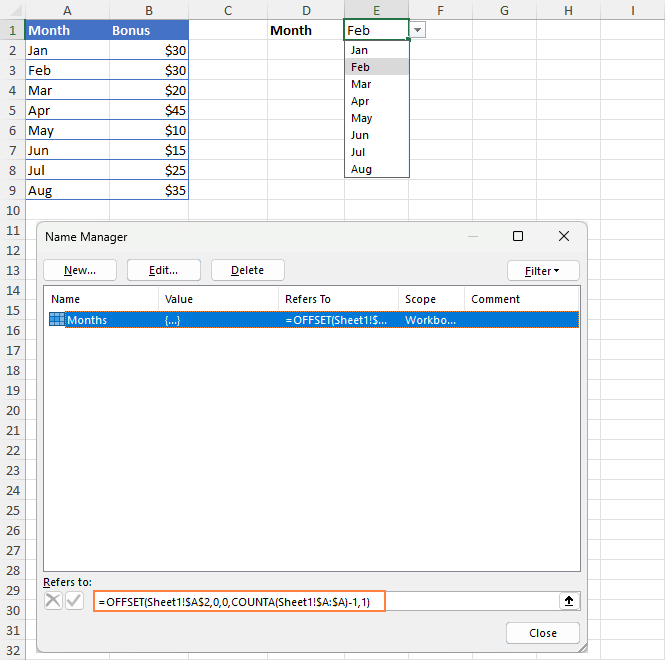
Notes:
- If you are making a dynamic range within the current sheet, you don't need to include the sheet name in the reference - Excel will do it automatically when creating a named range. However, if your range is in a different sheet, be sure to include the sheet name followed by an exclamation mark, like in this formula example.
- For a formula to work correctly, there should be no blank cells between data entries and no other data below the dynamic range items.
For the detailed step-by-step guidance on creating drop-down lists in Excel, please check out the following tutorials:
Excel OFFSET & VLOOKUP
As everyone knows, simple vertical and horizontal lookups are performed with the VLOOKUP or HLOOKUP function, respectively. However, these functions have too many limitations and often stumble in more powerful and complex lookup formulas. So, in order to perform more sophisticated lookups in your Excel tables, you have to look for alternatives such as INDEX, MATCH and OFFSET.
Example 1. OFFSET formula for a left Vlookup in Excel
One of the most infamous limitations of the VLOOKUP function is inability to look at its left, meaning that VLOOKUP can only return a value to the right of the lookup column.
In our sample lookup table, there are two columns - month names (column A) and bonuses (column B). If you want to get a bonus for a certain month, this simple VLOOKUP formula will work without a hitch:
=VLOOKUP(B1, A5:B11, 2, FALSE)
However, as soon as you swap the columns in the lookup table, this will immediately result in the #N/A error:
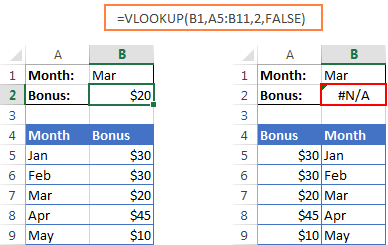
To handle a left-side lookup, you need a more versatile function that does not really care where the return column resides. One of possible solutions is using a combination of INDEX and MATCH functions. Another approach is using OFFSET, MATCH and ROWS:
Where:
- Lookup_col_offset - is the number of columns to move from the starting point to the lookup column.
- Return_col_offset - is the number of columns to move from the starting point to the return column.
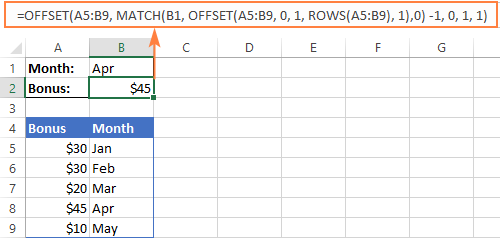
In our example, the lookup table is A5:B9 and the lookup value is in cell B1, the lookup column offset is 1 (because we are searching for the lookup value in the second column (B), we need to move 1 column to the right from the beginning of the table), the return column offset is 0 because we are returning values from the first column (A):
=OFFSET(A5:B9, MATCH(B1, OFFSET(A5:B9, 0, 1, ROWS(A5:B9), 1) ,0) -1, 0, 1, 1)
I know the formula looks a bit clumsy, but it does work :)
Example 2. How to do an upper lookup in Excel
As is the case with VLOOKUP being unable to look at the left, its horizontal counterpart - HLOOKUP function - cannot look upwards to return a value.
If you need to scan an upper row for matches, the OFFSET MATCH formula can help again, but this time you will have to enhance it with the COLUMNS function, like this:
Where:
- Lookup_row_offset - the number of rows to move from the starting point to the lookup row.
- Return_row_offset - the number of rows to move from the starting point to the return row.
Assuming that the lookup table is B4:F5 and the lookup value is in cell B1, the formula goes as follows:
=OFFSET(B4:F5, 0, MATCH(B1, OFFSET(B4:F5, 1, 0, 1, COLUMNS(B4:F5)), 0) -1, 1, 1)
In our case, the lookup row offset is 1 because our lookup range is 1 row down from the starting point, the return row offset is 0 because we are returning matches from the first row in the table.

Example 3. Two-way lookup (by column and row values)
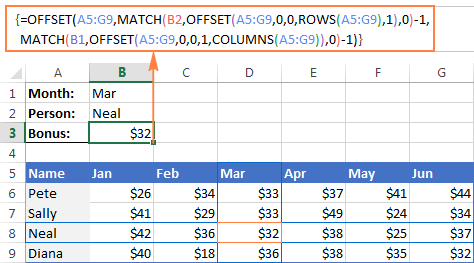
Two-way lookup returns a value based on matches in both the rows and columns. And you can use the following double lookup array formula to find a value at the intersection of a certain row and column:
Given that:
- The lookup table is A5:G9
- The value to match on the rows is in B2
- The value to match on the columns is in B1
You get the following two-dimensional lookup formula:
=OFFSET(A5:G9, MATCH(B2, OFFSET(A5:G9, 0, 0, ROWS(A5:G9), 1), 0)-1, MATCH(B1, OFFSET(A5:G9, 0, 0, 1, COLUMNS(A5:G9)), 0) -1)
It's not the easiest thing to remember, is it? In addition, this is an array formula, so don't forget to press Ctrl + Shift + Enter to enter it correctly.
Of course, this lengthy OFFSET formula is not the only possible way to do a double lookup in Excel. You can get the same result by using the VLOOKUP & MATCH functions, SUMPRODUCT, or INDEX & MATCH. There is even a formula-free way - to employ named ranges and the intersection operator (space). The following tutorial explains all alternative solutions in full detail: How to do two-way lookup in Excel.
OFFSET function - limitations and alternatives
Hopefully, the formula examples on this page have shed some light on how to use OFFSET in Excel. However, to efficiently leverage the function in your own workbooks, you should not only be knowledgeable of its strengths, but also be wary of its weaknesses.
The most critical limitations of the Excel OFFSET function are as follows:
- Like other volatile functions, OFFSET is a resource-hungry function. Whenever there is any change in the source data, your OFFSET formulas are recalculated, keeping Excel busy for a little longer. This is not an issue for a single formula in a small spreadsheet. But if there are dozens or hundreds of formulas in a workbook, Microsoft Excel may take quite a while to recalculate.
- Excel OFFSET formulas are hard to review. Because references returned by the OFFSET function are dynamic, big formulas (especially with nested OFFSETs) can be quite tricky to debug.
Alternatives to using OFFSET in Excel
As is often the case in Excel, the same result can be achieved in a number of different ways. So, here are three elegant alternatives to OFFSET.
- Excel tables
Since Excel 2002, we have a truly wonderful feature - fully-fledged Excel tables, as opposed to usual ranges. To make a table from structured data, you simply click Insert > Table on the Home tab or press Ctrl + T.
By entering a formula in one cell in an Excel table, you can create a so-called "calculated column" that automatically copies the formula to all other cells in that column and adjusts the formula for each row in the table.
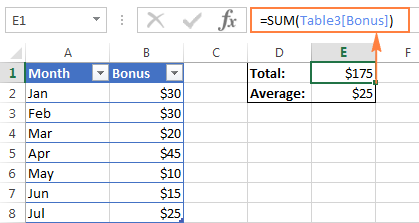
Moreover, any formula that refers to a table's data automatically adjusts to include any new rows you add to the table or exclude the rows you delete. Technically, such formulas operate on table columns or rows, which are dynamic ranges in nature. Each table in a workbook has a unique name (the default ones are Table1, Table2, etc.) and you are free to rename your table via the Design tab > Properties group > Table Name text box.
The following screenshot demonstrates the SUM formula that refers to the Bonus column of Table3. Please pay attention that the formula includes the table's column name rather than a range of cells.
- Excel INDEX function
Although not exactly in the same way as OFFSET, Excel INDEX can also be used to create dynamic range references. Unlike OFFSET, the INDEX function is not volatile, so it won't slow down your Excel.
- Excel INDIRECT function
Using the INDIRECT function you can create dynamic range references from many sources such as cell values, cell values and text, named ranges. It can also dynamically refer to another Excel sheet or workbook. You can find all these formula examples in our Excel INDIRECT function tutorial.
Do you remember the question asked at the beginning of this tutorial - What is OFFSET in Excel? I hope now you know the answer : ) If you want some more hands-on experience, feel free to download our practice workbook (please see below) containing all the formulas discussed on this page and reverse engineer them for deeper understanding. Thank you for reading!
Practice workbook for download
OFFSET formula examples (.xlsx file)
 by
by
32 comments
Hello,
I have 2 conditions to solve.
I have copy pasted data for my orders from pdf and I want to make it easy for me with offset function.
2nd column of first row contain order number that I only need from that row and this order id will be on every 7th row, like B1, B7,B13 and so on.
Every 4th row contain customer details, like B4, C4, to K4.
Now the finished data from row data will be in single row like below.
B1 Order id
B4 Name
C4 Address
D4 ...
Row 2
B7 Order id
B10 Name
C10 Address
D10 ...
Please suggest the offset function by dragging done.
Thanks
Hi! What result do you want to get out of this data?
Thanks for quick response.
I want these columns as i have submit before.
B1 Order id
B4 Name
C4 Address
D4 ...
In row 1
Row 2
B7 Order id
B10 Name
C10 Address
D10 ...
In row 2 and so on.
Can I get any update.
Thank you
Hello all!
I have this table of data that has three cells for each day (3 shifts of production). I have the data organized vertically with the dates/shifts going horizontally. For the numerical data points, I am good. For the text cells, I have this formula =CONCAT(OFFSET('[Sample Titanium T1 Crib Sheets.xlsx]Data'!$D$6,0,(COLUMN()-COLUMN($D$6))*3,1,3))
I am trying to add CHAR(10) to enter a carriage return after each cell. Can somebody please help me!?
Hi! Try to follow the recommendations from this article: How to start a new line in Excel cell: 3 ways to insert a line break.
Add &CHAR(10) to your formula.
Hi, I don't know if I am in the right window to post to. But I am really frustrated with what kind of excel formula I will use. I want to get the text below a specific text. For example, my date is in just one column, the description first then then what its called.
Example:
A1 Position
A2 Nurse
A3 blank
A4 Name
A5 John Doe
A6 blank
A7 Age
A8 45
I want to get the "Nurse" to show if I will look for "position" or "John Doe" if I will look for the "Name"
Hello!
If I understand correctly, use INDEX+MATCH to find the desired value. Then add 1 to the number of the position that you found.
=INDEX(B1:B8,MATCH("Position",B1:B8,0)+1)
For more information, please visit: INDEX & MATCH in Excel. I hope my advice will help you solve your task.
Amazing! Thank you so much for the help. This works! Thank you thank you!
I have created a dynamic Pivot using Offset, but in Pivot date is coming as blank bcz offset if taking date in general format, how to solve this issue?
Hi!
Unfortunately, Excel formulas can't copy cell formats. You can see all possible ways here: Excel Format Painter and other ways to copy formatting. You can get the value as text in the format you want using the TEXT function.
I have set up conditional formatting to color a cell a certain color based on the cell's value compared to the cell in front of it. The problem I'm having is that if there is a blank cell I need it to compare to the next non blank cell, in other words, skip or ignore the blanks. For example, P28 will turn green if it's value is greater than the value in O28. I have it set up for green if greater than, red if less than and yellow if equal to. I am using conditional formatting with the formula =OFFSET(INDIRECT(ADDRESS(ROW(), COLUMN())),0,-1) to achieve this. The problem is that if the previous cell is blank, it is comparing to zero. I need it to skip O28 if it is blank and compare to N28 or the next non blank cell if possible.
Hi!
To check if a cell is zero and move to another cell, use the IF function:
=IF(OFFSET(INDIRECT(ADDRESS(ROW(),COLUMN())),0,-1)=0, OFFSET(INDIRECT(ADDRESS(ROW(),COLUMN())),0,-2), OFFSET(INDIRECT(ADDRESS(ROW(),COLUMN())),0,-1))
I hope this will help.
Hello,
Does anyone have a magic trick for my very specific issue?
I am using an offset formula for a set of graphs - looking at the last 28 entries some of which include 0%'s but they look rubbish on the graph so I'd rather it show gaps in the graph.. However, when I put an If formula in to my table to show " " or N/A the graph doesn't like it and presents no data because the offset gets confused.
The offset I have applied in a defined name for the graph to pull from..
=OFFSET('LE1 - Table'!$D$1,COUNT('LE1 - Table'!$D:$D),0,-28,1)
The Hlookup I have to pull the data I need in to a table I can work with..
=HLOOKUP([@Date],'Data Input'!$1:$1048576,45,0)
In the Hlookup i've tried the IF 0%," " but as I mention above, it messes with the offset.
Any help would be great!
I am trying to sum specific cells in a column skipping cells by using the OFFSET formula to no avail.What can I do. I want to sum say B4+B10+ B13+, up to B109
Hi! There is no logical sequence in your data. I can't guess which cell should be summed after B13. We could try to sum every third cell, for example. But this is not your case.
I have 1-file & there is 5-sheets.
I want to vlookup with 5 sheets at a time
Hi!
Please have a look at this article – VLOOKUP across multiple sheets in Excel with examples.
I have dates in one column that I want copied into another column and if one cell is empty ie no date then I want no entry in the 2nd column . The formula I set up works in the transfer of data with the exception that if there is no date in column "D" then it posts a date of 00-Jan-00 in column "H" and I want it just to be blank in column "H" I posted the following in column H
=offset($D$114,0,0,counta(D114:D250)*1) How can I correct this formula?
Hello!
If you want to replace zero with empty try this formula
=if(offset($D$114,0,0,counta(D114:D250)*1)=0,"",offset($D$114,0,0,counta(D114:D250)*1))
I hope it’ll be helpful.
=sheet1! B1
By dragging to down
=sheet1! B2
I want
=sheet2! B1
So please help me
=INDIRECT("'"&"Sheet"&ROW()&"'!B1").
When you copy and paste this formula down or drag it down, it should work.
Hi,
I have around 10000 in one column , i would like do do shift every 100 rows then write the value and do on .
Thank you in advance
Hi,
I have around 10000 values in one column , i would like to do shift every 100 rows then write the value and do on .
Thank you in advance
Hi,
I have a spreadsheet with months 1,2,3 etc across the rows and a specific number of months to count backwards in a cell. For instance, I want to use the offset function to count back 6 columns from the reference cell. However, the 6 month count results in being either off the spreadsheet or into my column with all my field labels. This is causing the error either #value or #ref.. Unless I put the offset formula starting after column F (6 columns forward). How can I incorporate the offset function while not going off the sheet or into a cell that has text?
Thanks
Greg
Hey Greg, I'm having the same problem. Did you ever figure it out?
Hi,
Great summary on Offset, just one question that can I use offset in two different excel workbook?
Hi Xian,
Yes, it can. For example, this formula will return a value from cell B4 in Sheet1 of Book2:
=OFFSET([Book2]Sheet1!A1,3,1)
Thanks for this email. I need your help.
I want a formula to search for certain strings located in a column in one sheet from a column in another sheet and replace the content of the column in the second sheet with that of the string from the first sheet if found.
i.e. if 'xyz' in cell A1 of sheet test if found in 'sjkhgjjhkxyzrewqed' of cell b3 in sheet test2 replace 'sjkhgjjhkxyzrewqed' with 'xyz'.
Thanks to your expected help.
Regards
hi, i understand that you want to replace sheet2 b3 cell should be enter as sheet1 a1 value
in that case you can use these formulas in sheet2 b3 cell
those are
1) =xyz!A1
2)=indirect("xyz!A1")
here "xyz" means sheet1 name
Hope you find the solution
or else please let me know
Hi!, I want to thank Oyu in advance.
I use this function to count the number of zeros after the last non zero data. It works perfect, except when the first cell in the row is zero.
COLUMNS(D24:W24)-MATCH(2;1/(D24:W240))-COUNTBLANK (D24:W24)
I want the formula to start counting zeros from the first cell if it is zero.
Thanks
=SUM(OFFSET(H4,0,0,1,-$L$3))