The tutorial explains how to use Excel functions to convert text to date and number to date, and how to turn text strings into dates in a non-formula way. You will also learn how to quickly change a number to date format.
Since Excel is not the only application you work with, sometimes you'll find yourself working with dates imported in an Excel worksheet from a .csv file or another external source. When that happens, chances are the dates will export as text entries. Even though they look like dates, Excel won't not recognize them as such.
There are many ways to convert text to date in Excel and this tutorial aims to cover them all, so that you can choose a text-to-date conversion technique most suitable for your data format and your preference for a formula or non-formula way.
How to distinguish normal Excel dates from "text dates"
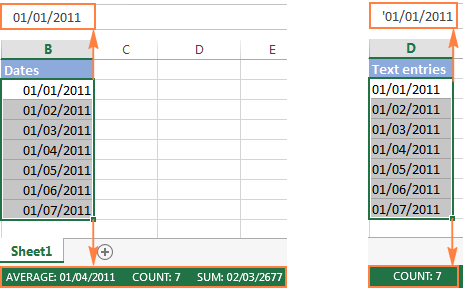
When importing data into Excel, there is often a problem with date formatting. The imported entries may look like normal Excel dates to you, but they don't behave like dates. Microsoft Excel treats such entries as text, meaning you cannot sort your table by date properly, nor can you use those "text dates" in formulas, PivotTables, charts or any other Excel tool that recognizes dates.
There are a few signs that can help you determine whether a given entry is a date or a text value.
| Dates | Text values |
|
|
How to convert number to date in Excel
Since all Excel functions that change text to date return a number as a result, let's have a closer look at converting numbers to dates first.
As you probably know, Excel stores dates and times as serial numbers and it is only a cell's formatting that forces a number to be displayed as a date. For example, 1-Jan-1900 is stored as number 1, 2-Jan-1900 is stored as 2, and 1-Jan-2015 is stored as 42005. For more information on how Excel stores dates and times, please see Excel date format.
When calculating dates in Excel, the result returned by different date functions is often a serial number representing a date. For example, if =TODAY()+7 returns a number like 44286 instead of the date that is 7 days after today, that does not mean the formula is wrong. Simply, the cell format is set to General or Text while it should be Date.
To convert such serial number to date, all you have to do is change the cell number format. For this, simply pick Date in the Number Format box on the Home tab.
To apply a format other than default, then select the cells with serial numbers and press Ctrl+1 to open the Format Cells dialog. On the Number tab, choose Date, select the desired date format under Type and click OK.
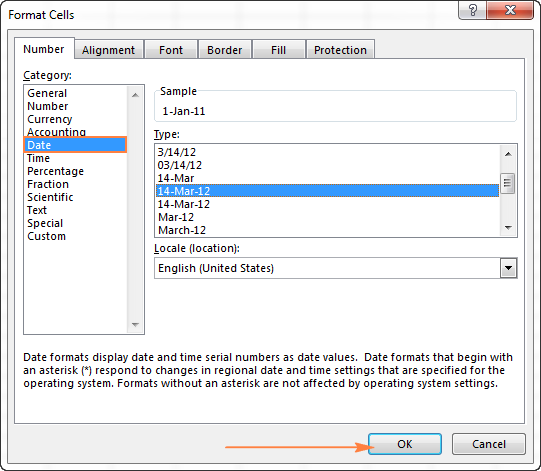
Yep, it's that easy! If you want something more sophisticated than predefined Excel date formats, please see how to create a custom date format in Excel.
If some stubborn number refuses to change to a date, check out Excel date format not working - troubleshooting tips.
How to convert 8-digit number to date in Excel
It's a very common situation when a date is input as an 8-digit number like 10032016, and you need to convert it into a date value that Excel can recognize (10/03/2016). In this case, simply changing the cell format to Date won't work - you will get ########## as the result.
To convert such a number to date, you will have to use the DATE function in combination with RIGHT, LEFT and MID functions. Unfortunately, it is not possible to make a universal formula that will work in all scenarios because the original number can be input in a variety of different formats. For example:
| Number | Format | Date |
| 10032016 | ddmmyyyy | 10-Mar-2016 |
| 20160310 | yyyymmdd | |
| 20161003 | yyyyddmm |
Anyway, I will try to explain the general approach to converting such numbers to dates and provide a few formula examples.
For starters, remember the order of the Excel Date function arguments:
So, what you need to do is extract a year, month and date from the original number and supply them as the corresponding arguments to the Date function.
For example, let's see how you can convert number 10032016 (stored in cell A1) to date 3/10/2016.
- Extract the year. It's the last 4 digits, so we use the RIGHT function to pick the last 4 characters: RIGHT(A1, 4).
- Extract the month. It's the 3rd and 4th digits, so we employ the MID function to get them MID(A1, 3, 2). Where 3 (second argument) is the start number, and 2 (third argument) is the number of characters to extract.
- Extract the day. It's the first 2 digits, so we have the LEFT function to return the first 2 characters: LEFT(A2,2).
Finally, embed the above ingredients into the Date function, and you get a formula to convert number to date in Excel:
=DATE(RIGHT(A1,4), MID(A1,3,2), LEFT(A1,2))
The following screenshot demonstrates this and a couple more formulas in action:

Please pay attention to the last formula in the above screenshot (row 6). The original number-date (161003) contains only 2 chars representing a year (16). So, to get the year of 2016, we concatenate 20 and 16 using the following formula: 20&LEFT(A6,2). If you don't do this, the Date function will return 1916 by default, which is a bit weird as if Microsoft still lived in the 20th century :)
Note. The formulas demonstrated in this example work correctly as long as all numbers you want to convert to dates follow the same pattern.
How to convert text to date in Excel
When you spot text dates in your Excel file, most likely you would want to convert those text strings to normal Excel dates so that you can refer to them in your formulas to perform various calculations. And as is often the case in Excel, there are a few ways to tackle the task.
Excel DATEVALUE function - change text to date
The DATEVALUE function in Excel converts a date in the text format to a serial number that Excel recognizes as a date.
The syntax of Excel's DATEVALUE is very straightforward:
So, the formula to convert a text value to date is as simple as =DATEVALUE(A1), where A1 is a cell with a date stored as a text string.
Because the Excel DATEVALUE function converts a text date to a serial number, you will have to make that number look like a date by applying the Date format to it, as we discussed a moment ago.
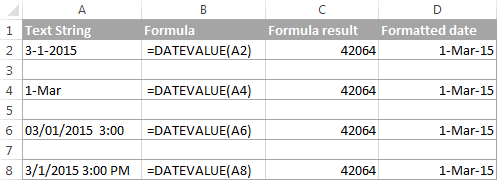
The following screenshots demonstrates a few Excel DATEVALUE formulas in action:
Excel DATEVALUE function - things to remember
When converting a text string to a date using the DATEVALUE function, please keep in mind that:
- Time information in text strings is ignored, as you can see in rows 6 and 8 above. To convert text values containing both dates and times, use the VALUE function.
- If the year is omitted in a text date, Excel's DATEVALUE will pick the current year from your computer's system clock, as demonstrated in row 4 above.
- Since Microsoft Excel stores dates since January 1, 1900 , the use of the Excel DATEVALUE function on earlier dates will result in the #VALUE! error.
- The DATEVALUE function cannot convert a numeric value to date, nor can it process a text string that looks like a number, for that you will need to use the Excel VALUE function, and this is exactly what we are going to discuss next.
Excel VALUE function - convert a text string to date
Compared to DATEVALUE, the Excel VALUE function is more versatile. It can convert any text string that looks like a date or number into a number, which you can easily change to a date format of your choosing.
The syntax of the VALUE function is as follows:
Where text is a text string or reference to a cell containing the text you want to convert to number.
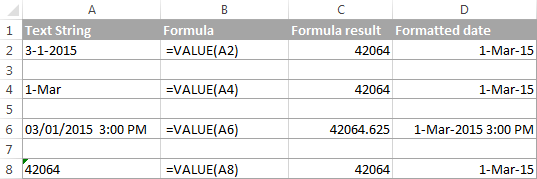
The Excel VALUE function can process both date and time, the latter is converted to a decimal portion, as you can see in row 6 in the following screenshot:
Mathematical operations to convert text to dates
Apart from using specific Excel functions such as VALUE and DATEVALUE, you can perform a simple mathematical operation to force Excel to do a text-to-date conversion for you. The required condition is that an operation should not change the date's value (serial number). Sounds a bit tricky? The following examples will make things easy!
Assuming that your text date is in cell A1, you can use any of the following formulas, and then apply the Date format to the cell:
- Addition:
=A1 + 0 - Multiplication:
=A1 * 1 - Division:
=A1 / 1 - Double negation:
=--A1
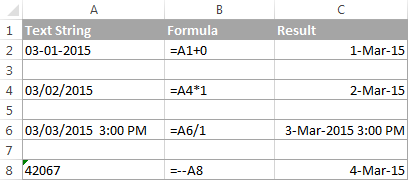
As you can see in the above screenshot, mathematical operations can convert dates (rows 2 and 4), times (row 6) as well as numbers formatted as text (row 8). Sometimes the result is even displayed as a date automatically, and you don't have to bother about changing the cell format.
How to convert text strings with custom delimiters to dates
If your text dates contain some delimiter other than a forward slash (/) or dash (-), Excel functions won't be able to recognize them as dates and return the #VALUE! error.
To fix this, you can run Excel's Find and Replace tool to replace your delimiter with a slash (/), all in one go:
- Select all the text strings you want to convert to dates.
- Press Ctrl+H to open the Find and Replace dialog box.
- Enter your custom separator (a dot in this example) in the Find what field, and a slash in the Replace with
- Click the Replace All
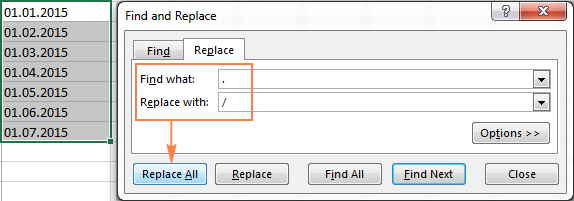
Now, the DATEVALUE or VALUE function should have no problem with converting the text strings to dates. In the same manner, you can fix dates containing any other delimiter, e.g. a space or a backward slash.
If you prefer a formula solution, you can use Excel's SUBSTITUTE function instead of Replace All to switch your delimiters to slashes.
Assuming the text strings are in column A, a SUBSTITUTE formula may look as follows:
=SUBSTITUTE(A1, ".", "/")
Where A1 is a text date and "." is the delimiter your strings are separated with.
Now, let's embed this SUBSTITUTE function into the VALUE formula:
=VALUE(SUBSTITUTE(A1, ".", "/"))
And have the text strings converted to dates, all with a single formula.
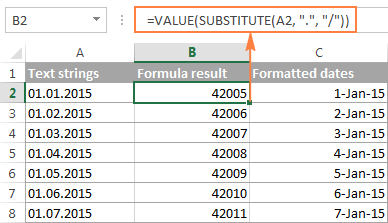
As you see, the Excel DATEVALUE and VALUE functions are quite powerful, but both have their limits. For example, if you are trying to convert complex text strings like Thursday, January 01, 2015, neither function could help. Luckily, there is a non-formula solution that can handle this task and the next section explains the detailed steps.
Text to Columns wizard - formula-free way to covert text to date
If you are a non-formula user type, a long-standing Excel feature called Text To Columns will come in handy. It can cope with simple text dates demonstrated in Example 1 as well as multi-part text strings shown in Example 2.
Example 1. Converting simple text strings to dates
If the text strings you want to convert to dates look like any of the following:
- 1.1.2015
- 1.2015
- 01 01 2015
- 2015/1/1
You don't really need formulas, nor exporting or importing anything. All it takes is 5 quick steps.
In this example, we will be converting text strings like 01 01 2015 (day, month and year are separated with spaces) to dates.
- In your Excel worksheet, select a column of text entries you want to convert to dates.
- Switch to the Data tab, Data Tools group, and click Text to Columns.

- In step 1 of the Convert Text to Columns Wizard, select Delimited and click Next.
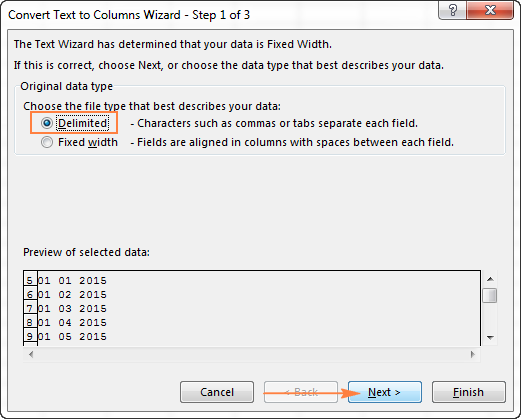
- In step 2 of the wizard, uncheck all delimiter boxes and click Next.
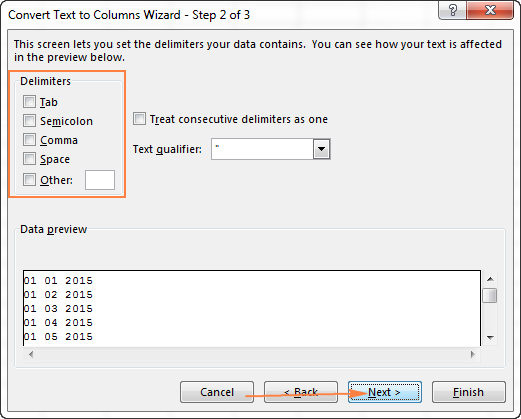
- In the final step, select Date under Column data format, choose the format corresponding to your dates, and click Finish.
In this example, we are converting the text dates formatted as "01 02 2015" (month day year), so we select MDY from the drop down box.
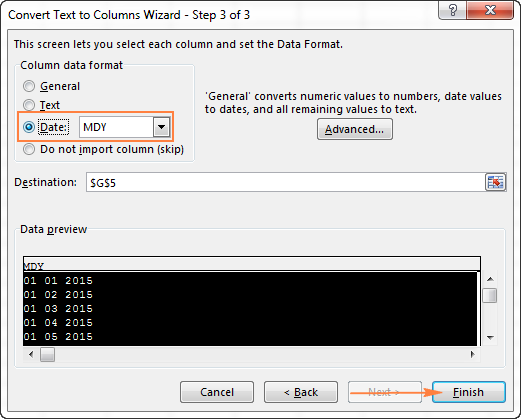
Now, Excel recognizes your text strings as dates, automatically converts them to your default date format and displays right-aligned in the cells. You can change the date format in the usual way via the Format Cells dialog.
Note. For the Text to Column wizard to work correctly, all of your text strings should be formatted identically. For example, if some of your entries are formatted like day/month/year format while others are month/day/year, you would get incorrect results.
Example 2. Converting complex text strings to dates
If your dates are represented by multi-part text strings, such as:
- Thursday, January 01, 2015
- January 01, 2015 3 PM
You will have to put a bit more effort and use both the Text to Columns wizard and Excel DATE function.
- Select all text strings to be converted to dates.
- Click the Text to Columns button on the Data tab, Data Tools group.
- On step 1 of the Convert Text to Columns Wizard, select Delimited and click Next.
- On step 2 of the wizard, select the delimiters your text strings contain.
For example, if you are converting strings separated by commas and spaces, like "Thursday, January 01, 2015", you should choose both delimiters - Comma and Space.
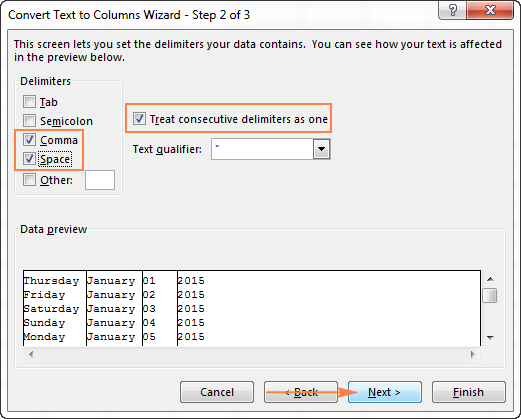
It also makes sense to select the "Treat consecutive delimiters as one" option to ignore extra spaces, if your data has any.
And finally, have a look at the Data preview window and verify if the text strings are split to columns correctly, then click Next.
- On step 3 of the wizard, make sure all columns in the Data Preview section have the General format. If they don't, click on a column and select General under the Column data format options.
Note. Do not choose the Date format for any column because each column contains only one component, so Excel won't be able to understand this is a date.
If you don't need some column, click on it and select Do not import column (skip).
If you don't want to overwrite the original data, specify where the columns should be inserted - enter the address for the top left cell in the Destination field.
When done, click the Finish button.
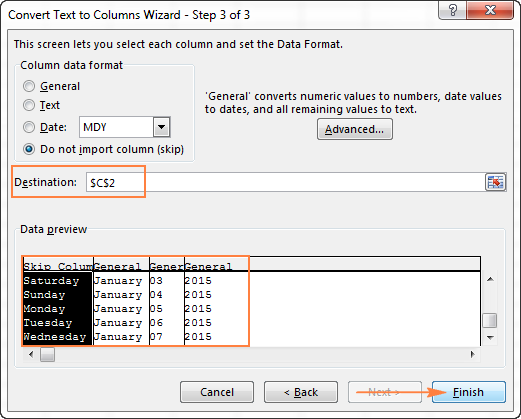
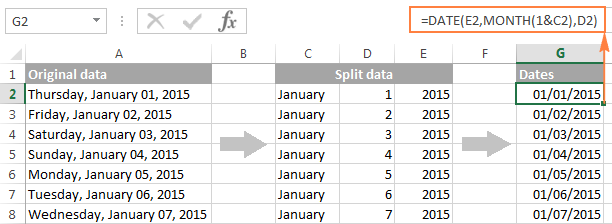
As you see in the screenshot above, we are skipping the first column with the days of the week, splitting the other data into 3 columns (in the General format) and inserting these columns beginning from cell C2.
The following screenshot shows the result, with the original data in column A and the split data in columns C, D and E.

- Finally, you have to combine the date parts together by using a DATE formula. The syntax of the Excel DATE function is self-explanatory:
DATE(year, month, day)
In our case,
yearis in column E anddayis in column D, no problem with these.It's not so easy with
monthbecause it is text while the DATE function needs a number. Luckily, Microsoft Excel provides a special MONTH function that can change a month's name to a month's number:=MONTH(serial_number)For the MONTH function to understand it deals with a date, we put it like this:
=MONTH(1&C2)Where C2 contains the name of the month, January in our case. "1&" is added to concatenate a date (1 January) so that the MONTH function can convert it to the corresponding month number.
And now, let's embed the MONTH function into the
month; argument of our DATE formula:=DATE(F2,MONTH(1&D2),E2)
And voila, our complex text strings are successfully converted to dates:
Quick conversion of text dates using Paste Special
To quickly convert a range of simple text strings to dates, you can use the following trick.
- Copy any empty cell (select it and press Ctrl + C).
- Select the range with text values you want to convert to dates.
- Right-click the selection, click Paste Special, and select Add in the Paste Special dialog box:

- Click OK to complete the conversion and close the dialog.
What you have just done is tell Excel to add a zero (empty cell) to your text dates. To be able to do this, Excel converts a text string to a number, and since adding a zero does not change the value, you get exactly what you wanted - the date's serial number. As usual, you change a number to the date format by using the Format Cells dialog.
To learn more about the Paste Special feature, please see How to use Paste Special in Excel.
Fixing text dates with two-digit years
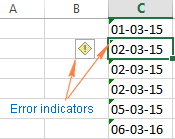
The modern versions of Microsoft Excel are smart enough to spot some obvious errors in your data, or better say, what Excel considers an error. When this happens, you will see an error indicator (a small green triangle) in the upper-left corner of the cell and when you select the cell, an exclamation mark appears:
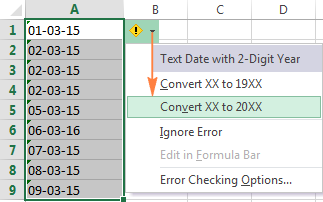
Clicking the exclamation mark will display a few options relevant to your data. In case of a 2-digit year, Excel will ask if you want to convert it to 19XX or 20XX.
If you have multiple entries of this type, you can fix them all in one fell swoop - select all the cells with errors, then click on the exclamation mark and select the appropriate option.
How to turn on Error Checking in Excel
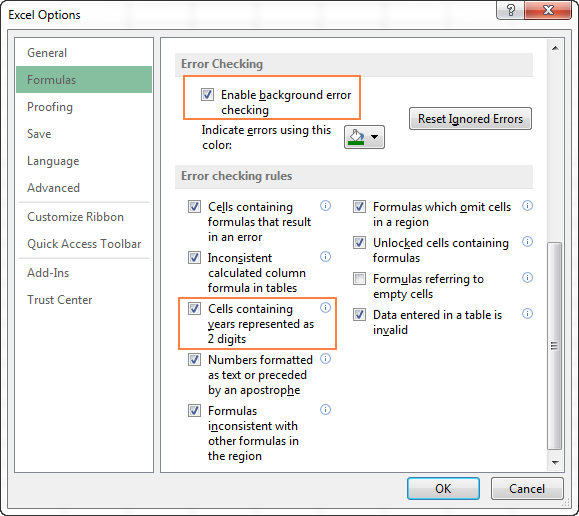
Usually, Error Checking is enabled in Excel by default. To make sure, click File > Options > Formulas, scroll down to the Error Checking section and verify if the following options are checked:
- Enable background error checking under Error Checking;
- Cells containing years represented as 2 digits under Error checking rules.
How to change text to date in Excel an easy way
As you see, converting text to date in Excel is far from being a trivial one-click operation. If you are confused by all different use cases and formulas, let me show you a quick and straightforward way.
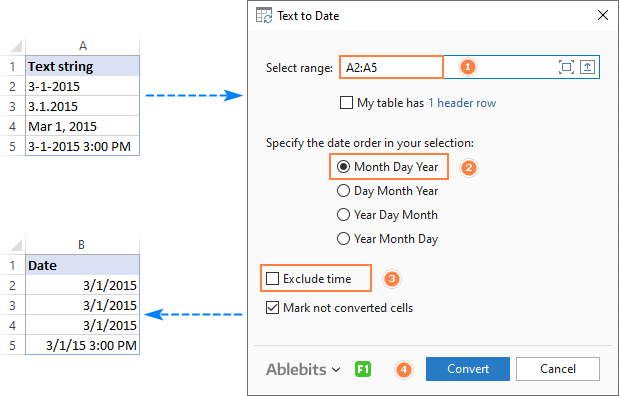
Install our Ultimate Suite (a free trial version can be downloaded here), switch to the Ablebits Tools tab (2 new tabs containing 70+ awesome tools will be added to your Excel!) and find the Text to Date button:

To convert text-dates to normal dates, here's what you do:
- Select the cells with text strings and click the Text to Date button.
- Specify the date order (days, months and years) in the selected cells.
- Choose whether to include or not include time in the converted dates.
- Click Convert.
That's it! The results of conversion will appear in the adjacent column, your source data will be preserved. If something goes wrong, you can simply delete the results and try again with a different date order.
Tip. If you chose to convert times as well as dates, but the time units are missing in the results, be sure to apply a number format that shows both the date and time values. For more info, please see How to create custom date and time formats.
If you are curious to learn more about this wonderful tool, please check out its home page: Text to Date for Excel.
This is how you convert text to date in Excel and change dates to text. Hopefully, you have been able to find a technique to your liking. In the next article, we will tackle the opposite task and explore different ways of converting Excel dates to text strings. I thank you for reading and hope to see you next week.
 by
by
742 comments
How to convert 15.09.2022 type date to MM/DD/YYYY.
Hi! If I understand your question correctly, this article may be helpful: How to change Excel date format and create custom formatting
Here's a trick I use.
Let's say your text date in cell A1 is in this format: "1/15/2005"
In your formula, you can split it into 3 parts and use them like this: =LET(MyDates,TEXTSPLIT(A1,"/"),DATE(INDEX(MyDates,,3),INDEX(MyDates,,1),INDEX(MyDates,,2)))
If your format has days first, you can easily change the INDEX numbers in the formula.
help! I need to convert a string of numbers such as "2025030513005900" to the format: 3/5/25 13:00:59.00. Thanks!
Hi! Use substring functions to extract desired numbers from text and use them in DATE and TIME formulas to create date and time values. There are many examples of such formulas in comments below.
For example, to create a date and time from text:
=DATE(LEFT(A1,4),MID(A1,5,2),MID(A1,7,2)) + TIME(MID(A1,9,2),MID(A1,11,2),MID(A1,13,2))
Set the desired date and time format using these instructions: How to change Excel date format and create custom formatting and How to change Excel date format and create custom formatting.
I have this date format 14:58 16th Apr 2024 and would like to convert it to DD/MM/YYYY in order to use formula between 2 dates.
For example: I have a pickup date 14:58 16th Apr 2024 and delivery date 08:04 17th Apr 2024 and would like to know if it gets delivered less than 6 days after pickup date, the staus is "ON TIME". I use TEXTAFTER formula and when using formula =IF([@[Delivered date]]-[@[Ship date]]<=6,"ON TIME","LATE"), it doesn't work. I guess it has to do as a text format.
Hello Kate!
I'm assuming that your date is written as text. So you can't do any calculations. To convert your text to a date, try this formula:
=DATE(RIGHT(A1, 4), MONTH(DATEVALUE("1" & MID(A1, 12, 3))), MID(A1, 7, 2))
RIGHT function takes the last 4 characters from cell A1, which represent the year.
MID(A1, 12, 3): MID function extract 3 characters starting from the 12th position in cell A1, which represent the month abbreviation.
DATEVALUE("1" & MID(A1, 12, 3)): This concatenates the string "1" with the month abbreviation and converts it to a date. The DATEVALUE function returns the first day of a given month.
MONTH(DATEVALUE("1" & MID(A1, 12, 3))): MONTH function extract the month number. For "1Apr," this will return 4 (April).
MID(A1, 7, 2): This extracts day.
Finally, the DATE function combines the year, month, and day extracted in the previous steps to create a complete date.
I recommend paying attention to the Text to Date tool. This tool easily converts text strings of different formats to dates.
It is available as a part of our Ultimate Suite for Excel that you can install in a trial mode and check how it works for free.
I am having trouble converting texts to dates and then having them all look the same, I have some in this format "12/8/24" which are right-aligned and others that appear as "14/08/2024" that are left-aligned.. I want to convert them to dates and be yyyy,mm,dd
Which steps should I take to complete this?
Hi! Have you tried the methods described in this blog post? If you are not satisfied, please let me know and I will try to help you. Read the article above carefully. The dates are aligned on the right and the text is aligned on the left.
I recommend paying attention to the Text to Date tool. This tool easily converts text strings of different formats to dates.
Hi I want to convert these dates MM/DD/YYYY in numbers
Jul 9 2024 10:03AM
Jul 9 2024 10:03AM
Jul 9 2024 10:35AM
Oct 14 2024 2:45PM
Sep 10 2024 9:18AM
Sep 10 2024 9:04AM
Jan 15 2025 4:59PM
Jan 15 2025 4:59PM
Jul 9 2024 10:03AM
thanks for the help..
Hi! I can assume that you want to convert text to date.
=DATE(MID(A1,7,5), MONTH(1&LEFT(A1,3)), MID(A1,5,2))
The MID function extracts a substring from a text string, starting at a specified position and for a specified length.
The LEFT function extracts the leftmost characters from a text string.
The 1& concatenates "1" to the extracted text. This is done to create a valid date string (e.g., "1Jan" for January).
The MONTH function converts this date string to a month number (e.g., "1Jan" becomes 1 for January).
The DATE function combines the year, month, and day values extracted in the previous steps to create a valid date.
I recommend paying attention to the Text to Date tool. This tool easily converts text strings of different formats to dates.
Trying to convert 31-JUL-24 01.36.18.201215000 PM in date time
Hi! See the answers to the 2 comments below your question. All the information you need is there.
Hi,
I am having whole year date in below format and I want to convert this to DD/MM/YYYY format for entire column.
your help will be appreciated.
Oct 24 2024 10:59AM (GMT+04:00)
Oct 23 2024 5:19PM (GMT+04:00)
Oct 22 2024 4:53PM (GMT+04:00)
Oct 19 2024 11:00AM (GMT+04:00)
Oct 17 2024 9:44AM (GMT+04:00)
Oct 16 2024 5:06PM (GMT+04:00)
Hello Monica!
The formula below will do the trick for you:
=DATE(MID(A1,8,4),MONTH(LEFT(A1,3)&" 1"),MID(A1,5,2))
MID(A1,8,4):
The MID function starts at the 8th character of the text in cell A1 and extracts 4 characters. This represents the year 2024.
LEFT(A1,3)&" 1":
The LEFT function extracts the first 3 characters from the text in cell A1, which are Oct.
& " 1" concatenates Oct with 1, forming Oct 1.
MONTH("Oct 1") converts this text to a date and extracts the month number. For Oct, the month number is 10.
MID(A1,5,2):
This MID function represents the day.
Combining all these parts together, the DATE function constructs a date.
Set the formula cells to the date format you want. Read more here: How to change date format in Excel and create custom formatting.
I can't convert the text "Wed, May 29, 2024 05:35 pm" to the date and time format.
Hi! Extract separate text strings from the text and insert them into the DATE and TIME formula. You can do this with the MID function. For example:
=DATE(MID(A1,14,4), MONTH(MID(A1,6,3)&" 1"), MID(A1,10,2))
You can solve the problem without using formulas. I recommend paying attention to the Text to Date tool. This tool easily converts text strings of different formats to dates. It is available as a part of our Ultimate Suite for Excel that you can install in a trial mode and check how it works for free.
Thanks a lot sir
In my line of work, converting text into number is the most used scenario
delimiter is the often the most useful tools
It was wonderful and straightforward to understand the contexts. Thank you for this. Is there any easy-to-understand way to learn about some complex Excel formulas?
How to convert a 7 digit general data into a date? I can't find a solution online. It works for the 8 digit.
Hello Laura!
Use LEN function to find the number of digits. Use IF formula to perform different calculations depending on the length of the number.
Use substring functions to extract desired numbers for the DATE function.
For example, for the ddmyyyy format, the formula might look like this:
=IF(LEN(A1=7),DATE(RIGHT(A1,4),MID(A1,3,1),LEFT(A1,2)),DATEVALUE(A1))
Need help to Convert 21-Jun-24 14:46 to JUN-24
DATE FORMAT DESIRED FORMAT
21-Jun-24 14:46 JUN-24
Hi! Change the date format as described in this article: How to change Excel date format and create custom formatting.
Hi, I'm trying to convert time which was pulled from a system which has no AM/PM and I'm using this formular but I'm getting an error message.
=LEFT(TEXT(H2,"h:mm:ss AM/PM"),FIND("",TEXT(H2,"h:mm:ss AM/PM"))-4)
Hi! Change format to AM/PM if time is written in cell H2. Here are the instructions to do this: Excel time format: 12/24 hour, custom, default.
Before changing format, if time in H2 is written as text, convert text to time as described here: Convert text to time using TIMEVALUE function.
I hope it’ll be helpful. If something is still unclear, please feel free to ask.
Hi , would need help on this:
how to convert "5/29/2024 0:00" to " 29/05/2024 " ?
Encountered a problem when wanna apply =datavalue, it came out as " #VALUE! "
Appreciate if you could help on this, thank you and have a nice day ;)
Hi! Extract the desired data from the text string and create a date using the DATE function.
You can find the examples and detailed instructions here: Excel substring: how to extract text from cell.
Based on the information provided, the formula could look like this:
=DATE(MID(A2,SEARCH("/",A2,4)+1,4), LEFT(A2,SEARCH("/",A2)-1), MID(A2,SEARCH("/",A2,4)-2,2))
I recommend paying attention to the Text to Date tool. This tool easily converts text strings of different formats to dates. The tool is included in the Ultimate Suite for Excel and can be used in a free trial to see how it works.
How can i format 22.05.2024 to 2024-05-22?
Hi! You can find the answer to your question in this article: How to change Excel date format and create custom formatting.
I would like to say a BIG BIG Thank you for the information on this website
For me, EXAMPLE 2: “Convert Complex Text Strings to Dates”, helped me tremendously.
Hallo Team,
Many thanks for the article and indicating that datevalue won't work with any delimited other than "/". I was using German Regional Format, which has "." as the date delimiter and Mar2023 used to datevalue was throwing error. Now I have a solution either to change settings to English or use substitute function in case the cell referred to has "." in it.
I find your articles very useful and descriptive.
This formula =SUMIF(AN31:AR31, ">TODAY()", AN30:AR30) always results in ZERO (0) even though row 31 has dates in date format and row 30 has numerical format numbers. Putting the actual TODAY date in place of the TODAY function gives the correct result. Can someone tell me why my formula doesn't work with the function criteria.
Hi! You've written the condition incorrectly. Look for the example formulas here: How to use Excel SUMIF with dates. Based on the information provided, the formula could look like this:
=SUMIF(AN31:AR31, ">"&TODAY(), AN30:AR30)