The tutorial shows how to insert a drop-down calendar in Excel (date picker) and link it to a specific cell, so the calendar is displayed when the cell is clicked. You will also learn a quick way to create a printable calendar based on an Excel calendar template.
When working with large or shared worksheets, maintaining data integrity is the biggest problem, especially when it comes to entering dates. Should they be entered as mm/dd/yy or dd/mm/yy or mm-dd-yyyy? And can I simply type a date like "05 Sep 2016"? Oh, and what was the date of the first Monday in September this year?
All of the above problems can easily be solved by inserting a drop down calendar that will let your users fill in dates in a mouse click! This tutorial will teach you an easy way to make such a calendar in Excel, and show how to quickly create a calendar based on a template.
How to insert a calendar in Excel (Date Picker control)
Inserting a dropdown calendar in Excel is easy, but because the Date and Time Picker Control is so well hidden many users don't even know that it exists. The following guidelines will walk you through the process step-by-step, but first be sure to read the following important note.
Note. Microsoft's Date Picker control is only compatible with 32-bit versions of Office but does not work in Excel 64-bit.
To insert a calendar in Excel, perform the following steps.
1. Show the Developer tab on the ribbon
The datepicker control belongs to a family of ActiveX controls, which reside on the Developer tab. By default, the Developer tab is hidden in Excel, but you can force it to appear in no time.
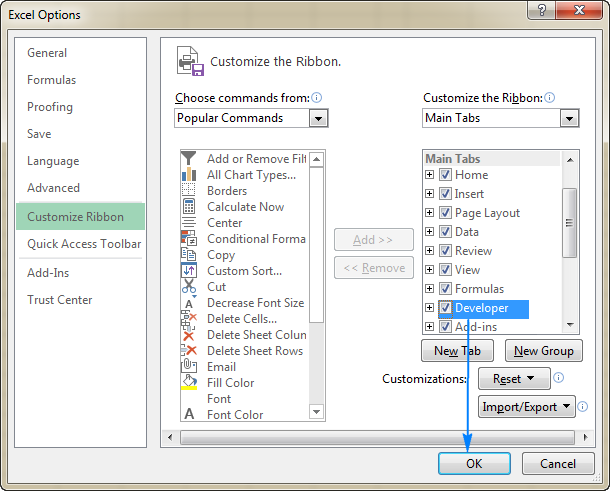
- Right-click anywhere on the ribbon, and then click Customize the Ribbon…
- In the right-hand part of the window, select Main Tabs (usually it is selected by default), check the Developer box, and click OK.
2. Insert a calendar control
A drop-down calendar in Excel is technically called Microsoft Date and Time Picker Control. To insert it in your sheet, just do the following:
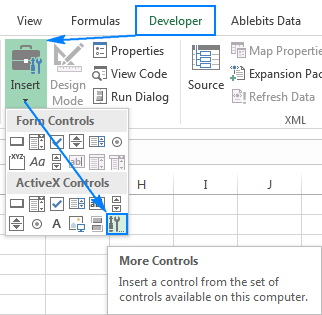
- Go to the Developer tab > Controls group, click Insert, and then click the More Controls button under ActiveX Controls.
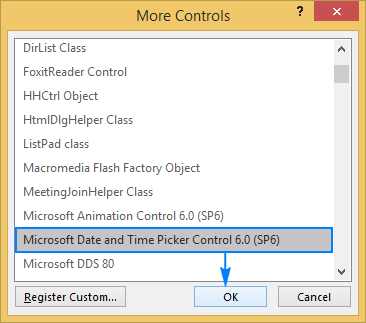
- In the More Controls dialog window, find the Microsoft Date and Time Picker Control 6.0 (SP6), select it, and click OK.
If you cannot find the Date and Time Picker Control in the list, please follow these instructions to register it.
- Finally, click on a cell where you want to insert the calendar control.
That's it! A drop down calendar control is inserted in your Excel sheet:
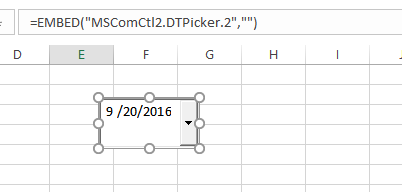
As soon as the datepicker control is inserted, the EMBED formula appears in the formula bar. It informs Excel what type of control is embedded in the sheet, and in no case you should change or delete it, because this would result in the "Reference is not valid" error.
Inserting any ActiveX control (including DTPiker) automatically turns the Design Mode on allowing you to modify the appearance and properties of the newly added control. The most obvious changes that you will want to make most of the time is to resize your calendar control and link it to a specific cell.
To activate your Excel drop down calendar, go to the Design tab > Controls group, and turn off the Design Mode:
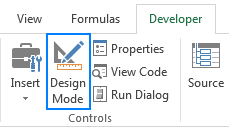
And now, you can click on the dropdown arrow to display the calendar and select the desired date:
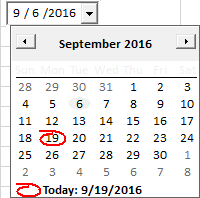
Note. If the Microsoft Date Piker control is not available in the More Controls list, it's most likely because of the following reasons:
- You are using the 64 bit version of Office. Regrettably, there is no official date picker control for Office 64-bit. The only solution is using a third-party calendar for Excel.
- The calendar control (mscomct2.ocx) is not available or is not registered on your machine. To fix this, please follow these instructions: How to register the calendar control.
3. Customize the calendar control
After adding a calendar control to your Excel sheet, the first thing you may to do is to move it to the desired location and get it to fit into a cell.
To resize the datepicker control, turn the Design Mode on, and drag a corner of the control:

Alternatively, with the Design Mode on, select your calendar control, and click Properties:
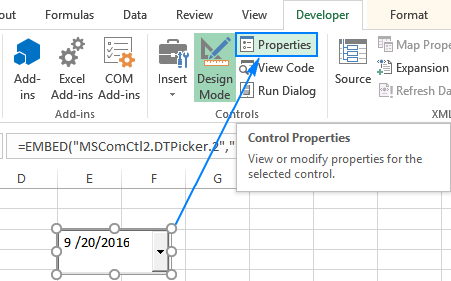
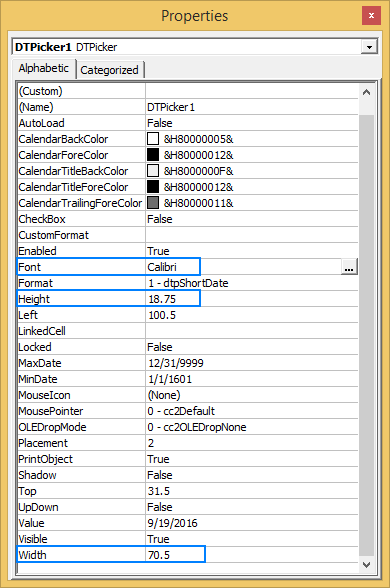
In the Properties window, you can set the desired height, width as well as change the font theme and size:
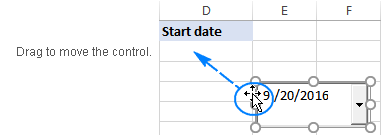
To move the datepicker control, hover your mouse over it and as soon as the cursor changes to a four-pointed arrow, drag the control where you want it.
4. Link the calendar control to a cell
Now that you have successfully added a drop down calendar in Excel, you may also want to link it to a specific cell. It is absolutely necessary if you intend to use the selected dates in formulas.
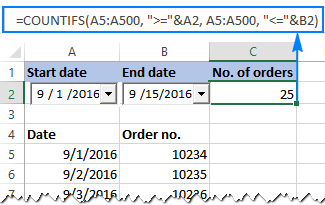
Let's say, you've written a formula to count the number of orders between the specified dates. To prevent your users from inputting incorrect dates like 2/30/2016, you inserted the dropdown calendars in 2 cells (A2 and B2 in this example). However, your obviously correct COUNTIFS formula returns zero, although you can clearly see a few orders within the specified time period!
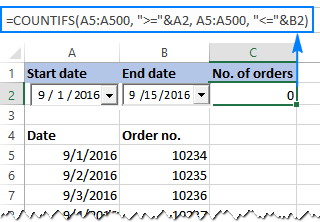
The reason is that Excel cannot recognize the value of a date picker control until you associate it with a certain cell. To fix this, link your date picker controls to some cells in this way:
- With the Design Mode on, select the calendar control.
- On the Developer tab, in the Controls group, click Properties.
- In the Properties windows, find the LinkedCell property, and type a cell reference next to it (A3 in this example):
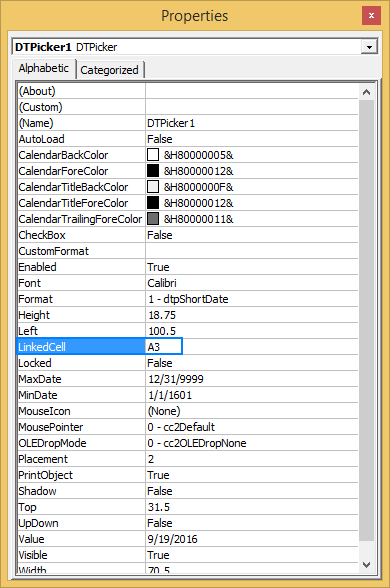
If Excel displays the "Can't set cell value to NULL…" error, just click OK to ignore it.
Excel pop-up calendar in action
Your Excel date picker is ready to use. As soon as you select a date in a pop-up calendar, it is automatically inserted in a linked cell. As shown in the screenshot below, Excel has no problem with understanding such dates, and our formula referencing the linked cells (A3 and B3) works perfectly:
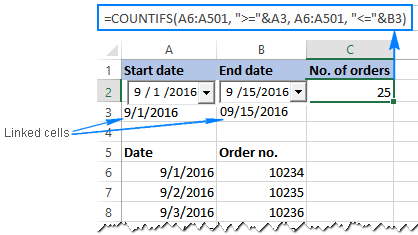
If you don't want to clutter your worksheet with "extra dates", you can link your date picker controls to the cells where they reside (A2 and B2 in this example). In this case, the underling dates won't be visible to the users, but you and Excel will know they are there and your formula will work faultlessly again:
How to register the Calendar control on your machine
In earlier versions of Excel, the Date and Time Picker Control (mscomct2.ocx in Excel 2010 and 2013 and mscal.ocx in Excel 2007) was usually included with the default installation. The users of Excel 2016 and higher will have to download and register this control manually. Here's how:
1. Check if mscomct2.ocx exists on your machine
For starters, check if the Microsoft Calendar Control is available on your machine. To do this, click the Start button (Office button), type mscomct2.ocx (or mscal.ocx in Excel 2007 and earlier) in the Search box, and click Enter.
If the mscomct2.ocx file is found, skip the next step, and proceed with step 3.
2. Download Microsoft Date and Time Picker control
If the Microsoft Date Picker Control is not found on your machine, you can download it using this link. Please remember, this control works only for the 32-bit version of Excel.
Once the mscomct2.exe file is downloaded, extract mscomct2.ocx, and copy it to one of the following folders depending on your Windows' bits:
- On Windows 32-bit: C:\Windows\System32
- On Windows 64-bit: C:\Windows\SysWoW64
Tip. A quick way to check the operating system information is to open Windows Explorer, right click Computer, and click Properties.
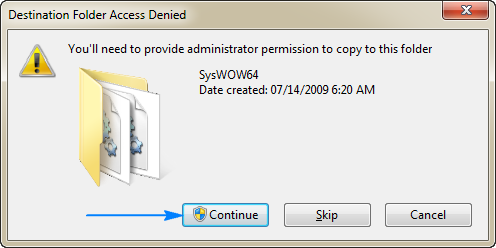
You must have the administrative permissions to copy files to the system folders. If you do have the admin permissions, but still get the Destination Folder Access Denied dialog, simply click Continue:
3. Register the calendar control in your system
Not only the calendar control (mscomct2.ocx) should exist on your computer, it should also be registered in the system. To have it done, perform the following steps:
- Click the Start button and type "command" in the search box, but don't press the Enter key.
- Right click Command Prompt at the top of the search results, and then click Run as Administrator.

- In the Administrator dialog box, enter one of the following commands, and then press Enter:
For Windows 32 bit:
C:\Windows\System32\regsvr32.exe mscomct2.ocx
For Windows 64 bit:
C:\Windows\SysWoW64\regsvr32.exe mscomct2.ocx

Note. By default, the copy/paste shortcuts are disabled in the command prompt window. To paste the command, position the cursor where you want the text to be inserted, then right-click on the command prompt's title bar, point to Edit, and click Paste.
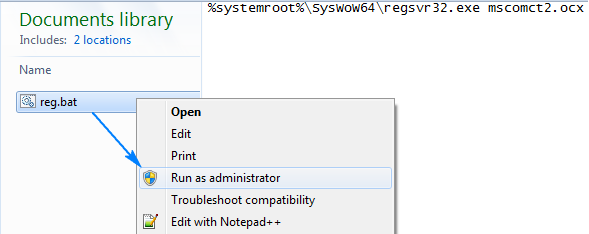
Alternatively, you can copy/paste the command in any text editor such as Notepad, save the file with the .bat extension (e.g. reg.bat) anywhere on your computer, right-click the .bat file, and then click Run as Administrator.
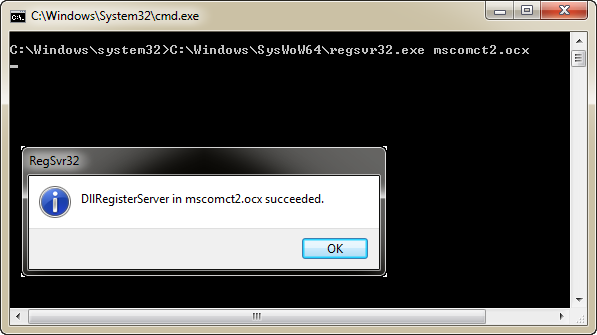
Either way, mscomct2.ocx should be successfully registered on your machine.
Once mscomct2.ocx is registered, restart your Excel, go to the Developer tab, click Insert > More Controls, and Microsoft Date and Time Picker Control will be there.
Note. MSCOMCT2.OCX is a 32-bit library for Windows and isn't compatible with 64-bit Office. While you can register it on a 64-bit Windows system, it will only work with 32-bit Office. Even if you add a reference to MSCOMCT2.OCX or MSCAL.OCX in Excel 64-bit, it will still return the "Could not load an object because it is not available on this machine" error.
Third-party tools to insert calendar in Excel
As already mentioned, Microsoft's Date and Time Picker controls work only in the 32-bit versions of Excel. If moving from 64-bits to 32-bits is not your option, third party tools are the only working solution. Below you will find a few calendars that work with both 32 bit and 64 bit versions of Excel 2019, Excel 2016, Excel 2013, and lower. It would be only natural if we start with our own calendar :)
Ablebits Date Picker for Excel
The users of the Ultimate Suite can find their Excel drop-down calendar on the Ablebits tab in the Date & Time group. The Date Picker is turned off by default, to turn it on, just click this button:
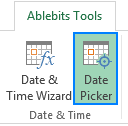
Once the Date Picker is activated, a small calendar button appears on the sheet when you type or select a date in a cell. If necessary, you can change date format as usual and the calendar will supply dates in your custom format - a nice feature that Microsoft's Date and Time Picker control lacks. Additionally, the calendar shows how far away the selected date is from today's date. Also, it allows you to quickly get to today's date or switch between one-month and two-month views:
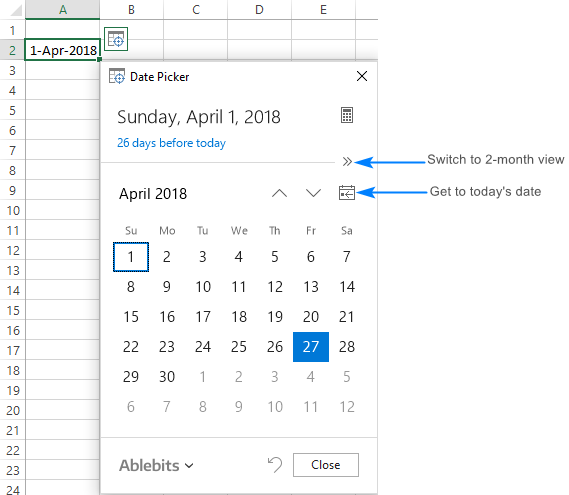
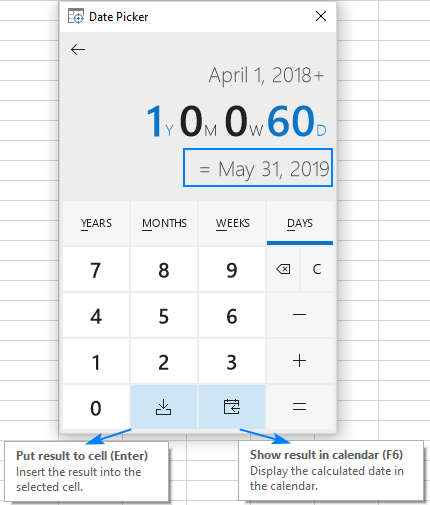
Moreover, you can also calculate dates right in the calendar! For this, select the target date in your worksheet or in the calendar, and click the Date Calculator button in the upper right corner. Then, click the desired unit on the upper pane and type how many years, months, weeks or days (or any combination of these units) you want to add to or subtract from the target date. After that, press the Enter key to insert the result into the currently selected cell or press F6 to display the calculated date in the calendar (or click one of the buttons shown in the image below).
As an example, let's add 1 year and 60 days to April 1, 2018:
If you don't have our Ultimate Suite in your Excel yet, you can download a trial version here, or you can go with one of the free drop-down calendars listed below.
Excel Date Picker
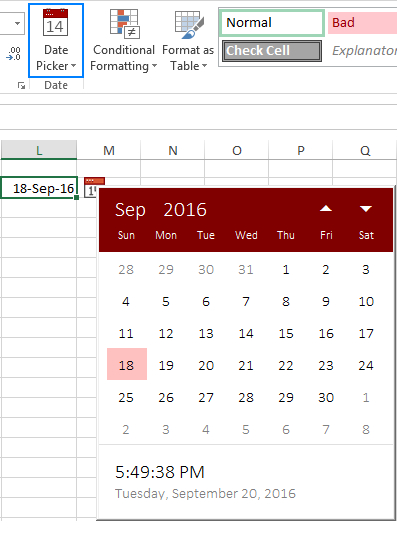
Excel Date Picker from samradapps.com is a beautifully designed and easy to use calendar that supports all versions of Excel.
It adds the Date Picker button to the ribbon, and optionally, an item to the right click menu. And I confirm that it works without a hitch in my Excel.
Pop-up calendars for Excel Online
If you often manage time tables, schedules and to-do lists in Excel Online, you may find the following Calendar add-ins helpful.
XLTools.net Calendar - one inserted, the below calendar appears on the sheet enabling you to enter or change a date in a click.
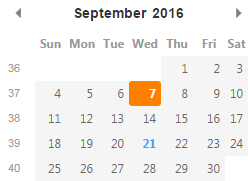
Modern Calendar & Date Picker - a pop-up calendar that works with the desktop versions of Excel 2013 and 2016, Excel 2016 for Mac, and Excel Online. It includes dozens of themes for you to choose from and costs around $1.50.
Mini Calendar and Date Picker - another low-cost calendar for Excel Online, Excel 2013, Excel 2016 and Excel 2016 for Mac. It allows you to toggle the size of the calendar, show week numbers, switch between the U.S. or ISO calendar systems, and choose different themes.
How to make a calendar in Excel based on template
In addition to spreadsheets that can calculate nearly everything, Microsoft Excel includes a handful of graphic options with drawing tools, clipart, charts, tables, etc. Using these features, you can easily create a weekly or monthly calendar with your own photos and special occasion days such as birthdays or anniversaries. The detailed guidelines to create a custom Excel monthly calendar can be found here.
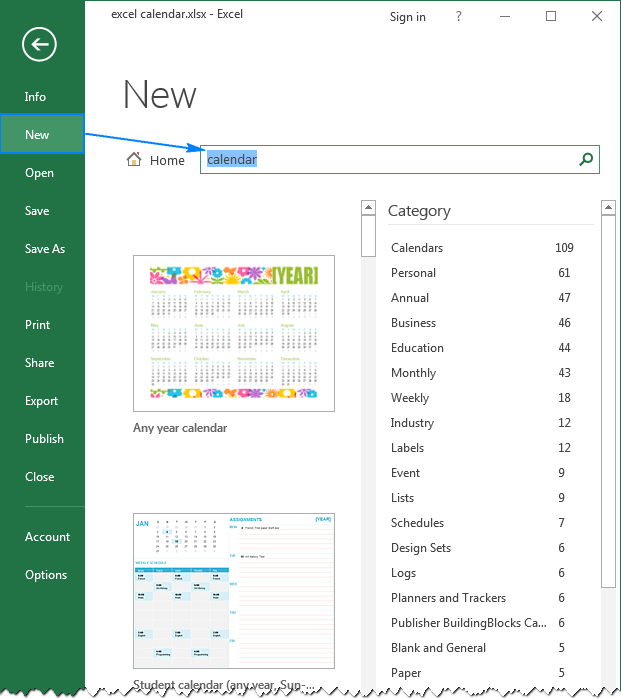
However, the fastest and easiest way create a calendar in Excel is to pick a free Excel calendar template. For this, just click File > New, and type "calendar" in the search box. Excel will search through thousands of templates online and show you a selection of daily, weekly, monthly and yearly calendar templates grouped into categories, like shown in the screenshot below:
Select the calendar template that you liked the most, and click Create:
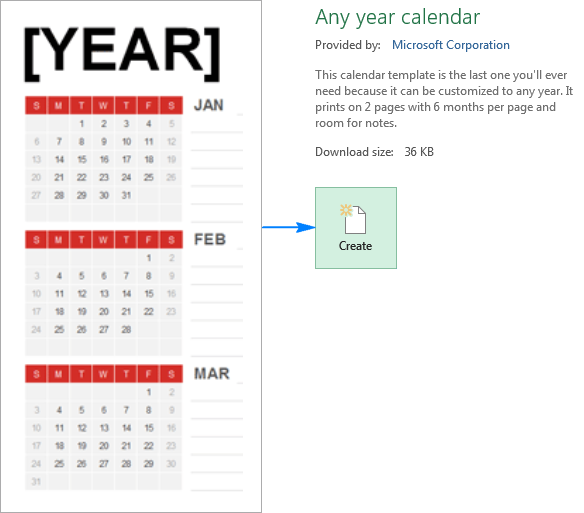
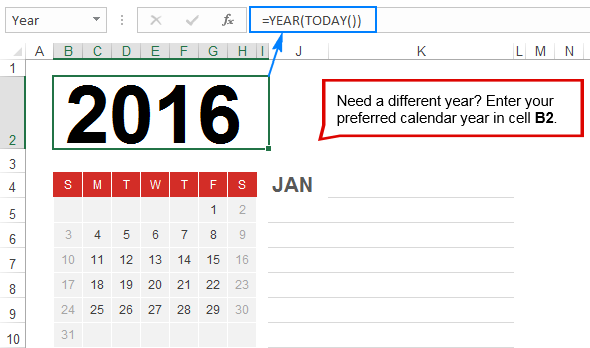
That's it! The calendar template will open up in a new workbook, and you can print it out straight away or customize to your liking. Generally, an Excel calendar template can be set to any year, some templates also allow setting a day to start the week.
Tip. To ensure that your Excel calendar always displays the current year, you can enter the following simple formula in the year cell: =YEAR(TODAY())
Well, this is how you can insert a drop-down calendar and make a printable calendar in Excel. Hopefully you will find the information in this tutorial helpful. Anyway, I thank you for reading and hope to see you on our blog next week!
 by
by
30 comments
I'm confused because you state repeatedly it will not work with 64-bit versions yet you provide instructions for adding the date/time picker.
Hi Suzanne,
We state that the Date Picker control does not work on a 64-bit version of Excel. However, it does work with Excel 32-bit on Windows 64-bit. And the article explains how to add this control to Windows 64-bit. In other words, if you have Win 64-bit and Excel 32-bit, it will work.
I have installed the drop calendar into one cell. I needed to copy the function into successive rows down my sheet with no date displayed until it is selected. Can you tell me how to do this please?
Hi! Unfortunately, the Microsoft Date Picker control in Excel isn't designed to be copied and pasted like regular cell content. It's an ActiveX control, a separate element embedded within the spreadsheet. Here's why copying it directly isn't possible:
The Date Picker doesn't hold the actual date value. It's a user interface element for selecting a date, which then populates a separate cell with the chosen date. Copying the control wouldn't transfer the functionality.
ActiveX Limitations: ActiveX controls aren't inherently designed to be copied within a spreadsheet. They require specific code for interaction.
However, there are alternative ways to achieve similar functionality in other cells:
Copy the Date: Instead of copying the control, simply copy the cell containing the date chosen by the Date Picker. This will copy the actual date value.
Insert Multiple Date Pickers: If you need Date Pickers in multiple cells, simply insert them individually using instructions in this article above.
Further to my earlier posting, I have now discovered that the date displayed in the calendar linked cell, cannot be copied to another cell, either with copy and paste or by making another cell equal to the display cell. I have the correct cell entered in the properties. Basically entering the date in this way seems useless.
What about those who, like me, use a Mac computer?
The option buttons "Insert" and "More controls" are not available in Excel for Mac version.
Thank you in advance for your support.
Carlos Eduardo
Hello! Unfortunately, the Microsoft Date and Time Picker Control 6.0 (SP6) is not supported in macOS versions of Excel. This control is designed for Windows versions of Excel only and cannot be installed on a MacBook. Try to use Ablebits Date Picker for Excel as described in article above.
My question is a repeat of Nelsons question below. Could someone please respond to this question below because I am also struggling to solve it.
"The date picker is working fine, but when i fix it in a cell after doing all the essential formatting, save it and try reopening the same file the date picker is at the top left corner. I face this issue each and every time I re-open the file. Request you to kindly help me in solving this issue.."
I, too, ran across the "floating control" problem (upon reopening, the control appears at the upper left of the worksheet, over the "A" column header, and there is a nonworking image of the control where I actually intended it to be).
I've search the interwebs for a long time looking for a solution, and all I have found is that works is if you freeze the top row (or any other freeze configuration that has rows in it), the problem goes away.
If you can't or don't want to do that, all you have to do is scroll down and then back up, and the display repaints properly.
Someone claimed that if you put some code into the Workbook_Open event, you can tweak the width (or maybe another property) of the control in a trivial way, and that will cause it to repaint and appear where it is supposed to. Downside of that is, you have to use an XLSM workbook if you aren't already, and it just seems like a VBA solution should not be necessary.
i had a spreadsheet where the calendar would pop up in the A1 area after selecting the calendar. i increased the size of the calendar box while in design mode just a little bit and then the calendar pops up where it should be.
The date picker works fine but in a different way, the date picker is the one changing once you change the linked cell to it. Did I miss anything because it works the other way around. Please help.
Hi Nats,
In fact, it works both ways. When you select a date using the date picker, the linked cell changes; and vice versa - changing the linked cell changes the date picker.
How do I change the displayed format of the date?
It shows 14/08/2018, and I'd like 14 AUG as the format (ideally capitalised but not essential). So it looks like I should go into Design Properties, and set "Custom Format" to "dd mmm" and set Format to "3-dtpCustom" which I assume triggers it to apply the Custom Format box above?
However that results in 14 00 as the display. Indeed, any variation of mmm in the custom format returns a 00 regardless of the month selected in the drop down.
What am I doing wrong?
I guess by now you may have figured out the problem, but for persons with similar issues, for the custom date format, you have to use capitalized m for month eg. yyyy-MMM-dd
I have inserted the Date Picker successfully but need to formula based on the date picked to show the 'due date' in the next column (28 days from date picked, and also to start colouring from green (1-15 days) to orange (16-27 days) & Red (28 days +). Is this possible? Thanks!
Hello,
If I understand your task correctly, you need to create a rule for conditional formatting.
You can learn more on how to conditionally format dates and time in Excel in this article.
Hope this information will be helpful for you.
Hi,
I was wondering if you'd guide me how to freeze two different rows in excel (like row no.3 and row no.10)! Is that even possible?
Thanks
Hi Alireza,
It's not possible to freeze non-adjacent rows in Excel. Only contiguous columns and rows can be freezed.
Thanks a million
"Easy" does not describe the last three hours of fruitless labour.
I have an expense spreadsheet that needs a pop-up calendar to choose a date for each line of expenses entered. Third-party is not an option, as it would require installing extra software on multiple off-site laptops.
The internal Excel process you describe does not allow for applying over a range of cells - each cell has to be configured separately. The 'cell content plus twisty' graphic is just that - a graphic. Clicking on it does nothing. The content can only be changed via a drop-down at the top-left of the sheet, and even then the process is fraught with errors. (I wish I could post a pic of what I'm talking about).
One would think that allowing for a calendar as one of the Data Validation drop-downs should be a standard no-brainer feature.
I think I might haver encountered the same thing as you, Alan. When I got the calendar graphic in the upper left hand corner of the spreadsheet, I then de-selected Design Mode - that made the upper left graphic disappear, but allowed me to resize and move the graphic of tha calendar near the cell I clicked on to the cell I wanted and it worked. Problem is - I want to copy this calendar drop/select into a range of cells and I cannot seem to do that I have to create a calendar / drop for each individual cell. For what it is worth....
I would like to find out if a client attended his/her appointment. So I'd like to add a yes/no button. If the yes button is pushed, I'd like to pick the date the client attended from my drop down calendar and have it populate the Appointment cell (B3) . If no is pushed, I would like the calendar to appear in the followup cell (O3), where a new date is selected but the color is red. This way we will know to also call this patient.
Thank you for your help.
Jay
I'm afraid we won't be able to help you with definite formulas without an example sheet. Because you will most likely have to create a yes/no dropdown list first (A1). Then your dropdown calendars will need to be dependant on the answer in A1 cell. To fill the cells with colour, you may apply conditional formatting for dates based on several conditions.
Microsoft Date and Time Picker Control not appering...plz suggest
Hello Narayan,
Microsoft Date and Time Picker Control is not available in 64 bit versions of Office. If you are using Office 32-bit, you can download and register the datepicker control using these instructions.
how to add DatePicker instead in a 64-bit version?
Hi, I followed the instructions to add it, and it succeeded. I restarted Excel and still the Microsoft Date and Time Picker Control does not appear under the developer tab > insert > more controls options. What could be causing that?
Hello
0 to 60 against 15
61 to 100 against 20
101 to 150 against 30
How to if formula?
Hello Dippak,
Try the following nested if's:
=IF(A1>100, 30, IF(A1>60, 20, IF(A1>=0, 15, "")))
So Is it not possible to copy the same date picker to a range of cells. Is there any VBa CODE for the same ?