The tutorial will teach you how to remove empty columns in Excel with a macro, formula and a button-click.
As trivial as it sounds, deleting empty columns in Excel is not something that can be accomplished with a mere mouse click. It cannot be done in two clicks either. The prospect of reviewing all the columns in your worksheet and removing the empty ones manually is definitely something you'd want to avoid. Luckily, Microsoft Excel provides a great lot of different features, and by using those features in creative ways you can cope with almost any task!
Quick way to delete empty columns that you should never use
When it comes to removing blanks in Excel (whether it is empty cells, rows or columns), many online resources rely on the Go to Special > Blanks command. Never do that in your worksheets!
This method (F5 > Special… > Blanks) finds and selects all empty cells in the range:
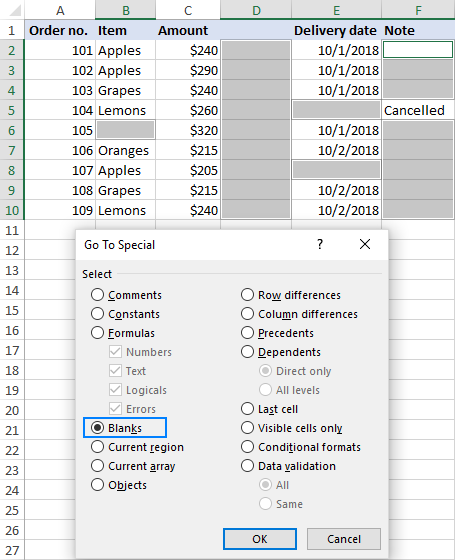
If now you right-click the selected cells and choose Delete > Entire column, all the columns that contain at least one blank cell would be lost! If you've inadvertently did that, press Ctrl + Z to get everything back.
Now that you know a wrong way to delete blank columns in Excel, let's see how to do it right.
How to remove blank columns in Excel with VBA
Experienced Excel users know this rule of a thumb: not to waste hours doing something manually, invest a few minutes in writing a macro that will do it for you automatically.
The below VBA macro removes all blank columns in the selected range. And it does this safely - only absolutely empty columns are deleted. If a column contains a single cell value, even an empty string returned by some formula, such a column will remain intact.
How to use the Delete Empty Columns macro
Here are the steps to add the macro to your Excel:
- Press Alt + F11 to open the Visual Basic Editor.
- On the menu bar, click Insert > Module.
- Paste the above code in the Code window.
- Press F5 to run the macro.
- When the pop-up dialog appears, switch to the worksheet of interest, select the desired range, and click OK:
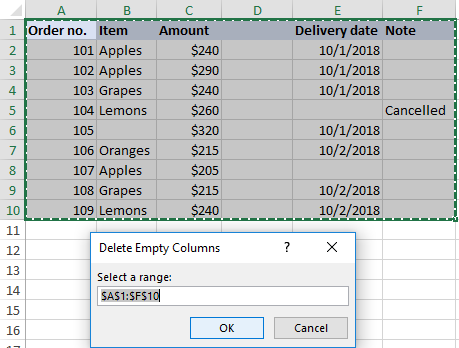
If you do not want to add a macro to your worksheet, you can run it from our sample workbook. Here's how:
- Download our sample workbook to Remove Blank Columns in Excel, open it, and enable content if prompted.
- Open your own workbook or switch to the already opened one.
- In your workbook, press Alt + F8, select the DeleteEmptyColumns macro, and click Run.
- In the pop-up dialog, select the range and click OK.
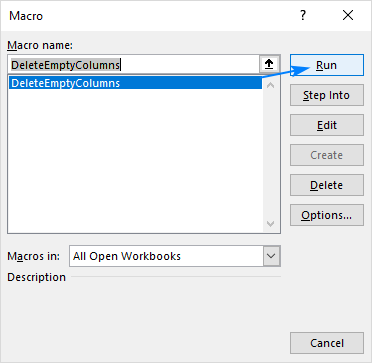
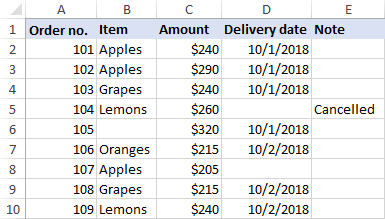
Either way, all empty columns in the selected range will be disposed of:
Identify and delete blank columns in Excel with a formula
The above macro removes empty columns quickly and silently. But if you are a "keep-everything-under-control" kind of person (like I am :) you may want to visually see the columns that are going to be removed. In this example, we will first identify blank columns by using a formula so that you could quickly review them, and then eliminate all or some of those columns.
Note. Before deleting anything permanently, especially by using an unknown technique, I strongly advise you to make a backup copy of your workbook, just to be on the safe side if something goes wrong.
With a backup copy in a safe place, perform the following steps:
Step 1. Insert a new row
Add a new row at the top of your table. For this, right-click the first row header and click Insert. Do not worry about mangling the structure/arrangement of your data - you can delete this row later.
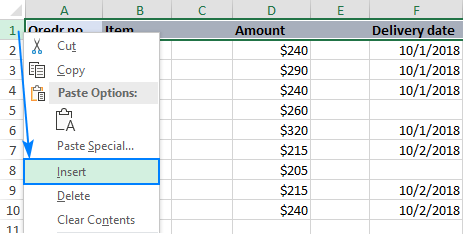
Step 2. Identify empty columns
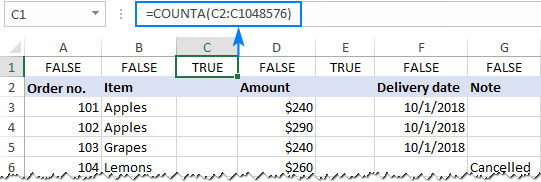
In the leftmost cell of the newly added row, enter the following formula:
=COUNTA(A2:A1048576)=0
And then, copy the formula to the other columns by dragging the fill handle.
The formula's logic is very simple: COUNTA checks the number of non-blanks cells in the column, from row 2 to row 1048576, which is a row maximum in Excel 2019 - 2007. You compare that number with zero and, as the result, have TRUE in blank columns and FALSE in the columns that contain at least one non-empty cell. Due to the use of relative cell references, the formula properly adjusts for each column where it is copied.
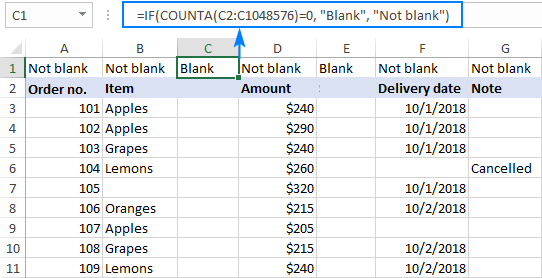
In case you are setting up the worksheet for someone else, you may want to label the columns in a more meaningful manner. No problem, this can be easily done with an IF statement similar to this:
=IF(COUNTA(A2:A1048576)=0, "Blank", "Not blank")
Now the formula explicitly indicates which columns are empty and which are not:
Tip. Compared to a macro, this method gives you more flexibility with regard to which columns should be considered blank. In this example, we check the whole table, including the header row. That means if a column contains only a header, such a column is not regarded as blank and is not deleted. If you'd like to check only data rows ignoring column headers, remove the header row(s) from the target range (A3:A1048576). As the result, a column that has a header and no other data in it will be deemed blank and subject to deleting. Also, you can limit the range to the last used row, which would be A11 in our case.
Step 3. Remove blank columns
Having a reasonable number of columns, you can simply select those that have "Blank" in the first row (to select multiple columns, hold the Ctrl key as you click the column letters). Then, right-click any selected column, and choose Delete from the context menu:
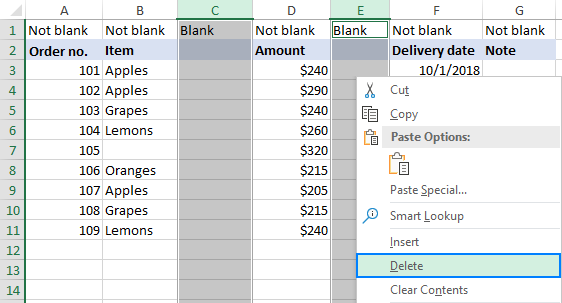
If there are tens or hundreds of columns in your worksheet, it makes sense to bring all empty ones to view. For this, do the following:
- Select the top row with formulas, go to the Data tab > Sort and Filter group, and click the Sort button.
- In the warning dialog box that appears, select Expand the selection, and click Sort…

- This will open the Sort dialog box, where you click the Options… button, select Sort left to right, and click OK.

- Configure just one sort level like shown below and click OK:
- Sort by: Row 1
- Sort On: Cell Values
- Order: A to Z
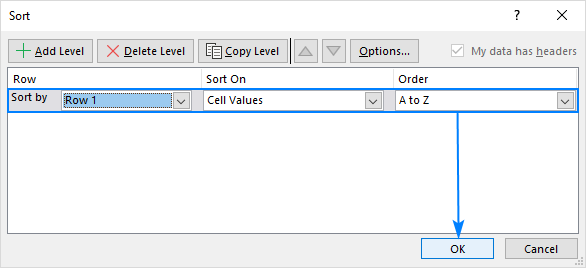
As the result, the blank columns will be moved to the left part of your worksheet:

- Select all blank columns - click on the first column letter, press Shift, and then click the letter of the last blank column.
- Right-click the selected columns and choose Delete from the pop-up menu.

Done! You've got rid of the blank columns, and there is nothing that would now prevent you from deleting the top row with the formulas.
Fastest way to remove empty columns in Excel
In the beginning of this tutorial, I wrote that there is no one-click way to delete blank columns in Excel. In fact, that isn't exactly true. I should have said there is no inbuilt way. The users of our Ultimate Suite can remove blanks in Excel literally in a couple of clicks :)
In the target worksheet, switch to the Ablebits Tools tab, click Delete Blanks and choose Empty Columns:
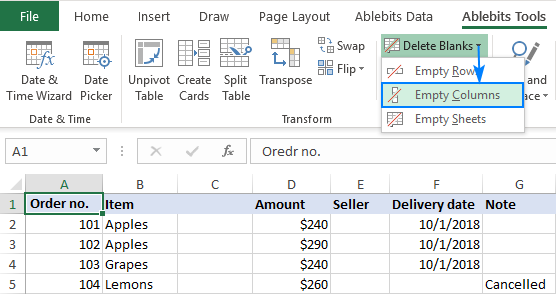
To make sure that wasn't an accidental mouse click, the add-in will ask you to confirm that you really want to remove empty columns from that worksheet:

Click OK, and in a moment all blank columns are gone!
Like the macro discussed above, this tool deletes only those columns that are absolutely empty. Columns that have any single value, including headers, are preserved.
Delete Blanks is just one of tens of wonderful features that can make your life as an Excel user easier. To find more, you are welcome to download a trial version of our Ultimate Suite for Excel.
Blank columns are not deleted! Why?
Issue: You have tried all of the above methods, but one or more empty columns are stuck in your worksheet. Why?
Most likely because those columns are not really empty. Many different characters invisible to the human eye may lurk unnoticed in your Excel spreadsheets, especially if you imported information from an external source. That can be a mere empty string or a space character, non-breaking space or some other non-printing character.
To pin down the culprit, select the first cell in the problematic column and press Ctrl + down arrow. For example, column C in the screenshot below is not blank because of a single space character in C6:
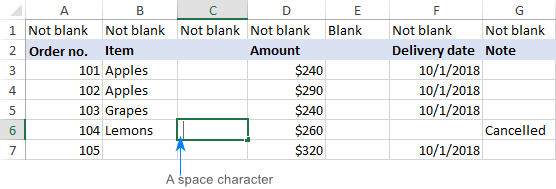
Double-click the cell to see what actually is in it or simply press the Delete key to get rid of the unknown something. And then repeat the above process to find out if there are any other invisible things in that column. You may also want to clean your data by removing leading, trailing and non-breaking spaces.
I thank you for reading and hope to see you on our blog next week!
 by
by
19 comments
Hi!
This script was amazing and worked perfectly. I was wondering if there is a way to get the module to automatically choose the entire range of cells on the worksheet from A1 to the last cell with data, instead of having to choose the range after initiating the macro.
I have found a separate script that will automatically select the entire range, but I can't quite figure out how to change the script to incorporate it. I am a VBA newbie. This is the other script I have...
Sub SelectUsedRangeFromA1()
Dim ws As Worksheet
Set ws = ActiveSheet ' Or specify the worksheet you want to work with
' Select the range from A1 to the last used cell
ws.Range("A1", ws.UsedRange.Cells(ws.UsedRange.Cells.Count)).Select
End Sub
Thanks!
Hi,
Please make the following correction
Incorrect Statement "COUNTA checks the number of blanks cells in the column"
Correct Statement "COUNTA checks the number of Non blanks cells in the column"
Logically we all want Excel to return count of Non blank cells & then compare with 0, Completely blank column will result in True.
Corrected, thank you!
I need to delete the blank cells within a range and shift those with a value to the left (or up). Usually this is accomplished by defining the names for the row (column) and Create from Selection, then Go to Special and select blanks, then selecting delete and shift to left (or up).
It would be much appreciated if you can help me.
David
Hello!
You can select all blank cells in the range using the 'Select Special Cells' tool, then delete these cells using Excel tools.
It is available as a part of our Ultimate Suite for Excel that you can install in a trial mode and check how it works for free.
My sheet has columns "A" and "B" There is a value in column "A" And in the "B" column the value is in some cells and some are blank cells.
Now I have to delete the value from that cell of column "A" Whose right cell "B" column does not have a value.
Hello!
You can filter by blank cells in column B. Then select and remove all visible values in column A.
Hello I have data in top row but many Colum is empty how to delete empty Colum with top row data.
eg.
Ram Shyam Ram Shyam Ram
1 1
1 1 1
1 1
want to remove 2nd and 4th colum in large data
Hello!
I hope you have studied the recommendations in the tutorial above. It contains answers to your question.
Hi - I don't understand how your formula would work without accounting for the extra row you inserted. You mention the header row, but the formula doesn't skip it. I had to do this:
=COUNTA(A3:A1048576)=0
Thank you for the start though!
Hi Darryl,
Thank you for your comment.
In my example, the formula does not skip the header row. If a column has a header, such column is not considered blank and is not deleted. If you'd like to check only the data rows ignoring headers, then use the formula that you suggested.
after i delete rows, i cant remake or ctrl z it. can u explain for me how to remake what i have deleted?
Hello John Nguyen!
Unfortunately, after you delete a column, it is not possible to restore it. You can insert a new one at the same place, but the data will be lost in any way.
However, if you notice your mistake in time, please simply close your Excel file without saving. Probably, the last changes haven't been included during the automatic save.
Excellent post! I used your formula technique at work when nothing else worked. Thank you and great job, Svetlana!
Thank you, Thomas. Nice to know that our solution has proved useful :)
how can we do this when only the first cell in the column - a header row - is populated and you dont want to look down thousands of rows to see if anything else is besides the header row?
btw - love your product and have been using it for 2+ years and recommend it to others
Hi John,
Thank you for your feedback. I am glad to hear you are happy with our product!
As for your question, is my understanding correct that you want to delete all the columns that have blanks in the header row, regardless of whether a column has any other data in it or not? Or do you want to ignore the header row and only check data rows?
Is there a setting to ignore the header row? It would be more useful to use "Remove Empty Columns" when it would actually remove the empty column and not consider it filled in when there is something in the header.
Thank you for your feedback, Jessica. I will pass it to our development team for consideration.