The tutorial explains the basics of the Flash Fill functionality and provides examples of using Flash Fill in Excel.
Flash Fill is one of the most amazing features of Excel. It grabs a tedious task that would take hours to be performed manually and executes it automatically in a flash (hence the name). And it does so quickly and simply without you having to do a thing, but only provide an example of what you want.
What is Flash Fill in Excel?
Excel Flash Fill is a special tool that analyzes the information you are entering and automatically fills data when it identifies a pattern.
The Flash Fill feature was introduced in Excel 2013 and is available in all later versions of Excel 2016, Excel 2019, Excel 2021, and Excel for Microsoft 365.
Started in December 2009 as an attempt of Sumit Gulwani, a senior researcher at Microsoft, to help a businesswoman he accidentally met at the airport with her merging challenge, a few years later it has evolved into a powerful ability to automate many Excel chores.
Flash Fill easily copes with dozens of different tasks that otherwise would require complex formulas or even VBA code such as splitting and combining text strings, cleaning data and correcting inconsistencies, formatting text and numbers, converting dates to the desired format, and a lot more.
Each time, Flash Fill combines millions of small programs that might accomplish the task, then sorts those code snippets using machine-learning techniques and finds the one that suits best for the job. All this is done in milliseconds in the background, and the user sees the results almost immediately!
Where is Flash Fill in Excel?
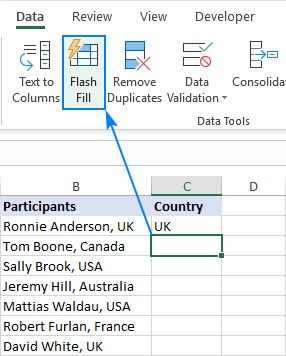
In Excel 2013 and later, the Flash Fill tool resides on the Data tab, in the Data tools group:

Excel Flash Fill shortcut
Those of you who prefer working from a keyboard most of the time, can run Flash Fill with this key combination: Ctrl + E
How to use Flash Fill in Excel
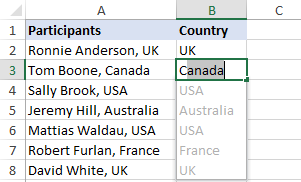
Usually Flash Fill starts automatically, and you only need to provide a pattern. Here's how:
- Insert a new column adjacent to the column with your source data.
- In the first cell of a newly added column, type the desired value.
- Start typing in the next cell, and if Excel senses a pattern, it will show a preview of data to be auto-filled in the below cells.
- Press the Enter key to accept the preview. Done!
Tips:
- If you are unhappy with the Flash Fill results, you can undo them by pressing Ctrl + Z or via the Flash Fill options menu.
- If Flash Fill does not start automatically, try these simple troubleshooting techniques.
- To find the number of the Flash Fill changed cells, just look at the Excel status bar.
How to Flash Fill in Excel with a button click or shortcut
In most situations, Flash Fill kicks in automatically as soon as Excel establishes a pattern in the data you are entering. If a preview does not show up, you can activate Flash Fill manually in this way:
- Fill in the first cell and press Enter.
- Click the Flash Fill button on the Data tab or press the Ctrl + E shortcut.
Excel Flash Fill options
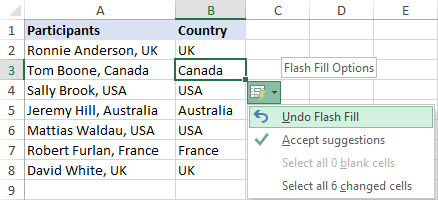
When using Flash Fill in Excel to automate data entry, the Flash Fill Options button appears near the auto-filled cells. Clicking this button opens the menu that lets you do the following:
- Undo the Flash Fill results.
- Select blank cells that Excel has failed to populate.
- Select the changed cells, for example, to format them all at once.
Excel Flash Fill examples
As already mentioned, Flash Fill is a very versatile tool. The below examples demonstrate some of its capabilities, but there is much more to it!
Extract text from cell (split columns)
Before Flash Fill came into existence, splitting the contents of one cell into several cells required the use of the Text to Columns feature or Excel Text functions. With Flash Fill, you can get the results instantly without intricate text manipulations.
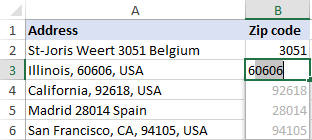
Supposing you have a column of addresses and you want to extract zip codes into a separate column. Indicate your goal by typing the zip code in the first cell. As soon as Excel understands what you are trying to do, it fills in all the rows below the example with the extracted zip codes. You only need to hit Enter to accept them all.
Formulas to split cells and extract text:
- Extract substring - formulas to extract text of a specific length or get a substring before or after a given character.
- Extract number from string - formulas to extract numbers from alphanumeric strings.
- Split names in Excel - formulas to extract first, last and middle names.
Extracting and splitting tools:
- Split Text - a versatile tool to divide cell content into multiple columns or rows. Easily split string by any character, string, or mask.
- Split Names tool - fast and easy way to separate names in Excel.
Combine data from several cells (merge columns)
If you have an opposite task to perform, no problem, Flash Fill can concatenate cells too. Moreover, it can separate the combined values with a space, comma, semicolon or any other character - you just need to show Excel the required punctuation in the first cell:

This method is especially useful for combining various name parts into a single cell as shown in How to merge first and last name with Flash Fill.
Formulas to join cell values:
- CONCATENATE function in Excel - formulas to combine text strings, cells and columns.
Merging tools:
- Merge Tables Wizard - quick way to combine two tables by common columns.
- Merge Duplicates Wizard - Combine similar rows into one by key columns.
Clean data
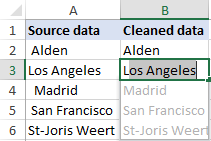
If some data entries in your worksheet begin with a leading space, Flash Fill can get rid of them in a blink. Type the first value without a preceding space, and all extra spaces in other cells are gone too:
Formulas to clean data:
- Excel TRIM function - formulas to remove excess spaces in Excel.
Data cleaning tools:
- Trim Spaces - trim all leading, trailing and in-between spaces but a single space character between words.
Format text, numbers and dates
Quite often the data in your spreadsheets is formatted in one way while you want it in another. Just start typing the values exactly as you want them to appear, and Flash Fill will do the rest.
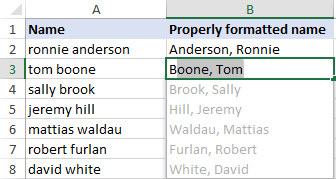
Perhaps you have a column of first and last names in lowercase. You wish the last and first names to be in proper case, separated with a comma. A piece of cake for Flash Fill :)
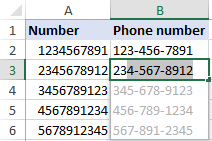
Maybe you are working with a column of numbers that need to be formatted as phone numbers. The task can be accomplished by using a predefined Special format or creating a custom number format. Or you can do it an easy way with Flash Fill:
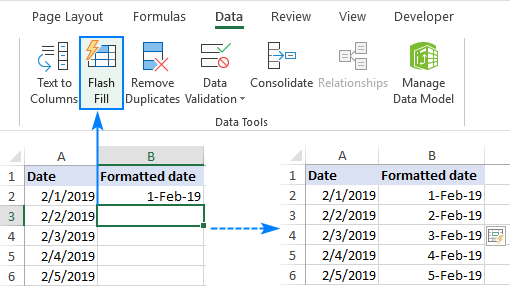
To re-format the dates to your liking, you can apply the corresponding Date format or type a properly formatted date into the first cell. Oops, no suggestions have appeared… What if we press the Flash Fill shortcut (Ctrl + E) or click its button on the ribbon? Yep, it works beautifully!
Replace part of cell contents
Replacing part of a string with some other text is a very common operation in Excel, which Flash Fill can also automate.
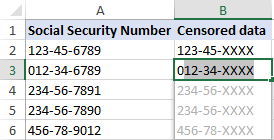
Let's say, you have a column of social security numbers and you want to censor this sensitive information by replacing the last 4 digits with XXXX.
To have it done, either use the REPLACE function or type the desired value in the first cell and let Flash Fill auto fill the remaining cells:
Advanced combinations
Flash Fill in Excel can accomplish not only straightforward tasks like demonstrated in the above examples but also perform more sophisticated data re-arrangements.
As an example, let's combine different pieces of information from 3 columns and add a few custom characters to the result.
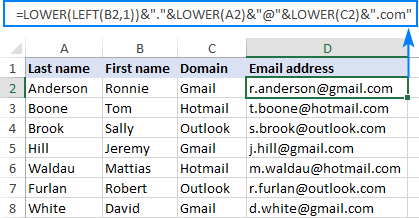
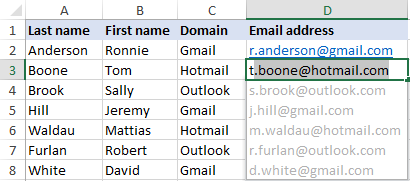
Supposing, you have first names in column A, last names in column B, and domain names in column C. Based on this information, you want to generate email addresses in this format: initial.surname@domain.com.
For experienced Excel users, there is no problem to extract the initial with the LEFT function, convert all the characters to lowercase with the LOWER function and concatenate all the pieces by using the concatenation operator:
=LOWER(LEFT(B2,1))&"."&LOWER(A2)&"@"&LOWER(C2)&".com"
But can Excel Flash Fill create these email addresses for us automatically? Sure thing!
Excel Flash Fill limitations and caveats
Flash Fill is an awesome tool, but it does have a couple of limitations that you should be aware of before you start using this feature on your real data sets.
1. Flash Fill results do not update automatically
Unlike formulas, the results of Flash Fill are static. If you make any changes to the original data, they won't be reflected in the Flash Fill results.
2. May fail to identify a pattern
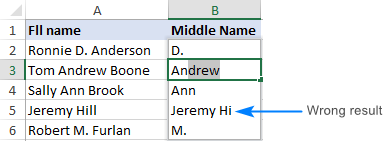
In some situations, especially when your original data are arranged or formatted differently, Flash Fill may stumble and produce incorrect results.
For example, if you use Flash Fill to extract middle names from the list where some entries contain only the First and Last names, the results for those cells will be wrong. So, it is wise to always review the Flash Fill output.
3. Ignores cells with non-printable characters
If some of the cells to be auto-filled contain spaces or other non-printable characters, Flash Fill will skip such cells.

So, if any of the resulting cells are blank, clear those cells (Home tab >Formats group > Clear > Clear All) and run Flash Fill again.
4. May convert numbers to strings
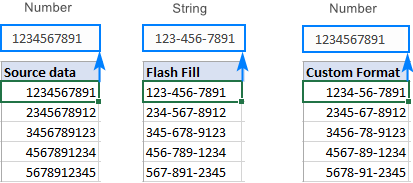
When using Flash Fill for reformatting numbers, please be aware that it may convert your numbers to alphanumeric strings. If you prefer to keep the numbers, use the capabilities of Excel format that changes only the visual representation, but not the underlying values.
How to turn Flash Fill on and off
Flash Fill in Excel is turned on by default. If you do not want any suggestions or automatic changes in your worksheets, you can disable Flash Fill in this way:
- In your Excel, go to File> Options.
- On the left panel, click Advanced.
- Under Editing options, clear the Automatically Flash Fill box.
- Click OK to save the changes.
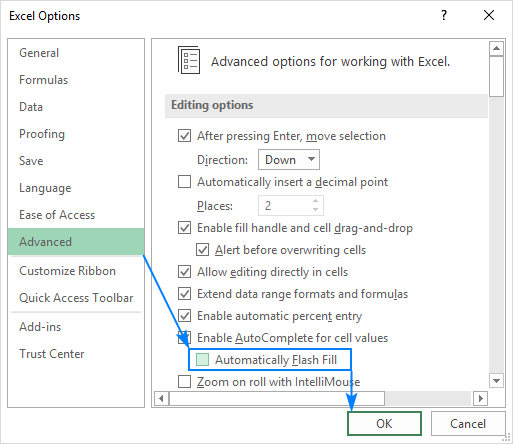
To re-enable Flash Fill, simply select this box again.
Excel Flash Fill not working
In most cases, Flash Fill works without a hitch. When it falters, the below error may show up, and the following tips will help you get it fixed.

1. Provide more examples
Flash Fill learns by example. If it is unable to recognize a pattern in your data, fill in a couple more cells manually, so that Excel could try out different patterns and find the one best suited for your needs.
2. Force it to run
If Flash Fill suggestions do not appear automatically as you type, try to run it manually.
3. Make sure Flash Fill is enabled
If it does not start either automatically or manually, check if the Flash Fill functionality is turned on in your Excel.
4. Flash Fill error persists
If none of the above suggestions has worked and Excel Flash Fill still throws an error, there is nothing else you can do but enter the data manually or with formulas.
That's how you use Flash Fill in Excel. I thank you for reading and hope to see you on our blog next week!
 by
by
21 comments
excellent
It was very useful
Nice
This is very useful for peoples and must learn by students and working people.
It’s good skills in future life
Excellent 👍
Thank ful, it's really good for study's
Good
this is grate
Thank you this is very useful
Very good
Thanks
Very nice and easy way to understand
Thankyou!
That 's exactly the information i was
Looking for.
Hello,
I'm late to the party but have an inquiry on whether flash fill can be used for more advanced combinations.
Take this formula as an example
=(F84*((BLDG33!E6)/E84))/(VLOOKUP(H84,'Available Time'!E3:F21,2,FALSE)*I84)
When I flash fill downward it gives the following
=(F85*((BLDG33!E7)/E85))/(VLOOKUP(H85,'Available Time'!E4:F22,2,FALSE)*I85)
Is there a way to reach my intended outcome with flash fill, which is only changing the cell of the columns within the same active sheet and not from other sheets or documents
=(F85*((BLDG33!E6)/E85))/(VLOOKUP(H85,'Available Time'!E3:F21,2,FALSE)*I85)
I worry I'm going to have to continue manually for these entries, any help is greatly appreciated!
Thanks,
Hi! If I understand your task correctly, the following tutorial should help: Relative and absolute cell reference: why use $ in Excel formula.
Thank you!
That's exactly the information i was looking for.
Good day. Thank you for the tutorial. I have one problem. I want to extract a year from a given date say I want to extract 2020 from the date 3/02/2020. How do I go about it? I keep getting wrong responses.
Hi!
I recommend reading this guide: Excel YEAR function - convert date to year.
This should solve your task.
I just want to learnt about the Flash fill formula. My excel sheet requirement is as under;
let and example;
Ali-050512-25-07-20220 i want to extract only the number not the name and date and the said number has the different length.
kindly provide me the solution
Hi
You may use excel bulitin tools
Combination of these tools
Text to columns
And function
If
Lenth