In this tutorial, you will learn a variety of methods to compare Excel files and identify differences between them. See how to open two Excel windows side by side, how to use Excel formulas to create a difference report, highlight differences with conditional formatting, and more.
When you have two similar Excel workbooks, or better say two versions of the same workbook, what's the first thing you usually want to do with them? Right, compare those files for differences, and then probably merge them into a single file. In addition, workbook comparison can help you spot potential problems like broken links, duplicate records, inconsistent formulas or wrong formatting.
So, let's have a closer look at various methods to compare two Excel sheets or entire workbooks and identify differences between them.
How to compare two Excel files by viewing them side by side
If you have relatively small workbooks and a sharp eye for detail, this quick and easy way to compare Excel files might work well for you. I am talking about View Side by Side mode that lets you arrange two Excel windows side by side. You can use this method to visually compare two workbooks or two sheets in the same workbook.
Compare 2 Excel workbooks
Let's say you have sales reports for two months and you want to view both of them simultaneously to understand which products performed better this month and which did better last month.
To open two Excel files side by side, do the following:
- Open the workbooks you want to compare.
- Go to the View tab, Window group, and click the View Side by Side button. That's it!

By default, two separate Excel windows are displayed horizontally.
To split Excel windows vertically, click Arrange All button and select Vertical:
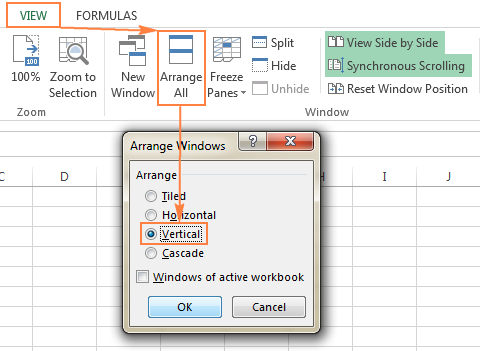
As the result, two separate Excel windows will be arranged side by side, like in the below screenshot.
If you want to scroll through both worksheets simultaneously to compare data row-by-row, make sure the Synchronous Scrolling option it turned on. This option resides on the View tab, in the Window group, right under the View Side by Side button, and is usually turned on automatically as soon as you activate View Side by Side mode.
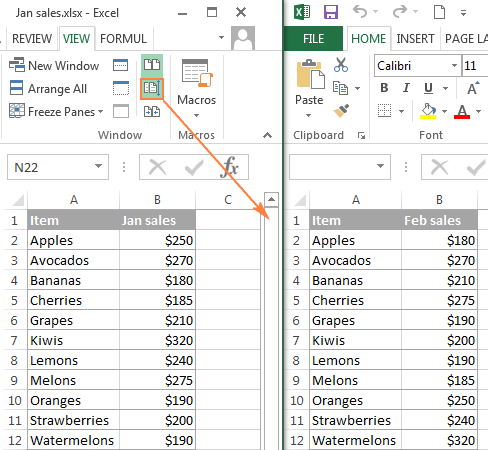
For more information about using this Excel feature, please see View Excel workbooks side by side.
Arrange multiple Excel windows side by side
To view more than 2 Excel files at a time, open all the workbooks you want to compare, and click the View Side by Side button. The Compare Side by Side dialog box will appear, and you select the files to be displayed together with the active workbook.

To view all open Excel files at a time, click the Arrange All button on the View tab, in the Window group, and choose your preferred arrangement: tiled, horizontal, vertical or cascade.
Compare two sheets in same workbook
Sometimes, 2 sheets that you want to compare reside in the same workbook. To view them side by side, perform the following steps.
- Open your Excel file, go to the View tab > Window group, and click the New Window button.

- This will open the same Excel file in a different window.
- Enable View Side by Side mode by clicking the corresponding button on the ribbon.
- Select sheet 1 in the first window and sheet 2 in the second window.
How to compare two Excel sheets for differences in values
It is the simplest way to compare data in Excel that lets you identify cells with different values. As the result, you will have a difference report in a new worksheet.
To compare two Excel worksheets for differences, just open a new empty sheet, enter the following formula in cell A1, and then copy it down and to the right by dragging the fill handle:
=IF(Sheet1!A1 <> Sheet2!A1, "Sheet1:"&Sheet1!A1&" vs Sheet2:"&Sheet2!A1, "")
Due to the we use of relative cell references, the formula will change based on a relative position of the column and row. As the result, the formula in A1 will compare cell A1 in Sheet1 and Sheet2, the formula in B1 will compare cell B1 in both sheets, and so on. The result will look similar to this:
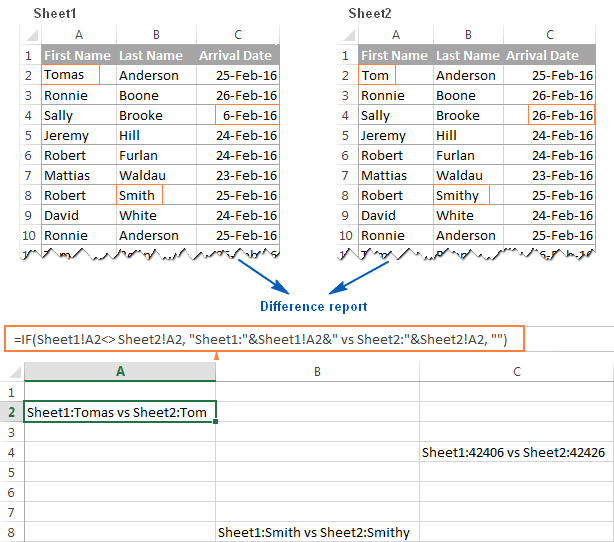
As you can see in the above screenshot, the formula compares 2 sheets, identifies cells with deferent values and displays the differences in corresponding cells. Please note that in the difference report, dates (cell C4) are presented by serial numbers as they are stored in the internal Excel system, which is not very convenient for analyzing differences between them.
Highlight differences between 2 sheets with conditional formatting
To highlight cells that have different values in two sheets with the color of your choosing, use the Excel conditional formatting feature:
- In the worksheet where you want to highlight differences, select all used cells. For this, click the upper left cell of the used range, usually A1, and press Ctrl + Shift + End to extend the selection to the last used cell.
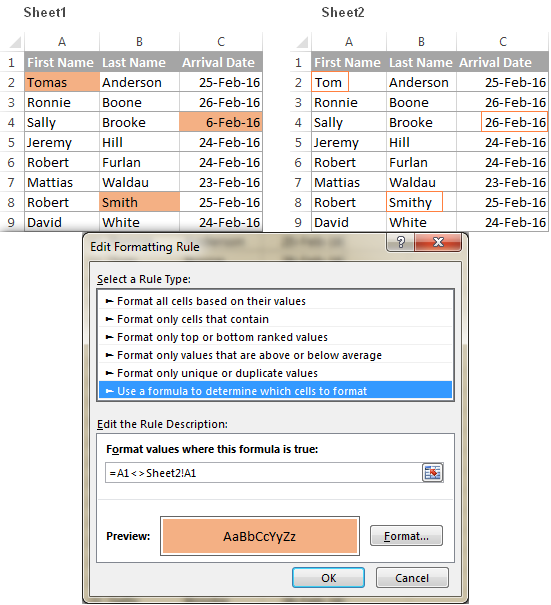
- On the Home tab, in the Styles group, click Conditional Formatting > New rule, and create a rule with the following formula:
=A1<>Sheet2!A1Where Sheet2 is the name of the other sheet you are comparing.
As the result, the cells with different values will get highlighted with the selected color:
If you are not very familiar with Excel conditional formatting, you can find the detailed steps to create a rule in the following tutorial: Excel conditional formatting based on another cell value.
As you see, it's very easy to compare two Excel sheets by using formulas or conditional formats. However, these methods are not well suited for all-round comparison because of the following limitations:
- They find differences only in values, but cannot compare formulas or cell formatting.
- They cannot identify added or deleted rows and columns. As soon as you add or delete a row / column in one sheet, all subsequent rows / columns will be marked as differences.
- They work on a sheet level, but cannot detect workbook-level structural differences such as sheet additions and deletions.
Compare and merge copies of a shared workbook
When it comes to merging different versions of the same Excel file, the Compare and Merge feature comes in handy. It is especially useful when several users collaborate on the same Excel workbook because it lets you view the changes and comments of all users at a time. To leverage this feature, be sure to do the following preparations:
- Share your Excel workbook before you make it available to other users.
To share a workbook, just click the Share Workbook button on the Review tab, in the Changes group, select the Allow Changes by More Than One User… box, and click OK. Allow Excel to save the workbook if prompted. Turning on the Track Changes feature shares the workbook automatically.
- Each person who makes any edits to the shared workbook must save a copy (.xls or xlsx file) using a unique file name.
Now that all initial preparations are done properly, you are ready to combine the copies of a shared workbook.
1. Enable the Compare and Merge Workbooks feature in your Excel
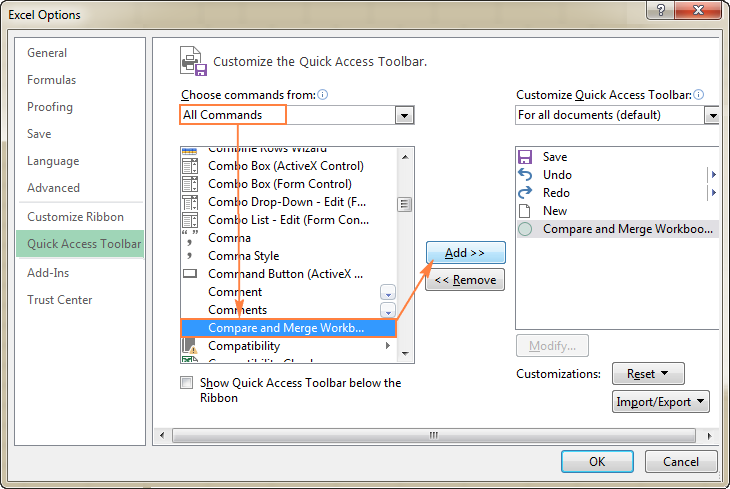
Although, the Compare and Merge Workbooks feature is available in all versions of Excel 2010 through Excel 365, this command is not displayed anywhere in Excel by default. To add it to the Quick Access toolbar, perform the following steps:
- Open the Quick Access drop down menu and select More Commands.
- In the Excel Options dialog box, select All Commands under Choose commands from.
- In the list of commands, scroll down to Compare and Merge Workbooks, select it and click the Add button to move it to the right-hand section.
- Click OK.
2. Compare and merge workbooks
When all of the users have finished working with your shared Excel workbook, you can merge all the copies into one file.
- Open the primary version the shared workbook.
- Click the Compare and Merge Workbooks command on the Quick Access toolbar.

- In the dialog box that appears, select a copy of the shared workbook that you want to merge. To select several copies, hold the Shift key while clicking the file names, and then click OK.

Done! The changes from each copy are merged into a single workbook.
3. Review the changes
To see all the edits by different users at a glance, just do the following:
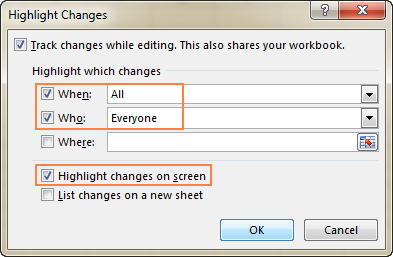
- Switch to the Review tab > Changes group, and click Track Changes > Highlight Changes.
- In the Highlight Changes dialog, select All in the When box, Everyone in the Who box, clear the Where box, select the Highlight changes on screen box, and click OK.
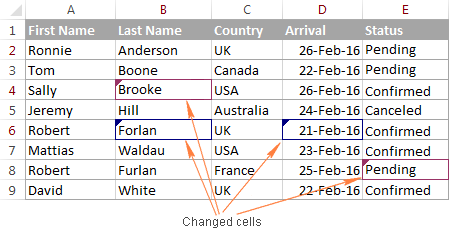
To point out the row and columns with differences, Excel highlights the column letters and row numbers in a dark red color. At the cell level, edits from different users are marked with different colors. To see who made a specific change, just hover over the cell.
Note. If the Compare and Merge Workbooks command is greyed out in your Excel, most likely you are trying to combine different Excel files. Please remember, the Compare and Merge Workbooks feature allows merging only copies of the same shared workbook.
Third-party tools to compare Excel files
As you have just seen, Microsoft Excel provides a handful of features to compare data in two or more workbooks. But none of the built-in options is sufficient to comprehensively compare Excel sheets, let alone entire workbooks, spotting all the differences in values, formulas or formatting.
So, if you need advanced and really efficient means to compare two Excel files, then most likely you would have to use one of the third-party tools specially designed for comparing, updating and merging Excel sheets and workbooks. Below you will find a quick overview of a few tools that, in my opinion, are best performers in this area.
Synkronizer Excel Compare: 3-in-1 tool to compare, merge and update Excel files
The Synkronizer Excel Compare add-in can quickly compare, merge and update two Excel files saving you the trouble of searching for differences manually.
If you are looking for a quick and reliable method to compare two Excel sheets or workbooks, you will certainly find helpful the following features of Synkronizer Excel Compare:
- Identifying the differences between two Excel sheets.
- Combining multiple Excel files into a single version without producing unwanted duplicates.
- Highlighting the differences in both sheets.
- Showing only the differences that are relevant to your task.
- Merging and updating the sheets.
- Presenting detailed and easy to read difference reports.
To get some basic idea about Synkronizer Excel Compare's capabilities and performance, let's carry out a couple of field tests.
Compare two Excel files for differences
Supposing you are organizing some event and, in your Excel table, you gather information about the participants such as a participant name, arrival date, number of seats, etc. Also, you have a couple of managers in direct contact with participants and the database, and as a result, you have 2 versions of the same Excel file.
Okay, let's see how efficiently Synkronizer can compare our two sheets and identify differences between them.
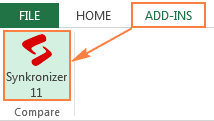
To run Synkronizer Excel Compare, go to the Add-ins tab, and click the Synchronizer 11 icon.
The Synkronizer pane will show up in the left part of your Excel window, where you do the following:
- Select 2 workbooks to compare:
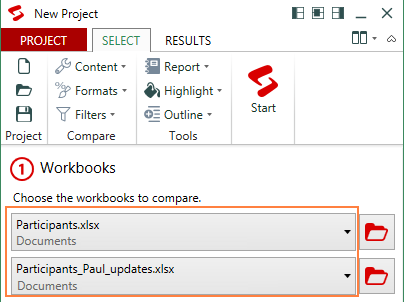
- Select sheets to compare.
If the selected workbooks have any sheets with the same names, all those sheets will be matched and automatically selected for comparison (like Participants sheets in the below screenshot).
Also, you can select worksheets manually or instruct the add-in to match sheets by other criteria, for example by worksheet type - all, protected, or hidden.
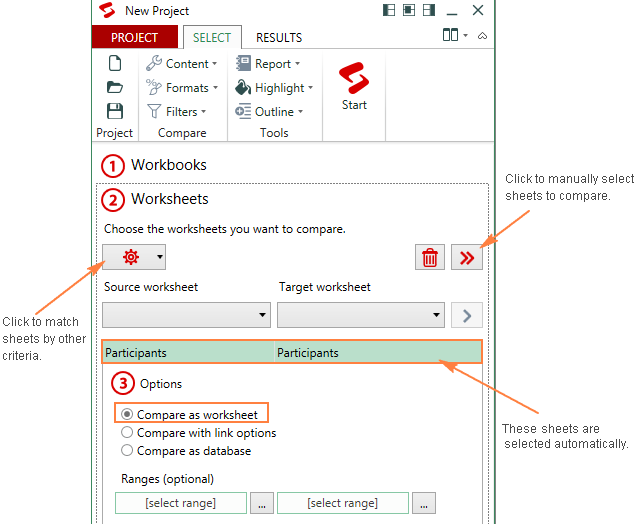
Once you've selected the sheets, the Synkronizer add-in will open them side by side, arranged vertically or horizontally, like in Excel's View Side by Side mode.
- Select one of the following comparison options:
- Compare as normal worksheets - the default option that works in most cases.
- Compare with link options - if the selected sheets do not contain any new or deleted rows and columns, you can compare them "1 on 1".
- Compare as database - recommended for comparing sheets that have a database structure.
- Compare selected ranges - if you do not want to compare the entire sheets, define the ranges to be compared.
- Choose the content types to be compared (optional).
On the Select tab, in the Compare group, you can choose the content type(s) relevant to your current task:

- Under Content, you can select comments and names (in addition to cell values, formulas and calculated values that are compared by default).
- Under Formats, you choose what cell formats such as alignment, fill, font, border etc.
- The Filters option lets you filter out differences that you don't want to display. For example, you can ignore case, leading or trailing spaces, all formulas or different formulas with the same result, hidden rows or column, and more.
- Finally, click the big red Start button on the ribbon and proceed to examining the results.
Visualizing and analyzing the differences
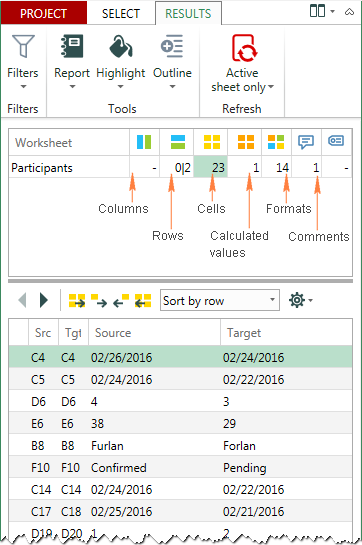
Usually it takes Synkronizer only a few seconds to compare 2 sheets and present two summary reports on the Results tab:
- In a summary report, you can see all difference types at a glance: changes in columns, rows, cells, comments, formats, and names.
- To view the detailed difference report, just click a specific difference type on the summary report.
The following screenshot shows the summary report (in the upper part of the Results pane), and cell difference report (in the lower part of the pane) that were created for our sample sheets:
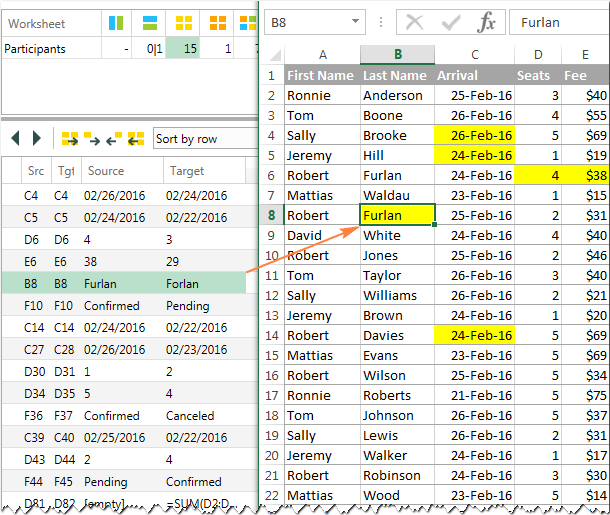
Clicking on a difference in the detailed report will select the corresponding cells on both sheets (the below screenshot shows just one sheet because there's enough room to show both :)
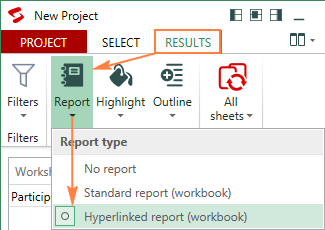
In addition, you can create a difference repot in a separate workbook, either standard or hyperlinked, and jump to a specific difference with a mouse click:
Compare all sheets in two workbooks at a time
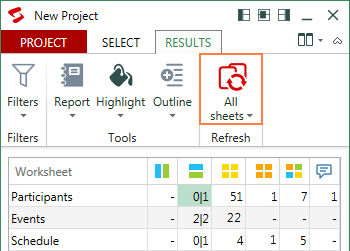
If the two Excel files you are comparing contain multiple sheets, all matching worksheet pairs will be presented in the summary report for your perusal:
Highlighting differences between sheets
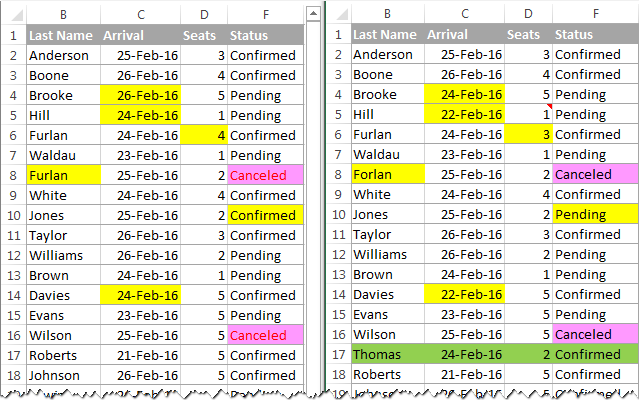
By default, the Synkronizer Excel Compare add-in highlights all found differences, like in the following screenshot:
- Yellow - differences in cell values
- Lilac - differences in cell formats
- Green - inserted rows
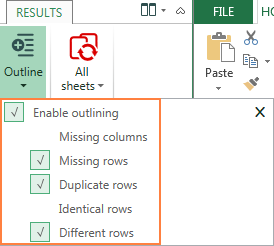
To highlight only the relevant differences, click the Outline button on the Results tab, and select the required options:
Update and merge sheets
The merge function is definitely one of the most useful features of the Synkronizer Excel Compare add-in. You can transfer individual cells or move different columns/rows from the source to target sheet, and have your primary sheet updated in seconds.
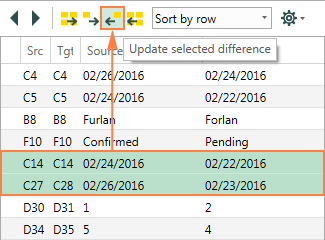
To update one or more differences, select them on the Synkronizer's pane and click one of the 4 update buttons - the first and last buttons update all differences, while the 2nd and 3rd buttons update selected differences only (the button arrows indicate the transfer direction):
Well, these are the key features of the Synkronizer add-in, but there is certainly much more to it. Want to give it a try? An evaluation version is available for download here.
Synkronizer is certainly worth your attention, but it's not the only way to compare files in Excel. A handful of other comparison tools exist, which basically provide the same set of features but in different implementations.
Ablebits Compare Sheets for Excel
The latest version of our Ultimate Suite includes over 40 new features and improvements, the most exciting of which is Compare Sheets - our own tool to compare worksheets in Excel.
To make the comparison more intuitive and user-friendly, the add-in is designed in this way:
- A step-by-step wizard walks you through the process and helps configure different options.
- You can choose the comparison algorithm best suited for your data sets.
- Instead of a difference report, the compared sheets are displayed in the Review Differences mode so that you could view all the differences at a glance and manage them one-by-one.
Now, let's try the tool on our sample spreadsheets from the previous example and see if the results are any different.
- Click the Compare Sheets button on the Ablebits Data tab, in the Merge group:

- The wizard will show up asking you to select the two worksheets you'd like to compare for differences.
By default, the entire sheets are selected, but you can also select the current table
 or a specific range
  by clicking the corresponding button:

- On the next step, you select the comparison algorithm:
- No key columns (default) - works best for sheet-based documents like invoices or contracts.
- By key columns - is appropriate for column-organized sheets that have one or more unique identifiers such as order numbers or product ID's.
- Cell-by-cell - best to be used to compare spreadsheets with the same layout and size, like balance sheets or year-to-year reports.
Tip. If you are unsure which option is right for you, go with the default one (No key columns). Whichever algorithm you select, the add-in will find all the differences, it will only highlight them differently (entire rows or individual cells).
On the same step, you can choose the preferred match type:
- First match (default) - compare a row in Sheet 1 to the first found row in Sheet 2 that has at least one matching cell.
- Best match - compare a row in Sheet 1 to the row in Sheet 2 that has the maximum number of matching cells.
- Full match only - find rows in both sheets that have exactly the same values in all the cells, and mark all other rows as different.
In this example, we will look for Best match by using the default No key columns comparing mode:

- Finally, specify which differences to highlight and which to ignore, and how to mark the differences.
Cell formatting is important to us, so we select Show differences in formatting. Hidden rows and columns are irrelevant, and we tell the add-in to ignore them:

- Click the Compare button and allow the add-in a couple of minutes to process your data and make the backup copies. Backups are always created automatically, so you may not worry about the safety of your data.
Review and merge differences
Once the worksheets are processed, they are opened side-by-side in a special Review Differences mode, with the first difference selected:
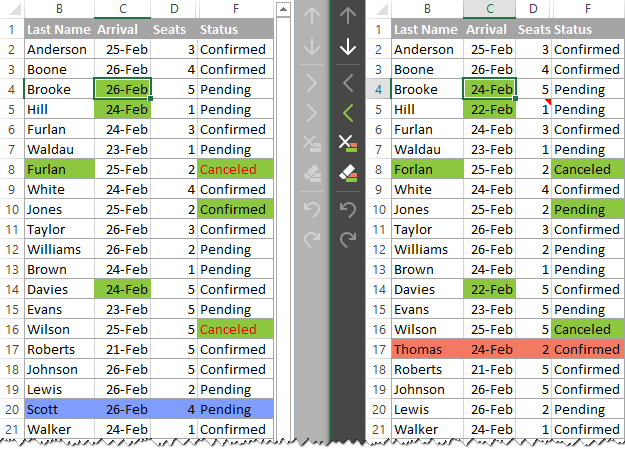
On the screenshot above, the differences are highlighted with the default colors:
- Blue rows - rows that exist only in Sheet 1 (on the left).
- Red rows - rows that exist only in Sheet 2 (on the right).
- Green cells - difference cells in partially matching rows.
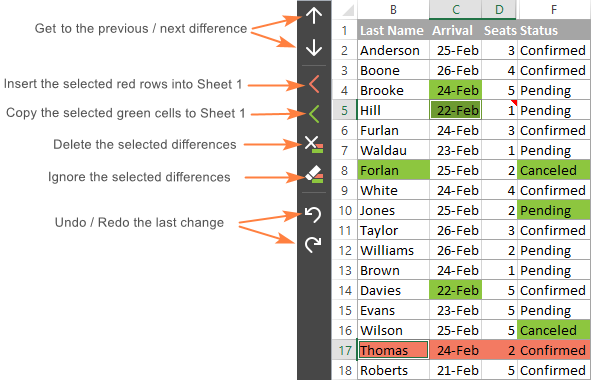
To help you review and manage the differences, each worksheet has its own vertical toolbar. For the inactive worksheet (on the left) the toolbar is disabled. To enable the toolbar, just select any cell in the corresponding sheet.
By using this toolbar, you go through the found differences one-by-one and decide whether to merge or ignore them:
As soon as the last difference is dealt with, you will be prompted to save the workbooks and exit the Review differences mode.
If you have not finished processing the differences yet but would like to take a break for now, click the Exit Review Differences button at the bottom of the toolbar and choose either to:
- Save the changes you've made and remove the remaining difference marks, or
- Restore the original workbooks from the backup copies.

That's how you compare two sheets in Excel with our tool (hope you liked it :) If you are curious to give it a shot, an evaluation version is available for download here.
xlCompare: compare and merge workbooks, sheets and VBA projects
Using the xlCompare utility, you can compare two Excel files, worksheets, names and VBA Projects. It identifies added, deleted and changed data and allows you to quickly merge differences. In addition, it provides the following options:
- Find duplicate records between two worksheets and remove them.
- Update all existing records in one sheet with values from another sheet.
- Add unique (new) rows and columns from one sheet to another.
- Merge all updated records from one workbook to another.
- Sort data on the sheets by the key column.
- Filter the comparison results to display differences or identical records.
- Highlight comparison results with colors.
Change pro for Excel: compare Excel sheets on desktop and mobile devices
With Change pro for Excel, you can compare two sheets in desktop Excel as well as on mobile devices with optional server-based comparison. The key features of this tool are:
- Find differences between 2 sheets in formulas and values.
- Identify layout changes, including added / deleted rows and columns.
- Recognize embedded objects such as charts, graphs and images.
- Create and print difference reports of formula, value and layout differences.
- Filter, sort, and search the difference report on key changes.
- Compare files directly from Outlook or document management systems.
- Support for all languages, including multi-byte.
Online services to compare Excel files
Apart from desktop tools and utilities, there exist a number of online services that let you quickly compare two Excel sheets for differences without installing any software on your computer. Probably it's not the best solution in terms of security, but if your Excel files do not contain any sensitive information why not use some free online service for immediate results?
For example, you can try XLComparator or CloudyExcel, or find some other similar services on the net. This is how the CloudyExcel service looks like:
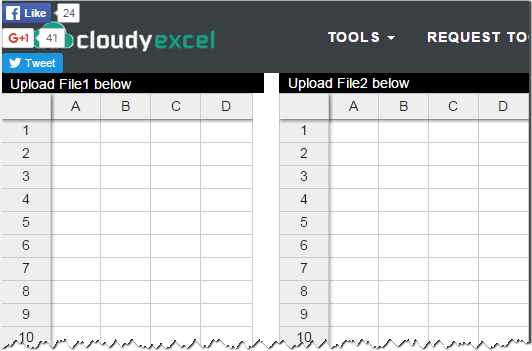
You just upload the two Excel workbooks you want to compare, and click the Find Difference button at the bottom of the screen. In a moment, the differences in two active sheets will get highlighted with different colors:
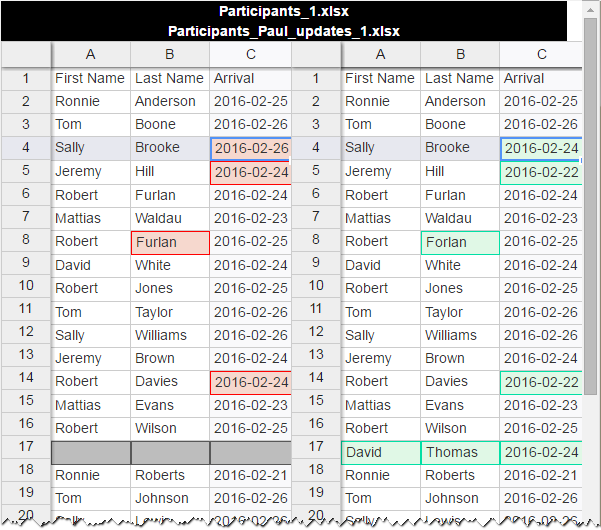
Well, this is how you can compare Excel files for differences. If none of the solutions described in this tutorial is suitable for your task, check out the following resources that cover other aspects of Excel file comparison. And if you know any other ways to compare two Excel files, your comments will be greatly appreciated. I thank you for reading and hope to see you on our blog next week!
 by
by
50 comments
How do you compared to files and pull the results if matching. For example, return the result in file B if cadidate number is matching in file A and B
Hi! If you are comparing the same cell addresses in two files, you can use IF function to solve your problem. You can also use VLOOKUP or INDEX MATCH to find a value.
kindly be of help.
i have two workbook with a worksheet each. i need to compare the two and display any additions/update to the second sheet
Ok for better understanding, i want compare the sajary voucher of the current month with the previous month and discover/display any inclusion in names as well as in values.
Note: the data were mot arranged in thseame order
Hi! Have you tried the methods described in this blog post? If you are not satisfied, please let me know and I will try to help you.
In Excel go to "file" / "option" / "Add-ins" then at the bottom manage "COM Add-ins" and activate "inquire".
Then you get a new tab "Inquire" to compare spreadsheets.
Enjoy
Thank you for your comprehensive instructions.
I used the 'side-by-side' visual comparison instructions and discovered that the two versions of the document contained completely different data in each row.
I compare mainly mailing lists, would it be possible to compare list from File A (original file before mail processing software) to File B (final file after mail processing software based on two columns, say labeled First Name and Last Name, (usually columns A and B) The output file may have some additional columns but I'd like to be able to highlight the changes in File B from the original File A for items like address, city state zip etc. based on the first and last names. The issue I see is that the mail processing software reorders the data so that what would be in line 2 on File A may be on line 2000 on File B. Would your tools be able to navigate that and compare accordingly or is that a situation where adding a sequence or number column to file B to resort both files to something like last name and then compare then resort File B to the sequence column?
Thanks in advance.
Hello!
You can use the Merge Tables tool. Specify the main table and the lookup table and set key columns. A new table will be created based on the main table. Non-matching data will be transferred to this table and highlighted. The order of the data in the key columns does not matter.
Merge Tables tool is available as a part of our Ultimate Suite for Excel that you can install in a trial mode and check how it works for free.
If you have any questions, don't hesitate to ask.
I want 1 master sheet data.which have to update from the multiple data sheets in shame work book on date to date basis as well as when i have choose particular date have master sheets data reflects at particular date.Results are shown only 1 master sheet or consolidated sheets. Please solve my problem. I can send sample data for example of your reply my mail immediately
Hello Harry!
To get data from another worksheet based on a condition, you can try using the FILTER function.
You can also find useful information in this article: Consolidate data in Excel and merge multiple sheets into one worksheet.
You can also use the Combine Sheets Wizard to merge data from multiple worksheets into a single Excel sheet.
The tool is included in the Ultimate Suite for Excel and can be used in a free trial to see how it works.
Hello All,
I am looking for a software/add-in that compares: columns A, B, C, D of workbook 1 with columns E, J, N, V of workbook 2; where I am able to select which columns in the 2 workbooks to compare together.
Is there any feature that can solve this issue?
I appreciate is I can receive any solution for that issue.
Hello!
I'd recommend you to have a look at our Compare 2 Tables tool that can help you search for matches and differences by one or several key columns.
It is available as a part of our Ultimate Suite for Excel that you can install in a trial mode and check how it works for free.
Hi ,
I have query as below.
sheet 1 have columns a,b,c,d
sheet 2 have columns a,b,c,d
I want to create sheet 3 with columns sheet 1 a, sheet 1 b, sheet 2 b, sheet 1 c, sheet 2 c,sheeet 1 d, sheet 2 d comparing Sheet 1 b and sheet 2 b columns. sheet 1 a and sheet 2 b columns values are characters only.
please help
Hello!
Look for the example formulas here: How to VLOOKUP between two sheets. For each column on Sheet 3, use a separate formula.
You can also find useful information in this article: How to merge two or more tables in Excel.
I have two worksheets to compare. Unlike a lot of the worksheets listed here, the worksheets will not have the same names in each row. The worksheets might contain the same names but they will be located in different rows. I am trying to find out what names on Worksheet 1 are also on Worksheet 2? By worksheets, do you mean tabs?
Hello!
If I understand the question correctly, you want to find duplicates in two columns that are in different worksheets. I recommend reading this guide: How to compare two columns in Excel for matches and differences.
We have a ready-made solution for your task. Compare Tables tool may help you solve it in a few clicks. It is available as a part of our Ultimate Suite for Excel that you can install in a trial mode and check how it works for free.
I hope my advice will help you solve your task.
I have two exactly similar sheets where I want to compare the data; however, there is one main difference between the two data-sets.
I must have a version prior to being re-shaped somewhat and many data-fields do not have the same data-type. So, in a typical conditional-comparison using a formula as you show; and as an example, date-columns may be text-type at one sheet and date-type at the other.
Obviously, these data-elements although showing the same date are different because of the data-types.
Will you're excel add-in "Ablebits" be able to ignore the data-type difference? thanks.
Hello!
The Compare Two Sheets, Compare Tables, Compare Multiple Sheets and Compare Two Workbooks tools determine the difference between an actual date and a date recorded as text.
You can convert a text column to a date with one click using the Text to Date tool.
It is available as a part of our Ultimate Suite for Excel that you can install in a trial mode and check how it works for free.
Do you offer a free trial version of software to compare two Excel files for differences?
Hi David,
Our Compare Sheets tool is included in Ultimate suite for Excel. You can download a trial by using this link.
I need a program that will compare two large excel sheets (about 250k records vs 270k records) and output a third sheet showing only (complete) rows in the larger file that are not in the smaller file, ideally based on a selected field. Ready to purchase software that can do this.
Hello!
We have a tool that can solve your task in a couple of clicks: Ablebits Data - Compare Sheets and Ablebits Data - Compare Tables.
This tool is available as a part of our Ultimate Suite for Excel that you can install in a trial mode and use for free: https://www.ablebits.com/files/get.php?addin=xl-suite&f=free-trial
I love you! Made a vast difference in validation and confidence in ongoing formal report submission!
First of all, any line of information is very meaning full. consequently, are they going to function on MacBook as well as windows?
Thanks
Hello Tammy,
All of the third-party solutions described in this tutorial function in Excel for Windows only. The built-in features will probably work in Excel for Mac too, though we have not tested it. Out blog focuses solely on Excel for Windows, sorry.
Dear Svetlana,
the advice is very useful, helped a lot, saves hours of work!
Only one point, the formula for the differences in value I had to change a bit, because it didn't work:
=IF(Sheet1!A4 Sheet2!A4; "Sheet1:"&Sheet1!A4&"vs Sheet2:"&Sheet2!A4;""). - MS EXCEL 2010
Anyway we are using the highlighted values, thank you very much!
Peter
Hi Peter,
It looks like the List Separator in your Regional Settings is set to semicolon, so Excel uses it for separating arguments in formulas. On my computer, it is set to comma :)
Awesome help for a non-expert Excel user. THANK YOU!
In "How to compare two Excel sheets for differences in values", this instruction is unclear:
"...then copy it down and to the right:"
Paste it in cell A1 and then B1, C1, A2, B2,, C2 etc? If that is the case, it doesn't work for me. It copies the same formula in the other cells.
The Excel version is 2010
Hello!
Yes, you copy the formula to A2, A3, etc, and then to B2, C2 etc, to as many rows and columns as you want to compare. But you should not paste it in other cells! In Excel, a formula is copied by dragging the fill handle. The detailed instructions can be found here: How to copy a formula in Excel.
Because we use relative cell references, the formula will change based on a relative position of the column and row. As the result, the formula in A1 will compare cell A1 in sheet1 and sheet2, the formula in B1 will compare cell B1 in both sheets, and so on.
Just wanted to say THANK YOU, this works great and saves a lot of work!!
Sorry that was a quick post.
What I needed was comparing two Excel sheets (a duplicate was created by cloud software and two people had two different versions). So I copied the sheet of one, into the other Excel. And then did the trick highlighting the differences with conditional formatting. Worked out great.
For small worksheets, rather than side-by-side comparison, I open both files and display them full page. Then I switch back and forth between them using Ctrl-F6, and differences are easy to see as they literally "jump out." Make sure column sizes are the same.
Very helpful. This made it very easy to compare 2 spreadsheets that were allegedly the same but had different time stamps. This resolved all differences quickly.
Hi Preethi,
Please make sure you enter the names of the sheets you are comparing. To copy the formula, point to the lower-right corner of the cell with the formula until you see a black plus sign, click on it and drag it to the right and down to fill all cells that you want to use for comparison. You will see that the formula changes in each cell to reflect the corresponding reference, e.g. in A1 you will see
=IF(Sheet1!A1<> Sheet2!A1, "Sheet1:"&Sheet1!A1&" vs Sheet2:"&Sheet2!A1, "")
in A2 it will change to
=IF(Sheet1!A2<> Sheet2!A2, "Sheet1:"&Sheet1!A2&" vs Sheet2:"&Sheet2!A2, "")
Thus if values differ in the compared cells, the formula will display the change.