In this blog post, we delve into the various techniques and features available to customize your Google Docs. Follow these tips and tricks to be well on your way to creating documents that convey your content effectively and look polished and visually captivating.
When you want to make documents look really professional and nice to read, it's super important to learn how to style the text properly. Google Docs offers a range of text formatting tools that will transform your documents from bland to outstanding.
How to use text formatting in Google Docs
Text formatting is crucial in conveying emphasis, clarity, and structure within your documents. Google Docs provides a range of text styling options to help you achieve these objectives.
How to change font style in Google Docs
The first thing I'd recommend changing is the font style (and its size).
Picking the most suitable font size and style in Google Docs from the start will minimize the need for retroactive formatting changes along the way. You'll be able to focus on the layout and content knowing that the main visual element is already set.
- Select all text (Ctrl+A or Command+A on Mac) or a certain text you'd like to change and open the Font dropdown from the Google Docs toolbar:
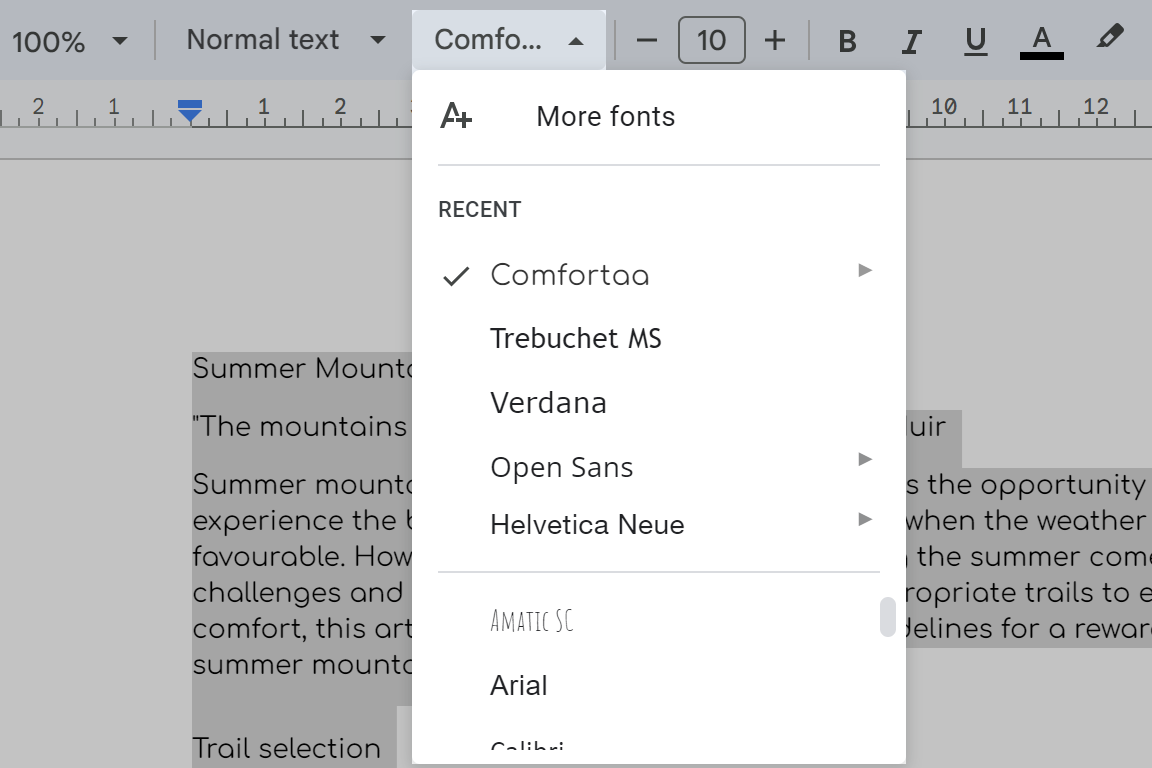
- The first fonts you'll see are your recent ones. It's the last 6 fonts you've used in your documents. The font applied to your currently selected text will be marked with a tick.
Below are some other standard fonts often used in different documents.
To change font style in Google Docs, click on any font. You can quickly go through multiple fonts to see which one you like better in action.
Tip. Additionally, you are free to add a custom font to your Google Docs. Click More fonts at the top of the drop-down:

A special window will appear where you'll be able to scroll through tens of different custom fonts for Google Docs:
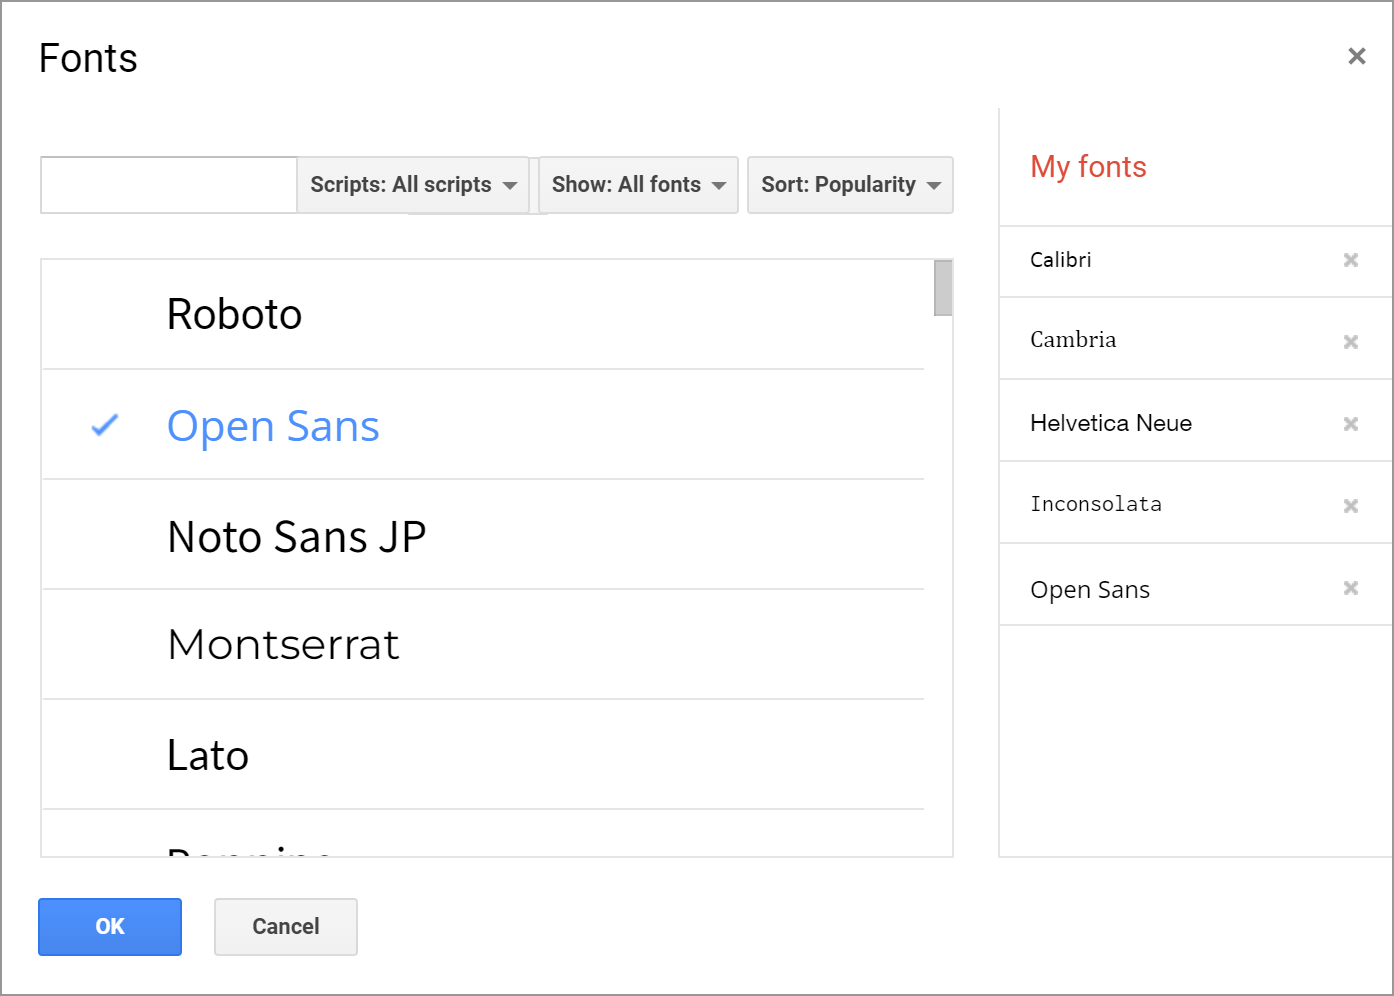
Once you find the ones you love, just click on them and they will appear in the list of your fonts in both the right panel and the drop-down with the available fonts.
Changing the font size is just as easy and the required buttons are right next to the font style on the Google Docs toolbar:
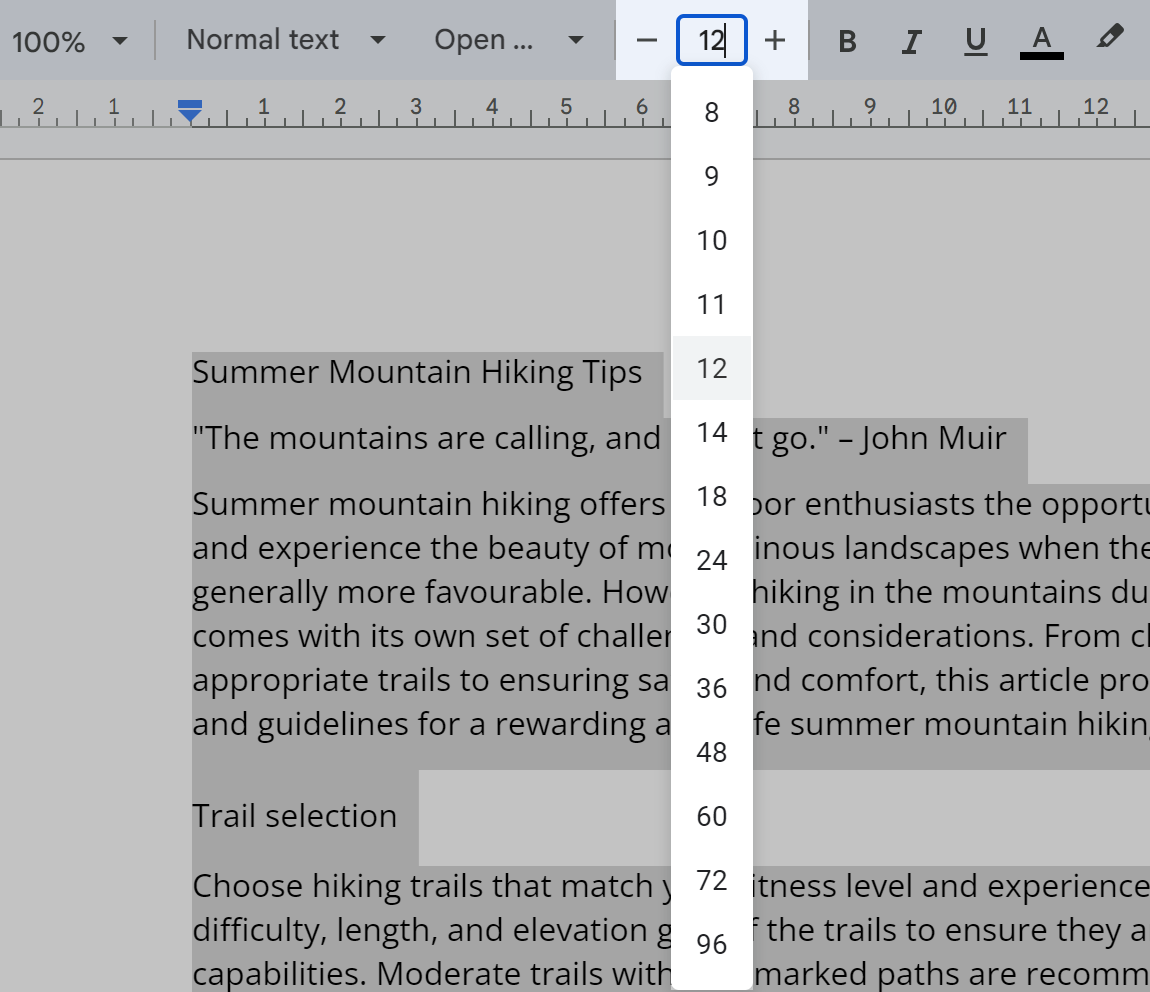
Use these to:
- increase or decrease the current font size (or use Ctrl+Shift+. and Ctrl+Shift-. hotkeys instead)
- pick one of the predefined font sizes from the drop-down
- enter the exact size from your keyboard
Bold, italic and underline
To make your text stand out and grab attention, you can use bold formatting, and italicized or underlined text.
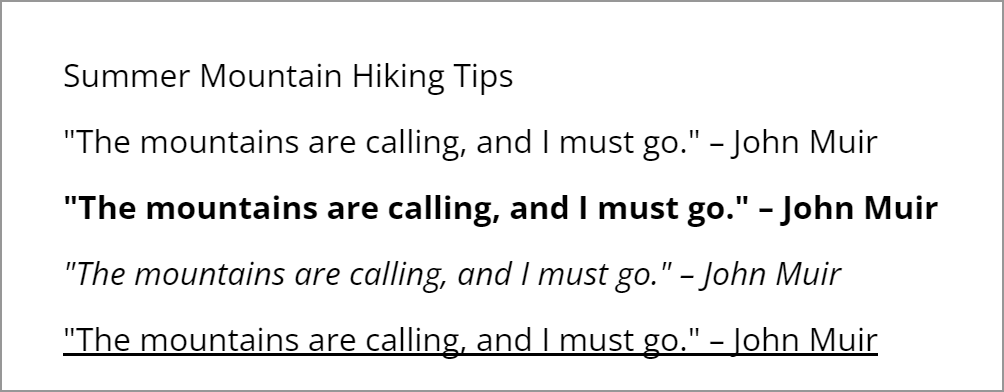
All three settings are located next to each other on the Google Docs toolbar. You just need to select the text and click one of the buttons:

Your selected part will change right away so you can instantly decide whether this formatting is needed here since each looks different and takes up different space:
Tip. Besides the toolbar, there's another way to indicate a different tone for your text. You can apply these Google Docs formats using shortcuts:
- Ctrl+B for bold (Command+B on Mac)
- Ctrl+I for italic (Command+I on Mac)
- Ctrl+U for underline (Command+U on Mac)
Of course, you can apply all three formatting Google Docs styles to the same piece of text or mix & match with just 2 of them.
To remove these Google Docs styles from text, simply click the icons on the toolbar or press the shortcuts on your keyboard again.
Strikethrough
Sometimes, conveying information involves showing what has changed or is no longer valid. Strikethrough is a text formatting tool that helps you visually indicate that a particular portion of text should be disregarded. You can also use strikethrough to add a touch of humor or irony to your text.
Though there's no button for this option, you can easily apply strikethrough to a portion of text in Google Docs by using the Alt+Shift+5 shortcut.
The selected text will appear with a horizontal line through it, indicating that it's no longer relevant or has been revised:

Whether you're editing, revising, or simply highlighting changes, strikethrough in Google Docs is a simple yet effective way to communicate modifications.
Text & highlight colors
To enhance the visual appeal or emphasize important points even more, don't neglect text and highlight colors. Using them strategically or creatively will make a significant difference.
Text color will change the color of letters. Highlight will color the white background behind the text.
- Select the part you want to emphasize and click on Text color or Highlight color:

- A color palette will appear:
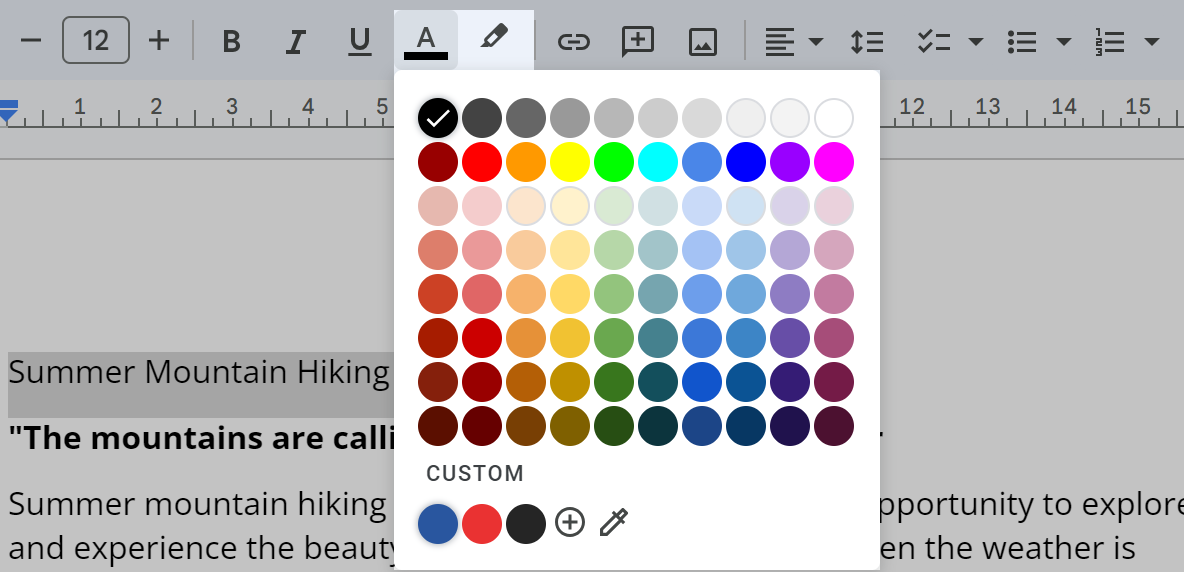
You can pick a hue from predefined colors or click one of the icons at the bottom of the palette:
- the plus icon will let you add your own custom color:
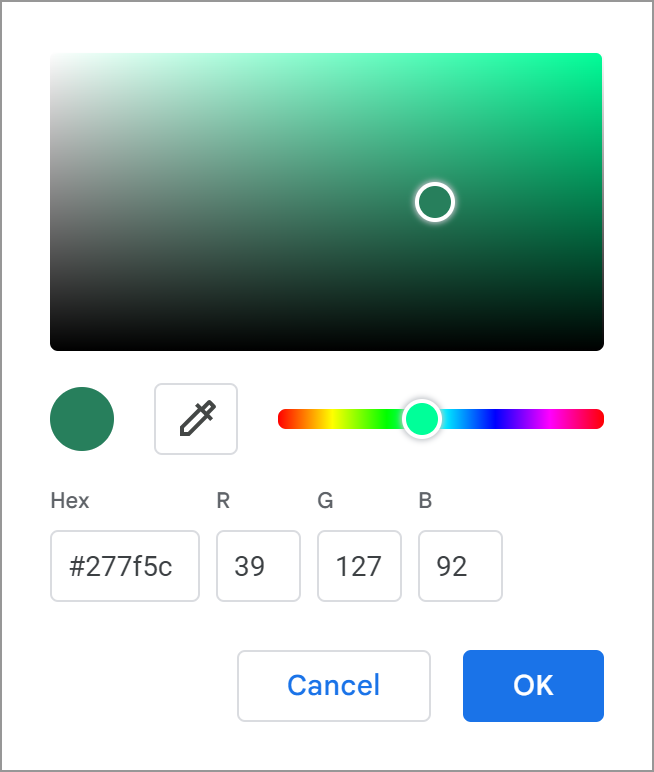
- the color picker icon lets you pick the color from somewhere on your document or screen in general:
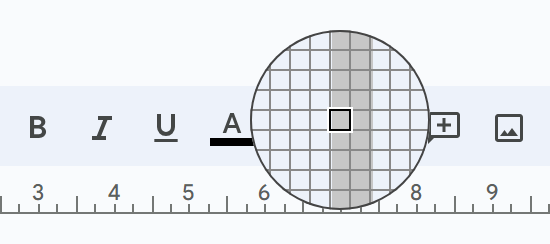
- the plus icon will let you add your own custom color:
Note. When using text and highlight colors in Google Docs, it's important to ensure adequate contrast for optimal readability. Choose such color combinations for your text that provide enough contrast between the text itself and its background to make your content easily legible.
Whatever color you choose, it will either update your selected text or make its background stand out within the document:

Tip. Remember to strike a balance between creativity and readability when playing with colors. Stay consistent with your color choices to maintain a professional and organized appearance.
To remove the text color, simply pick the black one back. To remove the highlight color, pick None from its dropdown.
Style Google Docs text using the paint format tool
I cannot help but mention one small tool to work with the formatting. Instead of applying the same visuals over and over again, you can copy them from any portion of your text.
I'm talking about the Paint format:

This tool acts as a formatting brush allowing you to copy the style in Google Docs, size, colors, bold/italic/underline and other formatting of one piece of text and apply it to other parts of your document:
- Format a text selection to your liking.
- Select the formatted text only.
- Click on the Paint format icon in the toolbar.
- Click and drag your cursor over the text you want to apply the formatting to.
The chosen text will adopt the formatting of the initial selection.
Tip. To apply the formatting to multiple selections, double-click the Paint format icon to keep it active until you're done.
Improve readability with line spacing and alignment
When it comes to styling documents in Google Docs, aesthetics and readability go hand in hand. Proper alignment, indentation, spacing, and effective use of lists are essential if you want to engage with your material effortlessly.
Alignment & indentation
The way text is aligned on a page can significantly impact the document's organization and structure. Google Docs offers four (4) main alignment options for the selected text:

- Left align. This is the default alignment for most texts, suitable for paragraphs and body text.
Can also be applied with Ctrl+Shift+L (Command instead of Ctrl for Mac).
- Center-aligned text is useful for headings, titles, and elements that you want to draw attention to. It creates a balanced and visually appealing presentation.
Can also be applied with Ctrl+Shift+C (Commandinstead of Ctrl for Mac).
- Right-aligned text is often used for specific elements like dates or addresses. Of course, you are free to incorporate it as you see fit, for quotes, for instance.
Can also be applied with Ctrl+Shift+R (Command instead of Ctrl for Mac).
- Justified alignment makes both the left and right edges of the text block aligned. It is often used in formal documents like reports and essays.
Can also be applied with Ctrl+Shift+J (Command instead of Ctrl for Mac).

As for indentation, it helps create a visual hierarchy. It's usually used to block quotes, bullet points, and more.
You can increase and decrease the existing left indentation using the corresponding shortcuts: Ctrl+] and Ctrl+[ (Command instead of Ctrl for Mac); or the Google Docs menu: Format > Align and indent:
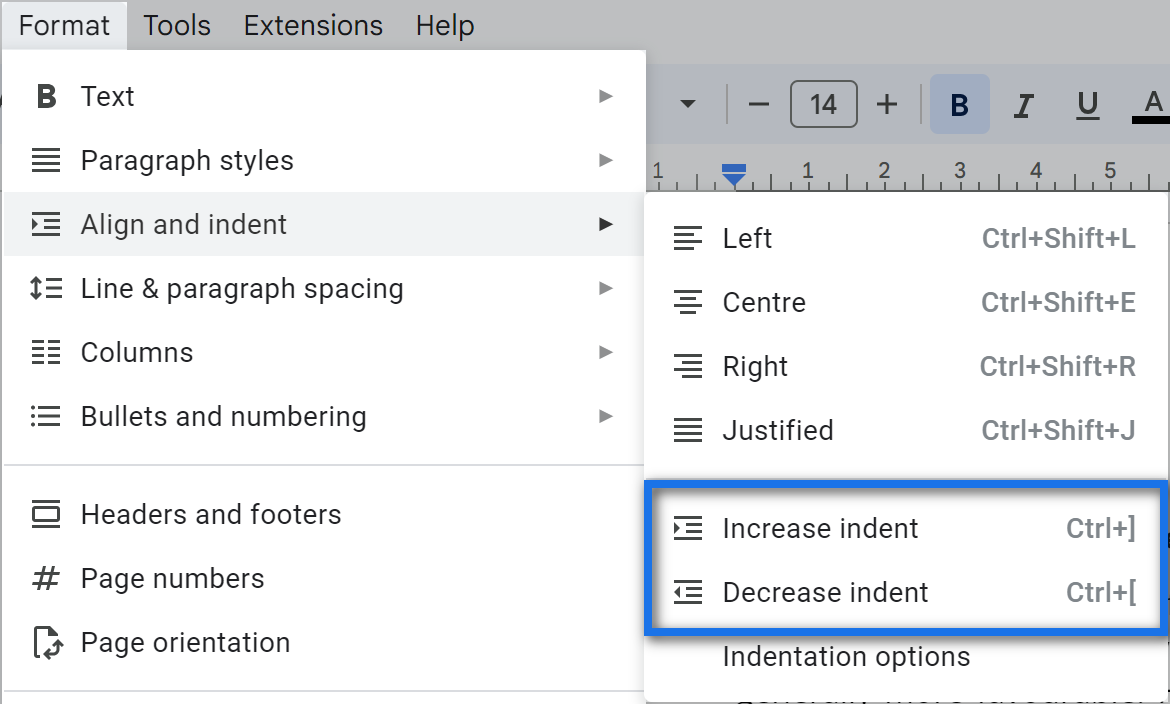
If you pick the bottom setting from this menu — Indentation options — you'll be able to specify indentations in centimetres and even pick a special indent whether First line or Hanging (for all lines but the first):
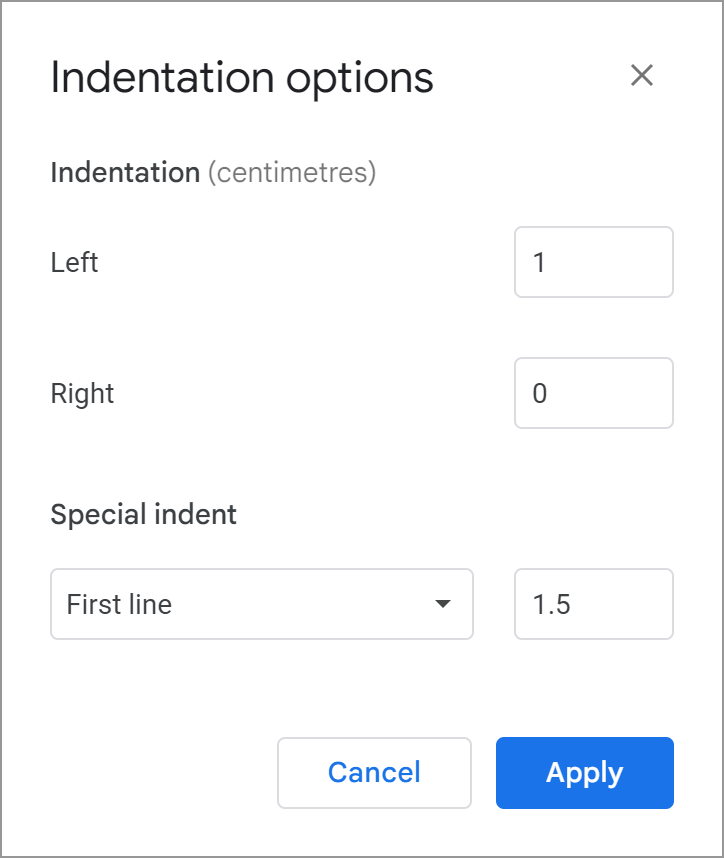
Experiment with different alignment options and indentation levels to find the best visual structure for your content.
Line & paragraph spacing
Optimal line and paragraph spacing are key elements for your document's readability. Let's see how you can adjust line and paragraph spacing to prevent text from feeling cluttered or too spread out.
You'll find these settings either under the Format > Line and paragraph spacing menu or right on the toolbar:
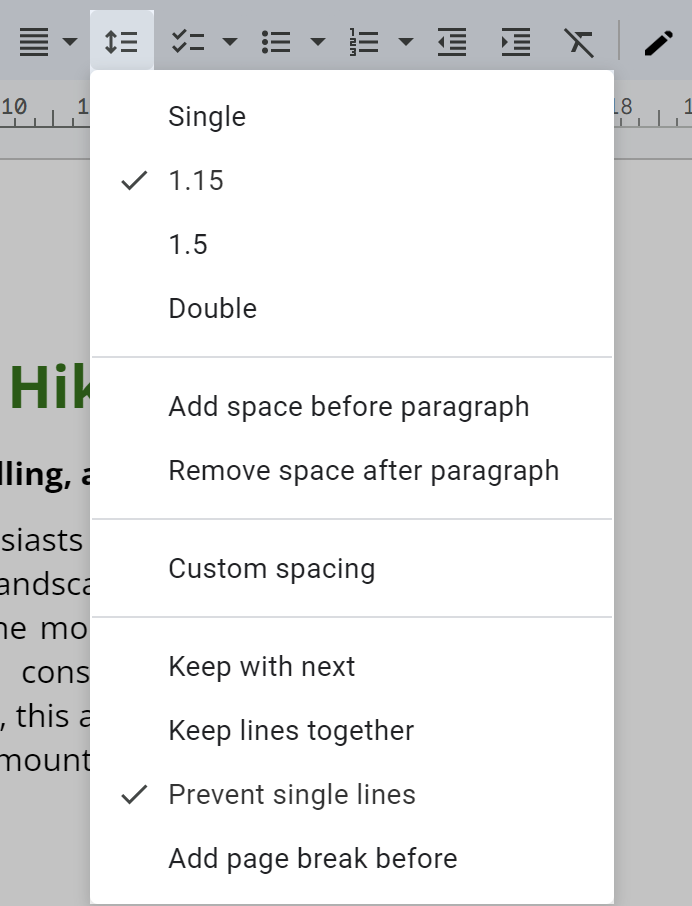
- The first 4 settings — single, 1.15, 1.5, double — offer various breathing rooms between the lines.
- The next two — Add/Remove space before/after paragraph — visually separate the content blocks. Use these to distinguish different sections easily.
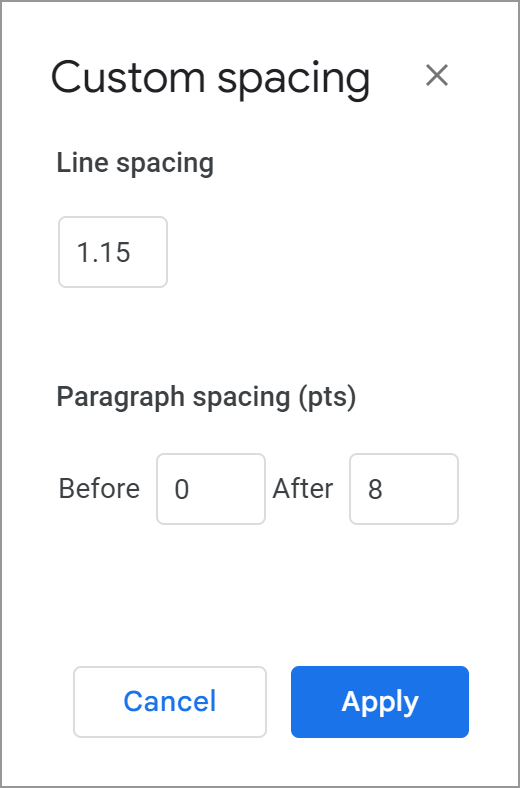
- Custom spacing lets you specify the parameters as numbers in case the default ones don't do the job:
- Keep with next and Keep lines together will make sure your paragraphs or lines are not divided into different pages.
- Add page break before, on the contrary, will move the selected block to a new page.
- Prevent single lines, well, prevents single lines at the beginning or the end of your section (paragraph) from being left out on a page. It always keeps at least two lines of text together.
Note. Some options are not available in the pageless format.
By mastering line and paragraph spacing techniques in Google Docs, you can create documents that are both aesthetically pleasing and easy to read. Try different options to find the ideal balance that suits your document's purpose and possible co-editors or readers.
Bulleted and numbered lists
Lists provide a way to break down complex ideas and clearly convey the info. In Google Docs, these lists are easy to create and customize since the options are also at hand on the toolbar :)

Select the text that you want to turn into a list and click either Bulleted or Numbered list icons.
Tip. Or use the shortcuts ;) Ctrl+Shift+8 for bullets, Ctrl+Shift+7 for numbers. For Mac, it's the Control key instead of Ctrl.
Your text will immediately transform into a list, adding it structure and helping follow its items step by step:
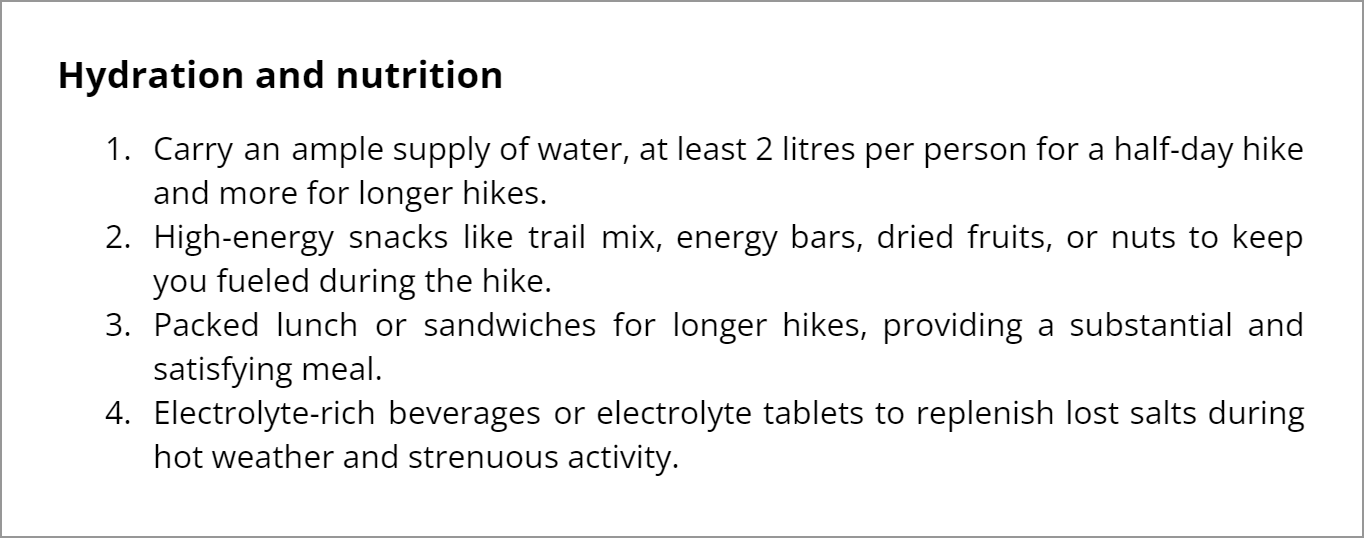
What's more, you can create lists with multiple levels for both bulleted or numbered lists when more complex content organization is required. Just press Tab after creating a list item to indent and turn it into a sub-item:
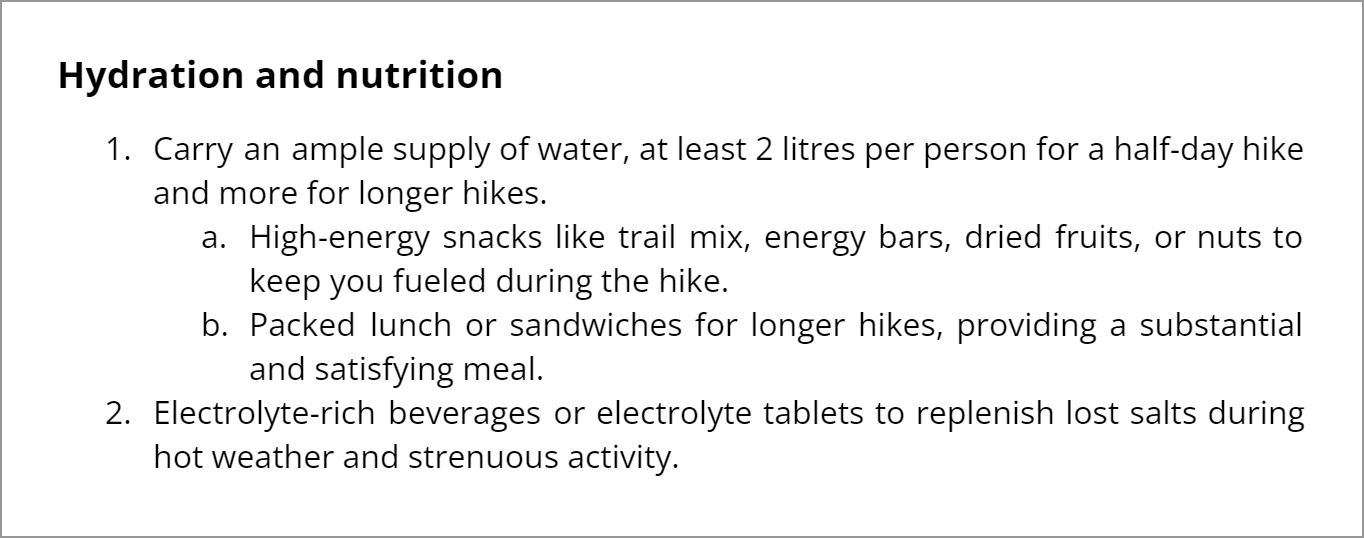
Tip. Press Shift+Tab to turn the sub-item into the main list item.
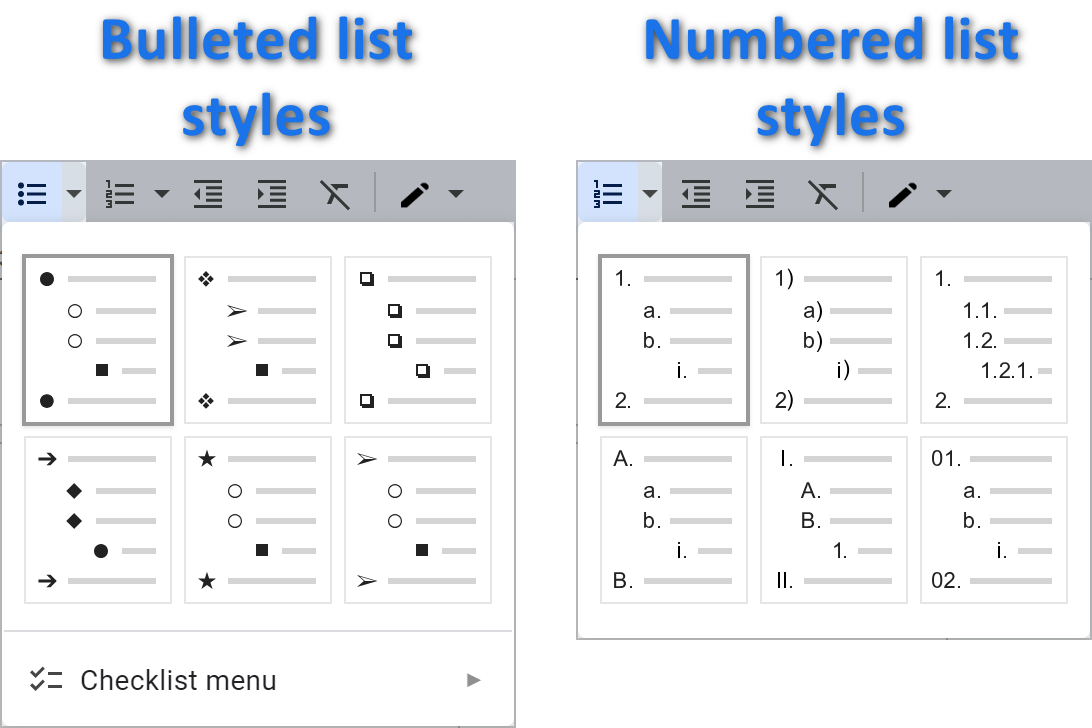
Additionally, Google Docs lets you pick the style of the symbols for your list. If you click the down arrows next to the options on the toolbar, you'll see 6 built-in variants for each list:
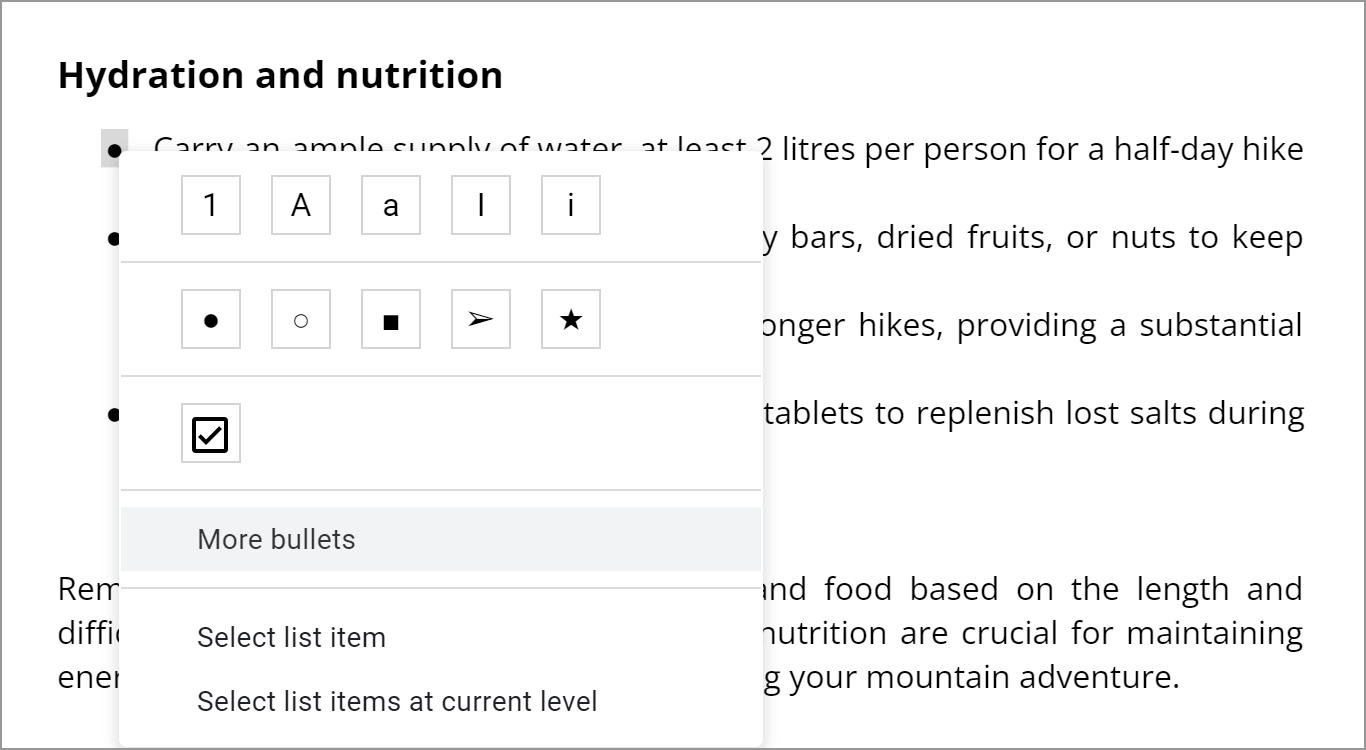
However, you can use custom symbols for each list adding a personal touch to your content. Select one of the bullets in your list (all will be selected automatically, within the list) and right-click it. Pick More bullets from the context menu:
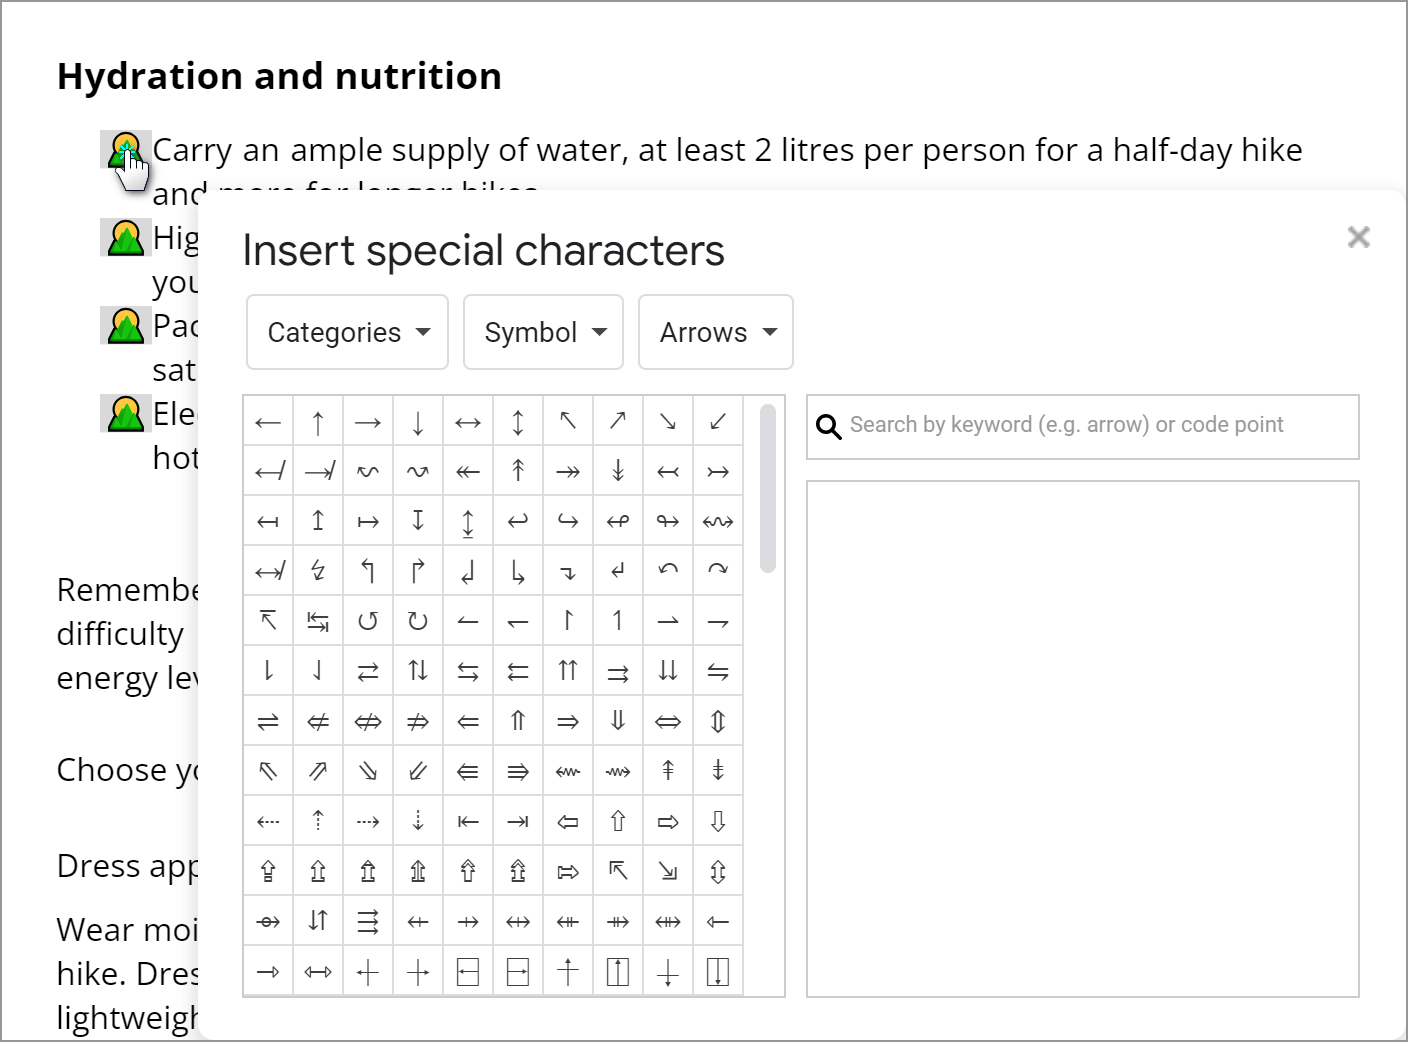
You'll see a window with tens of characters to choose from, including numbers, symbols from other languages, emojis, currencies, etc. Just find the one you like best for your list or draw your own symbol in a special field in the same window.
I picked mine using the search by the word mountain:
Headings & styles: enhancing Google Docs structure
Creating a well-structured Google document is essential if you want to guide your readers through your content. The tools from this section will help you achieve a clear hierarchy and visual consistency within your documents.
How to add headings in Google Docs
Headings provide a roadmap for everyone reading/working with the document, making it easier for them to navigate through.
To add headings in Google Docs, click somewhere in the paragraph that should act as a heading, then open the Normal text dropdown on the toolbar and choose the appropriate heading level from Title, Subtitle or Heading:
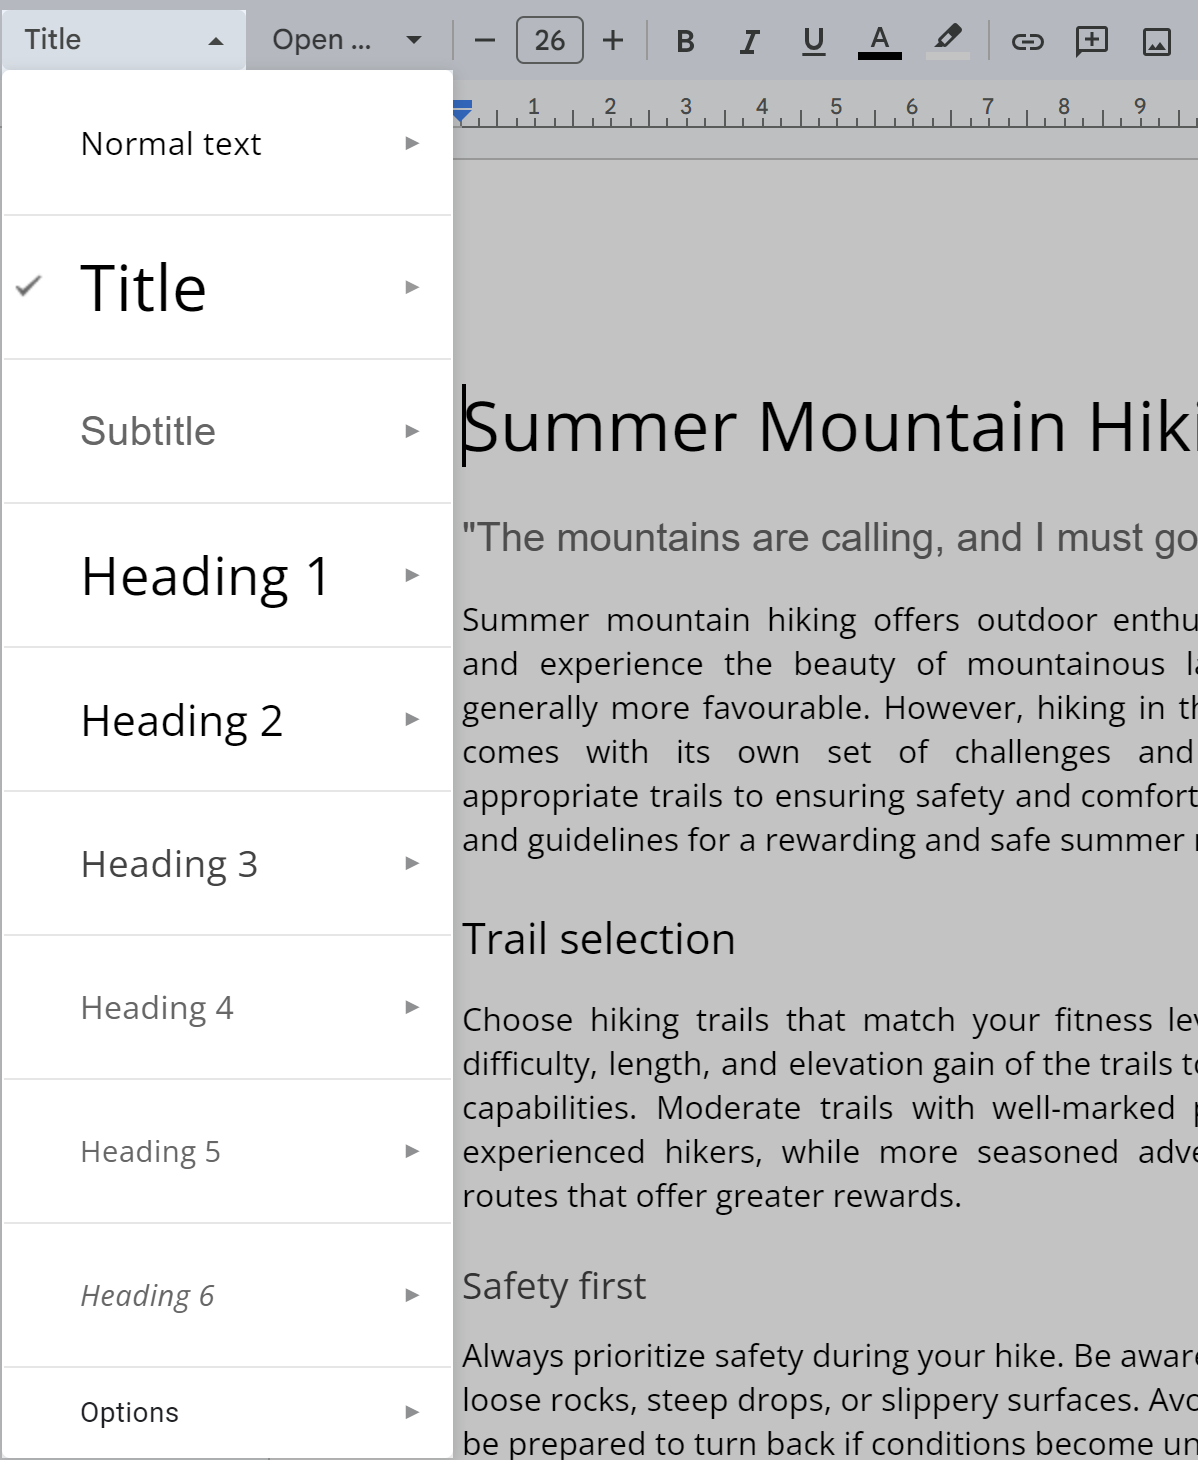
Tip. The more heading levels you use in Google Docs, the more extra levels will be available in the dropdown.
How to edit all headings in Google Docs at once
So you added headings in your Google Docs, what's next? You will most likely want to edit them: set the proper alignment, indentation or change colors, make them bold or underlined, etc.
Luckily, there's a smart option that lets you do that with all headings of a similar level in Google Docs in just a few clicks.
Let's suppose it's Headings 2 you'd like to format.
- Pick one heading of the 2nd level and right-click it.
- In the appeared context menu, choose Format options > Select matching text:

- All headings on Google Docs that share a 2nd level will be automatically highlighted and ready to be changed:
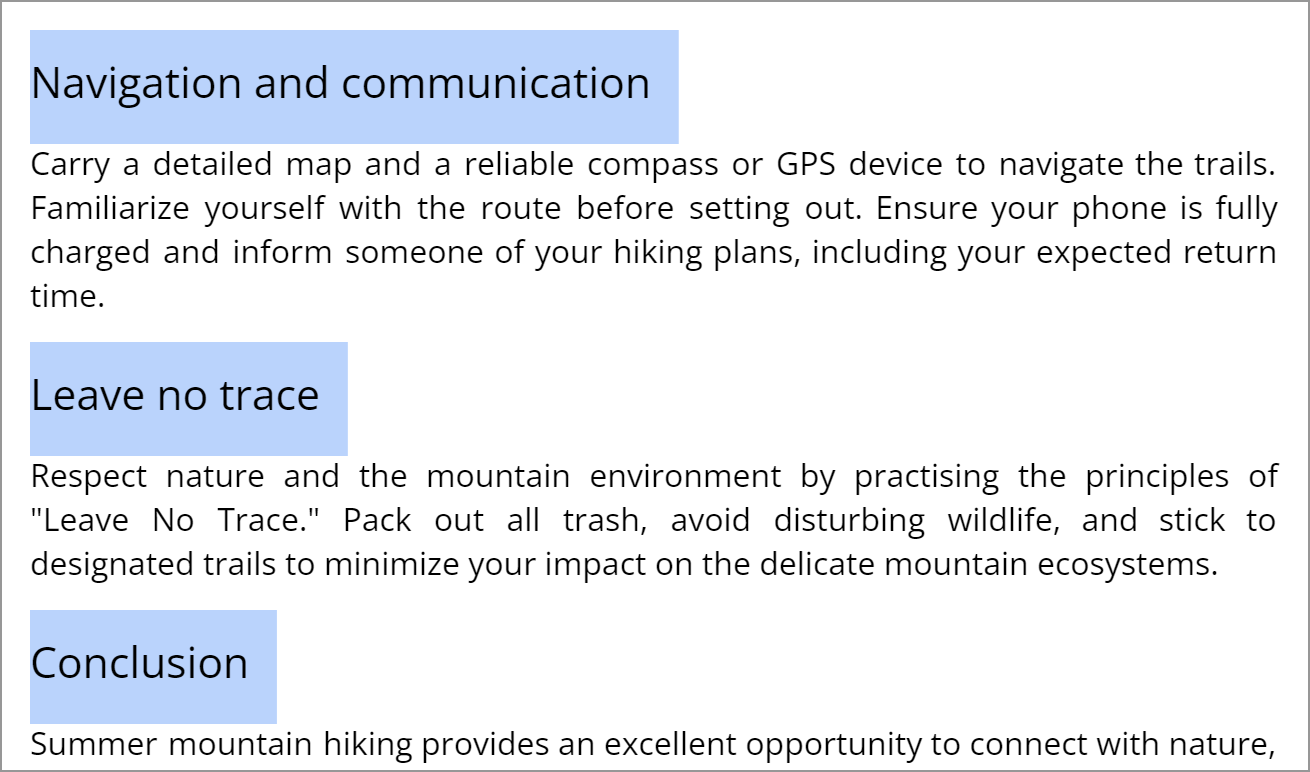
- So go ahead and adjust their formatting: their font, size, colors, etc. Everything you do will edit all headings selected at the moment in Google Docs:

Tip. This way is great to edit not just headings but the normal text as well.
Creating a table of contents
A well-organized document often includes a table of contents (TOC) that acts as a roadmap for readers. In Google Docs, you can create a table of contents that dynamically updates as you edit your content. This feature is particularly handy when your document contains several sections or subsections.
Generate TOC from headings on Google Docs
Google Docs knows how to automatically generate a table of contents based on your headings and place it whenever you need in the document:
- Make sure to add headings to your document as I described in the previous section.
- Place your cursor where you want the table of contents to appear and go to Insert > Table of contents in the menu:
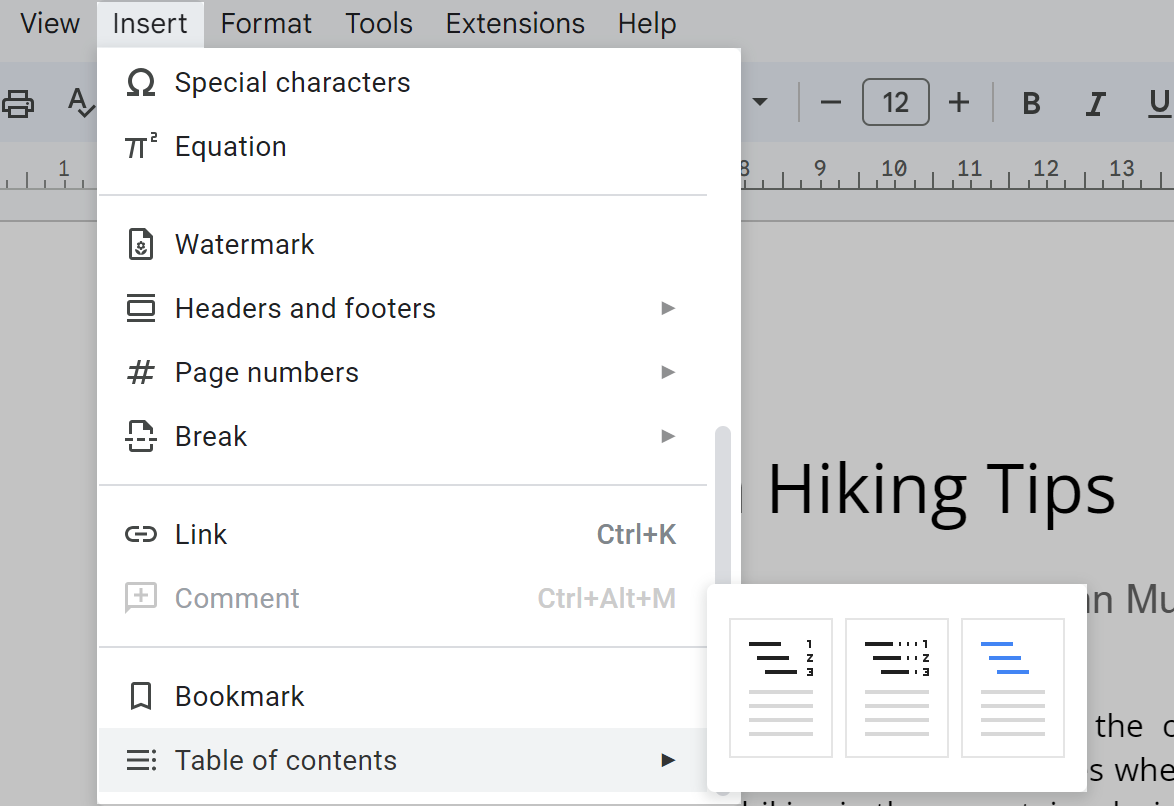
- Click on the style of the TOC that suits your document (Plain text, Dotted, Links) and will appear right away:
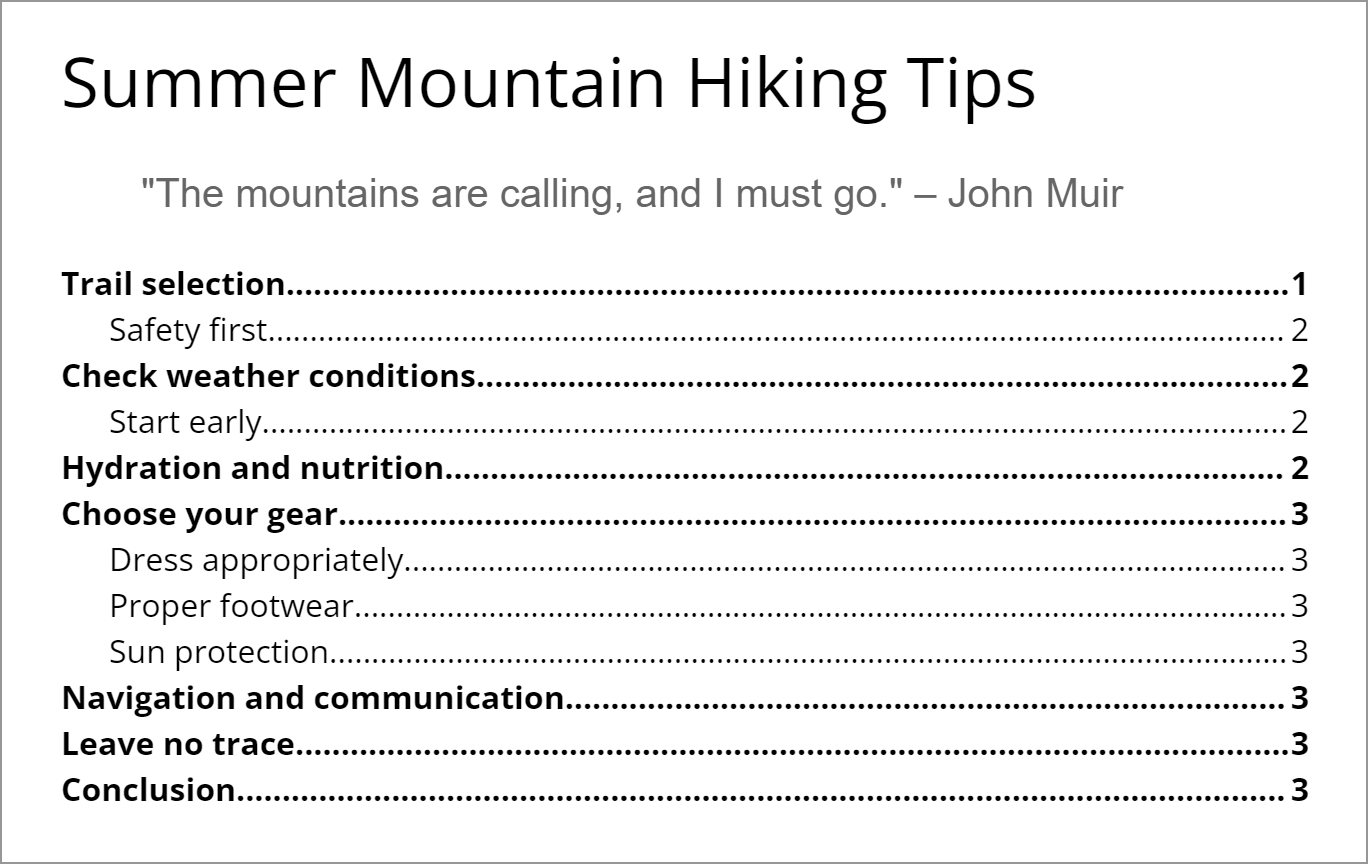
Each item in the TOC will be linked to its related section (even if you pick the style that doesn't look like it contains links).
One of the downsides of this TOC is that while you edit and rearrange your sections, it doesn't update automatically. However, there's a special option that appears right for this purpose once you click somewhere inside your TOC:
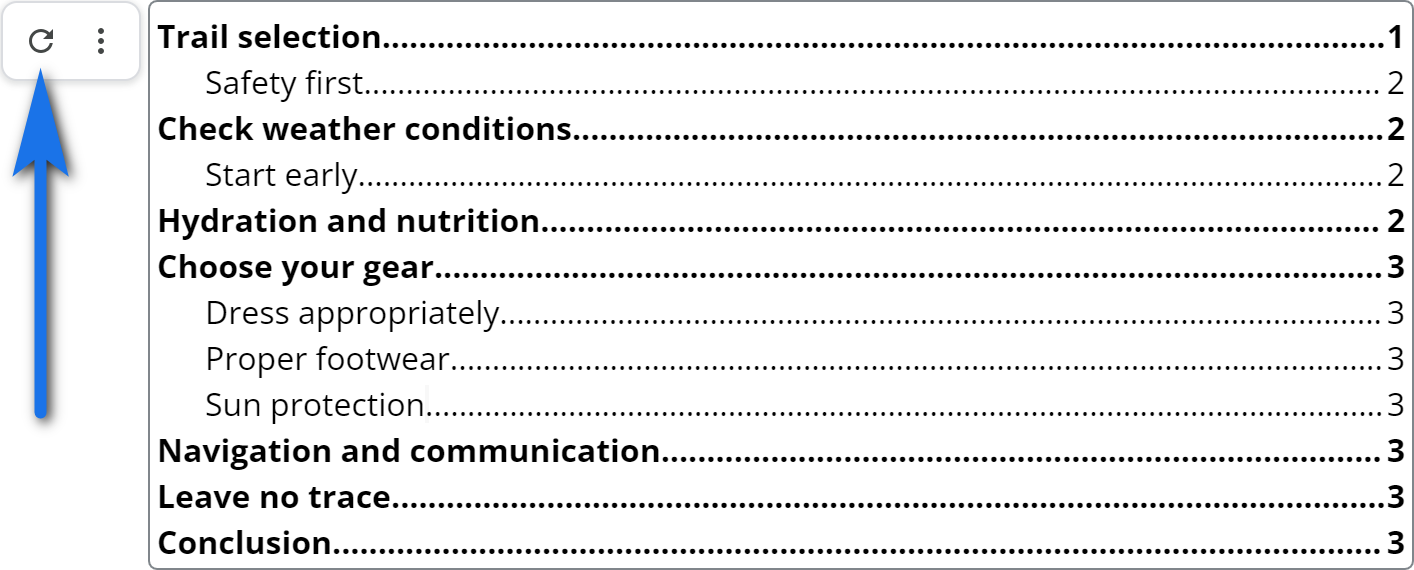
TOC outline: same concept, different purpose
An outline in Google Docs serves a similar purpose to a table of contents: it helps you create an organized structure. The only difference is that it's located not within the pages but on the side: as part of the Google Docs interface.
To turn on the outline, press Ctrl+Alt+A (use Command instead of Ctrl for Mac) on your keyboard or go to View > Show outline:
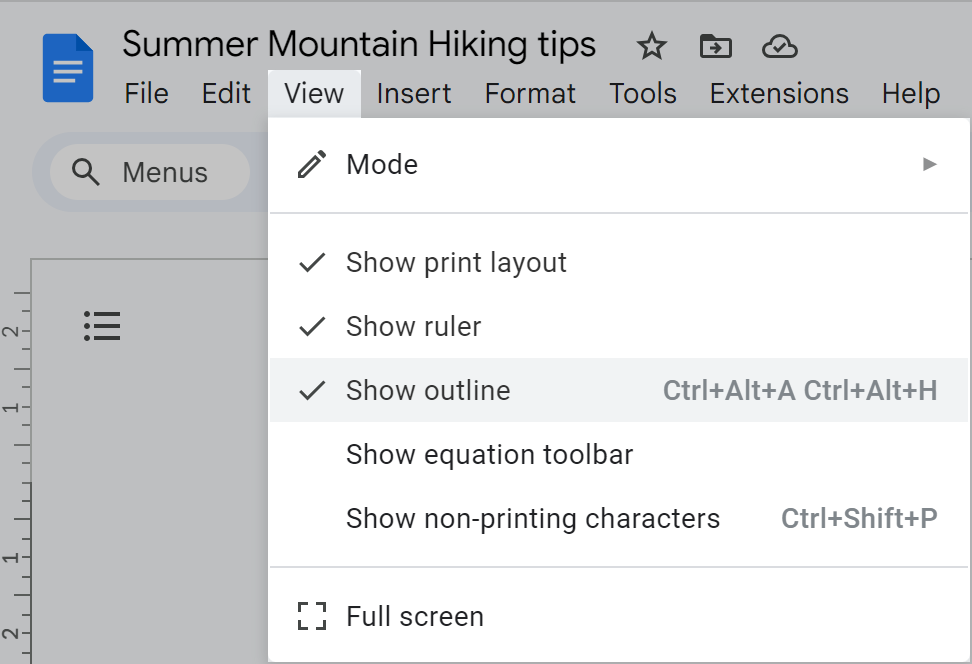
The outline will appear on the right side of your Docs as a list of all headings and subheadings from your document, making it easy to jump to specific sections while you're working on your content:
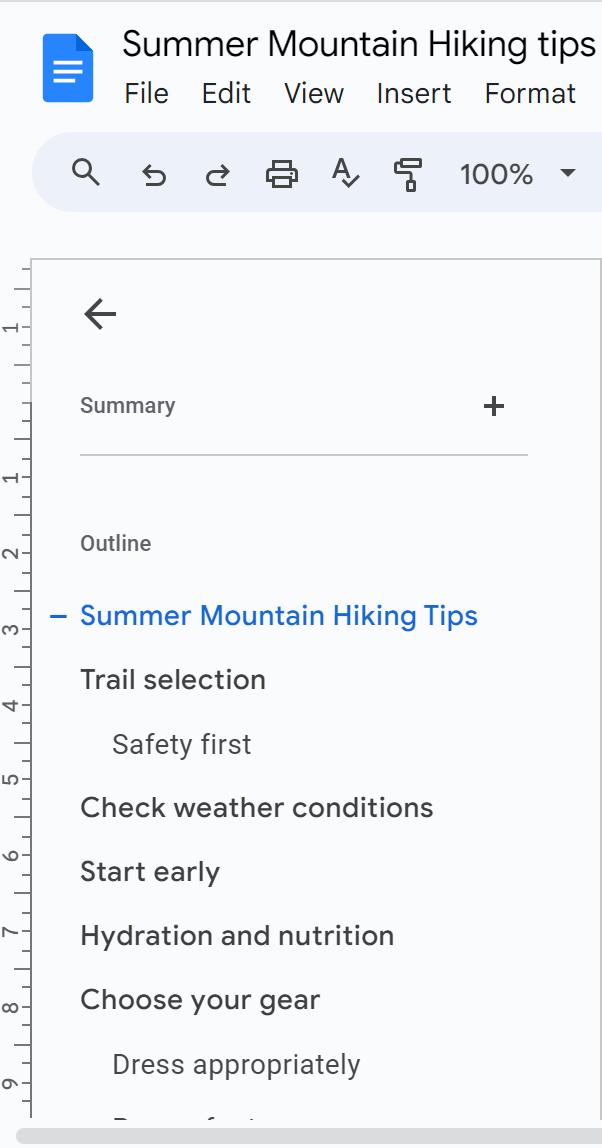
Note. Both the table of contents and the outline rely on properly formatted headings on Google Docs. Ensure your headings are consistently applied for accurate results.
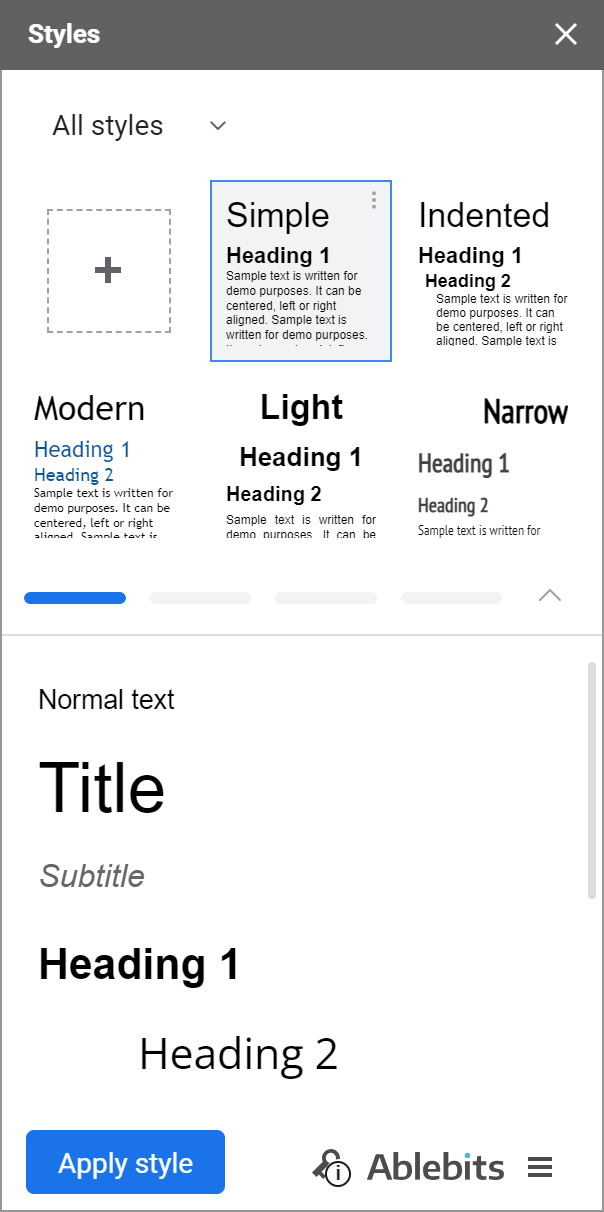
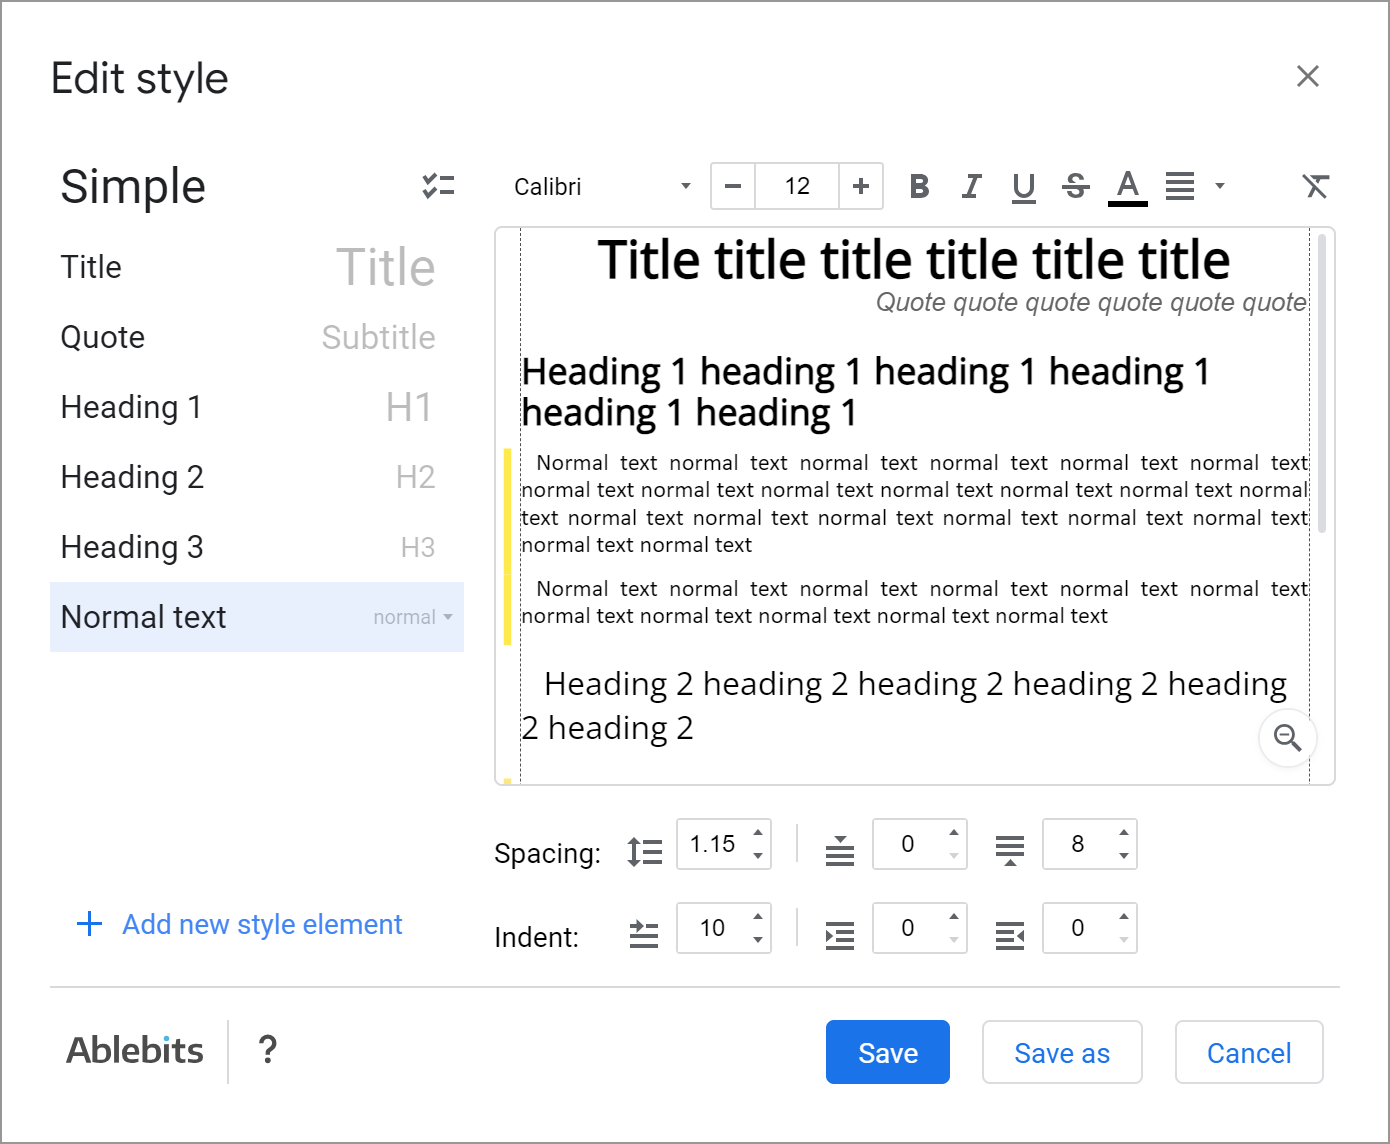
When customizing Google documents, you might have a specific look in mind that aligns with your brand or personal preference. Custom styles in Google Docs enable you to save your preferred formatting settings, allowing you to apply them consistently across your documents. The standard feature lets you save only one style as your default one for all future documents: You'll see the confirmation message from Google Docs that your style has been set. Now when you start the new document, the font, its size, color, and headings will look as you prefer from the start by default. To apply this style to other Google documents, go to Styles > Options > Use my default styles. Most likely, you already see the major drawback of this instrument: you can save & use only one style at a time. But what if I told you there's a way to create tens of custom reusable styles for different purposes in Google Docs? If you're looking to take your document styling to the next level, the Styles add-on for Google Docs is a real game-changer. It empowers you to create a multitude of custom styles, save them for future use, and effortlessly apply them to your entire document or specific sections. As a nice bonus, it goes with built-in 20+ style templates for your Google Docs to choose from. So it all goes down to this side pane where predefined and your custom-made style templates are neatly organized. The lower part of the pane is a preview of the title, normal text and headings used for a selected style:
This add-on gives you broad freedom of action: The Styles add-on for Google Docs will be your sidekick if you crave efficiency without compromising on aesthetics. To play with it around, install it by clicking the button below. After installing, you will find it under the Extensions menu in your Google Docs. This 1.5-minute demo video will describe the functionality better than a thousand words:
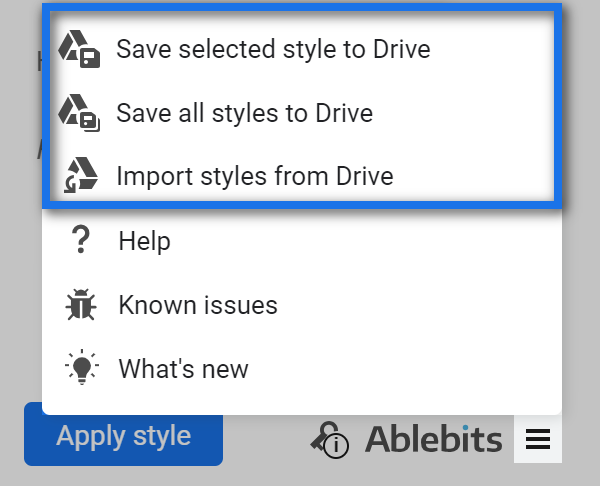
Since collaboration is at the heart of many Google Docs projects, sharing consistent styles among team members is crucial for maintaining a unified document appearance. Fortunately, Styles add-on for Google Docs allows you to share custom styles with your teammates so everyone is on the same page in terms of document formatting. At the bottom of the add-on there is an icon with three lines. Click it and you'll find the options I'm talking about:
This way you will be sure that everyone is using the same styling guidelines, enhancing the professionalism and visual appeal of all documents!
How to change default style in Google Docs
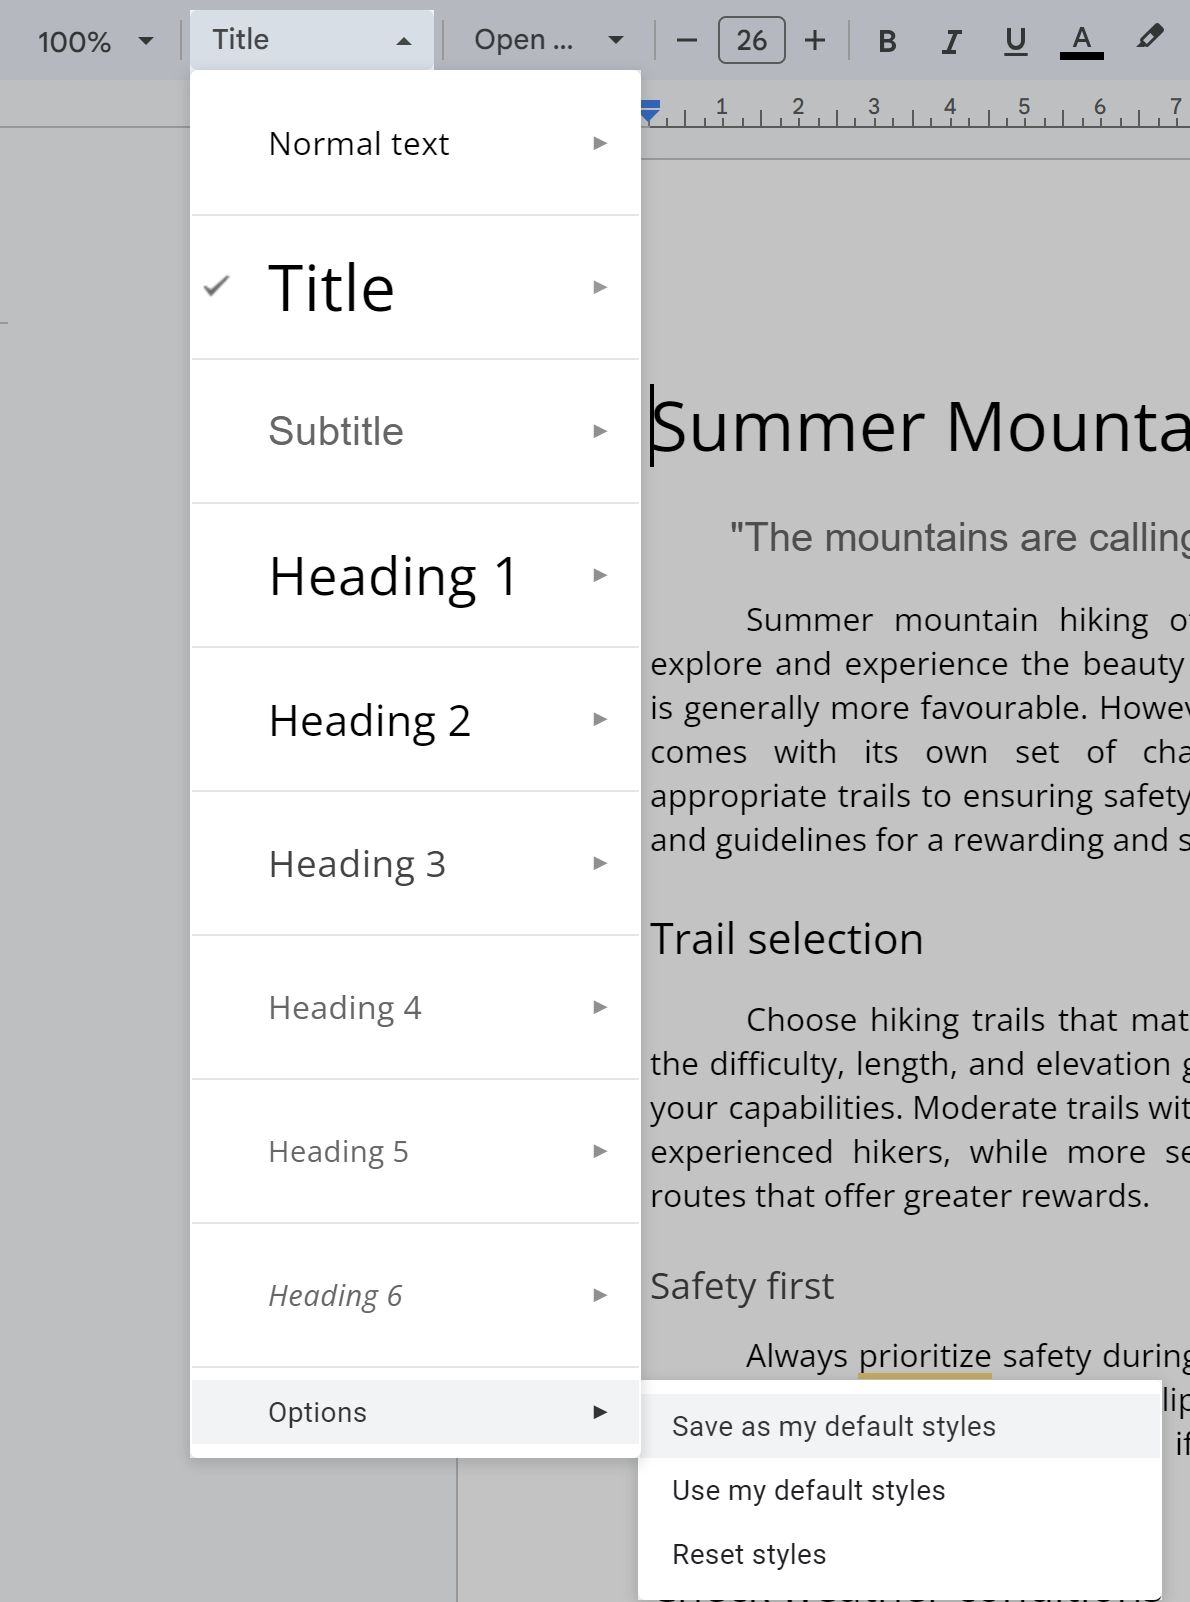
Create multiple reusable custom styles in Google Docs
Video: Styles add-on for Google Docs: customize your documents
Share Google Docs styles with teammates
Mastering text styling in Google Docs is not just about making your documents visually appealing; it's about effectively conveying your ideas and engaging your audience.
Whether you're working on an academic paper, crafting a report or simply sharing your thoughts, understanding these styling & customization techniques will give your Google documents an edge. By following the tips and tricks outlined in this guide, you'll be well on your way to creating documents that convey your content effectively and look polished and visually captivating.
So, go ahead and experiment with these features — your words deserve to be noticed :)
 by
by
8 comments
There is no topic on how to increase font size in a Comment box, am I missing something?
Hello Manuel,
There's no way to increase font size only in Google Docs comments. You can zoom the whole browser tab so the comments appear larger.
I'm looking for a way to create numbered paragraphs with text - like Article I., Article 2., etc. Is there a way to do this with the Styles or a different Add-on?
Hello Melissa,
I'm not sure Styles will help since it's merely changes the appearance of the text.
If you need extra headings literally containing 'Article 1', 'Article 2', etc., you will have to enter them manually. And then you can apply a certain style to them using the Styles add-on.
Alternatively, you could use standard Bookmarks for this purpose. Our Search & Navigate will then show you all these headings/bookmarks in a list.
I meant underline for Mac: Command-U
All fixed! Thanks for catching those mistakes, Peter!
It Was very helpful Thank you for gather all the information together.
Appreciate your feedback! I'm glad the article is helpful :)