3 quick ways to convert multiple CSV files to Excel turning each file into a separate spreadsheet or combining all data in a single sheet.
If you often export files in the CSV format from different applications, you may end up having a bunch of individual files relating to the same subject matter. Surely, Excel can open several files at once, but as separate workbooks. The question is - is there a simple way to convert multiple .csv files into a single workbook? Sure thing. There are even three such ways :)
Merge multiple CSV files into one Excel file using Command Prompt
To swiftly merge several csv files into one, you can make use of the Windows Command Prompt tool. Here's how:
- Move all of the target files into one folder and make sure that folder does not contain any other .csv files.
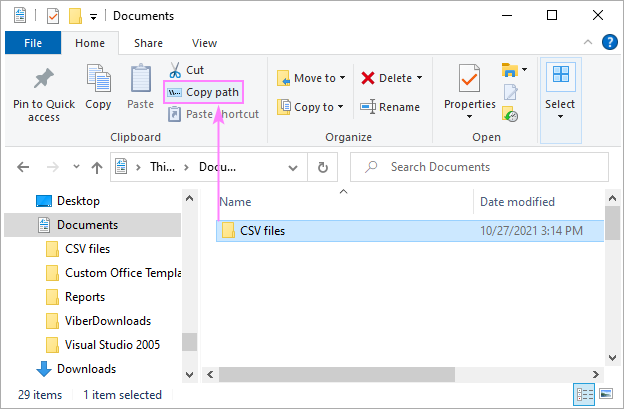
- In Windows Explorer, navigate to the folder containing your csv files and copy its path. For this, you can use the Ctrl + Shift + C shortcut. Or, right-click the folder, and then pick Copy as path in the context menu.
On Windows 10, the Copy path button is also available on File Explorer's Home tab.

- In the Windows search box, type cmd, and then click the Command Prompt app to start it.

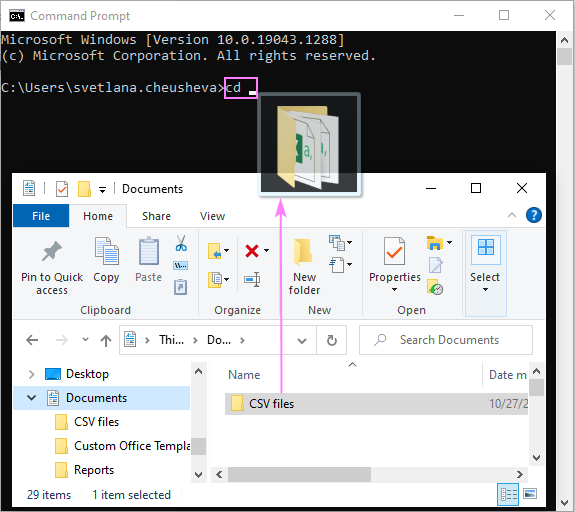
- In the Command Prompt window, enter a command to change the active directory to the CSV folder. To have it done, type cd followed by a space, and then press Ctrl + V to paste the folder path.
Alternatively, you can drag and drop the folder directly from File Explorer into the Command Prompt window.

- At this point, your screen should look something like the one below. If it does, press the Enter key to execute the command.

Once you do that, the folder path will appear in the command line, reflecting the change of the active directory.

- In the command line, after the folder path, type copy *.csv merged-csv-files.csv, and press Enter.
In the above command, merged-csv-files.csv is the name for the resulting file, feel free to change it to whatever name you like.

If all goes well, the names of the copied files will appear below the executed command:

Now, you can close the Command Prompt window and go back to the folder containing the original files. In there, you will find a new file named merged-csv-files.csv, or whatever name you specified in step 6.

Tips and notes:
- Merging all data into one larger file works great for homogeneous files of the same structure. For files with different columns, it may not be the best solution.
- If all the files that you intend to combine have the same column headings, it makes sense to remove reader rows in all but the first file, so they get copied to the bigger file just once.
- The copy command merges files as-is. If you want more control over how your CVS files are imported into Excel, then Power Query may be a more suitable solution.
Combine multiple CSV files into one with Power Query
Power Query is one of the most powerful tools in Excel 365 - Excel 2016. Among other things, it can join and transform data from different sources - an exciting feature that we are going to exploit in this example.
To combine multiple csv files into one Excel workbook, these are the steps you need to follow:
- Put all your CSV files into one folder. Make sure that folder does not contain any other files, as they may cause extra moves later.
- On the Data tab, in the Get & Transform Data group, click Get Data > From File > From Folder.

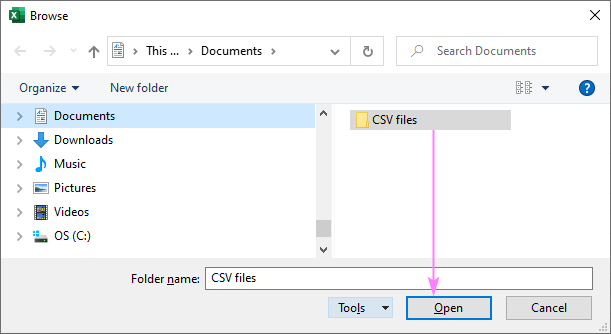
- Browse for the folder into which you've put the csv files and click Open.

- The next screen shows the details of all the filles in the selected folder. In the Combine drop-down menu, three options are available to you:
- Combine & Transform Data - the most flexible and feature rich one. The data from all csv files will be loaded to the Power Query Editor, where you can make various adjustments: choose data types for columns, filter out unwanted rows, remove duplicates, etc.
- Combine & Load - the simplest and fastest one. Loads the combined data straight into a new worksheet.
- Combine & Load To… - allows you to choose where to load the data (to an existing or new worksheet) and in what form (table, PivotTable report or chart, only a connection).

Now, let's briefly discuss the key points in each scenario.
Combine and load data
In a simplest case when no adjustments in the original csv files are needed, choose either Combine & Load or Combine & Load To… .
Essentially, these two options do the same thing - import data from individual files into one worksheet. The former loads the results into a new sheet, while latter lets you decide where to load them.
In the preview dialog box, you can only decide on:
- Sample File - which of the imported files should be regarded as a sample.
- Delimiter - in CSV files, it's typically a comma.
- Data Type Detection. You can let Excel automatically choose the data type for each column based on the first 200 rows (default) or entire dataset. Or you can choose not to detect data types and have all the data imported in the original Text format.
Once you've made your choices (in most cases, the defaults work just fine), click OK.

If you’ve chosen Combine & Load, the data will be imported in a new worksheet as a table.
In case of Combine & Load To…, the following dialog box will appear asking you to specify where and the data should be imported:

With the default settings shown in the image above, the data from multiple csv files will be imported in the table format like this one:

Combine and transform data
The Combine & Transform Data option will get your data loaded in the Power Query Editor. Features are numerous here, so let us bring into focus the ones that are especially useful for handling information from different sources.
Filter the files to combine
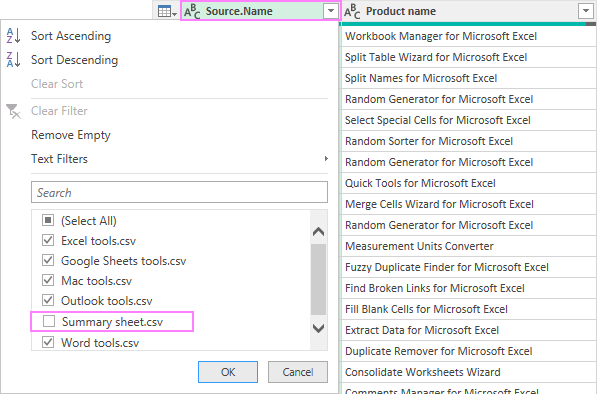
If the source folder contains more files than you really want to merge, or some files are not .csv, open the filter of the Source.Name column and unselect irrelevant ones.

Specify data types
Normally, Excel determines data types for all columns automatically. In some cases, however, the defaults may not be right for you. To change data format for a particular column, select that column by clicking its header, and then click Data Type in the Transform group.
For example:
- To keep leading zeros before numbers, choose Text.
- To display the $ symbol in front of amounts, choose Currency.
- To correctly display date and time values, pick Date, Time or Date/Time.

Remove duplicates
To get rid of duplicate entries, select the key column (unique identifier) that should contain only unique values, and then click Remove Rows > Remove Duplicates.

For more helpful features, explore the ribbon!
Load data into Excel worksheet
When you are done editing, get the data loaded into Excel. For this, on the Home tab, in the Close group, click Close & Load, and then hit either:
- Close & Load - imports data to a new sheet as a table.
- Close & Load To… - can transfer data to a new or existing sheet as a table, PivotTable or PivotTable chart.

Tips and notes:
- The data imported with Power Query remains connected to the original csv files.
- If you need to combine other CSV files, just drop them into the source folder, and then refresh the query by clicking the Refresh button on the Table Design or Query tab.
- To disconnect the combined file from the original files, click Unlink on the Table Design tab.
Import multiple CSV files to Excel as separate sheets in a single workbook
In the previous two examples, we were merging individual csv files into one. Now, let's look at how you can import each CSV as a separate sheet of a single workbook. To accomplish this, we'll be using the Copy Sheets tool included in our Ultimate Suite for Excel.
Importing will take you 3 minutes at the most, a minute per step :)
- On the Ablebits Data tab, click Copy Sheets and indicate how you want to import the files:
- To place each file on a separate sheet, choose Selected sheets to one workbook.
- To copy data from all csv files into a single worksheet, choose Data from the selected sheets to one sheet.

- Click the Add files button, and then find and select the csv files for importing. When done, click Next.

- Finally, the add-in will ask exactly how you want to paste the data. In case of csv files, you normally go ahead with the default Paste all option, and just click Copy.

A couple of seconds later, you'll find the selected csv files converted into separate sheets of one Excel workbook. Fast and painless!
That's how to convert multiple CSV to Excel. Thank you for reading and see you next week!
 by
by
7 comments
Thanks for this awesome option!
Instead just merging multiple files into one, how can I merge/create a single csv file but with multiple tabs?
Hi! A CSV file is a text file that cannot have tabs.
Ridiculous. The whole procedure could be resumed in one sentence: Concatenate the text files and open the result. And with that people would know that it is useless in most cases, because if people wanted to do that they could do it without help. What people want when they open multiple CSV files is in most case have ONE SHEET per CSV, of course.
Hello Anne,
Firstly, concatenating multiple text files is not something you can do swiftly manually, assuming there are dozens of big .csv files to be copied into one workbook.
Secondly, the third method described in the tutorial does exactly want you want - importing each CSV as a separate sheet in the resulting workbook.
thanks!! But how if there is a extra line in some of the cells, that row will become two rows in the combined file. How to overcome that..
Hello!
Remove extra line characters using Search&Replace with any text editor.