Learn how to print Excel spreadsheets exactly the way you want - print selection, sheet or entire workbook, on one page or multiple pages, with proper page breaks, gridlines, titles, and a lot more.
Living in a digital world, we still need a printed copy every now and then. At first sight, printing Excel spreadsheets is super easy. Just click the Print button, right? In reality, a well-organized and beautifully formatted sheet that looks great on a monitor is often a mess on a printed page. This is because Excel worksheets are designed for comfortable viewing and editing on screen, not to fit on a sheet of paper.
This tutorial aims to help you get perfect hard copies of your Excel documents. Our tips will work for all versions of Excel for Office 365, Excel 2019, Excel 2016, Excel 2013, Excel 2010 and lower.
How to print Excel spreadsheet
For starters, we will provide high-level instructions on how to print in Excel. And then, we will have a closer look at the most important and useful features.
To print an Excel worksheet, this is what you need to do:
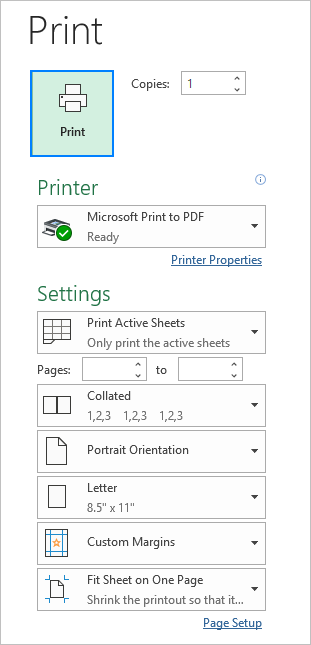
- In your worksheet, click File > Print or press Ctrl + P. This will get you to the Print Preview window.
- In the Copies box, enter the number of copies you want to get.
- Under Printer, choose which printer to use.
- Under Settings, specify exactly what to print and configure the page margins, orientation, paper size, etc.
- Click the Print button.
Choose what to print: selection, sheet or entire workbook
To tell Excel which data and objects should be included in the printout, under Settings, click the arrow next to Print Active Sheets, and choose one of these options:
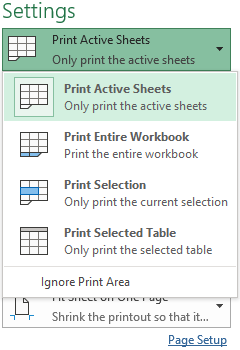
Below you will find a brief explanation of each setting shown in the screenshot above and how to correctly use them.
Print selection / range
To print only a specific range of cells, highlight it on the sheet, and then choose Print Selection. To select non-adjacent cells or ranges, hold the Ctrl key while selecting.
Print entire sheet(s)
To print the entire sheet that you currently have open, pick Print Active Sheets.
To print multiple sheets, click on the sheet tabs while holding the Ctrl key, and then choose Print Active Sheets.
Print entire workbook
To print all sheets in the current workbook, select Print Entire Workbook.
Print Excel table
To print out an Excel table, click any cell within your table, and then choose Print Selected Table. This option appears only when the table or its part is selected.
How to print the same range in multiple sheets
When working with identically structured worksheets, such as invoices or sales reports, you will obvious want to print the same rage in all the sheets. Here's the fastest way to do this:
- Open the first sheet and select the range to print.
- While holding the Ctrl key, click on other sheet tabs to be printed. To select adjacent sheets, click the first sheet tab, hold the Shift key and click the last sheet tab.
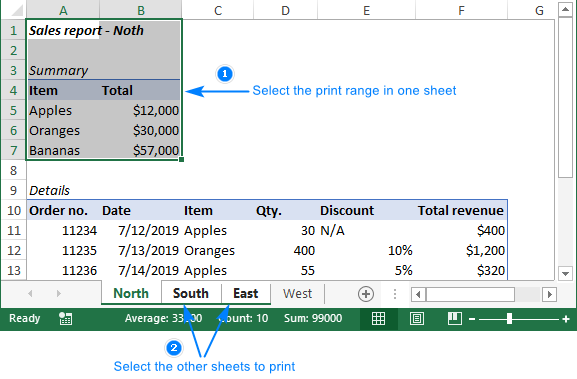
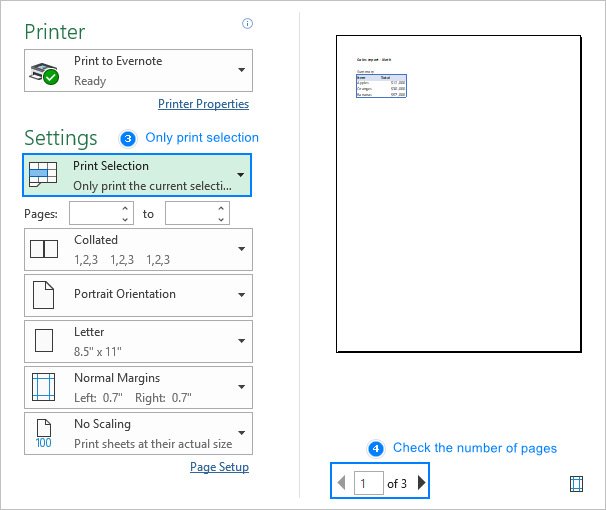
- Click Ctrl + P and choose Print Selection in the drop-down list right under Settings.
- Click the Print button.
Tip. To make sure Excel is going to print the data you want, check the number of pages at the bottom the Preview section. If you selected just one range per sheet, the number of pages should match the number of selected sheets. If two or more ranges are selected, each will be printed on a separate page, so you multiply the number of sheets by the number of ranges. For full control, use the right and left arrows to go through each printable page preview.
Tip. To set the print area in multiple sheets, you can use these Print Area macros.
How to print Excel spreadsheet on one page
By default, Excel prints sheets at their actual size. So, the bigger your worksheet, the more pages it will take. To print an Excel sheet on one page, choose one of the following Scaling options that reside at the end of the Settings section in the Print Preview window:
- Fit Sheet on One Page – this will shrink the sheet so that it fits on one page.
- Fit All Columns on One Page – this will print all the columns on one page while the rows may be split across several pages.
- Fit All Rows on One Page – this will print all the rows on one page, but the columns may extend to multiple pages.
To remove scaling, choose No Scaling in the list of options.
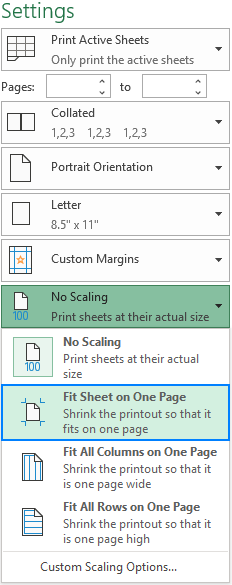
Please be very careful when printing on one page – in a huge sheet, your printout may become unreadable. To check how much scaling will actually be used, click Custom Scaling Options… . This will open the Page Setup dialog box, where you look at the number in the Adjust to box:
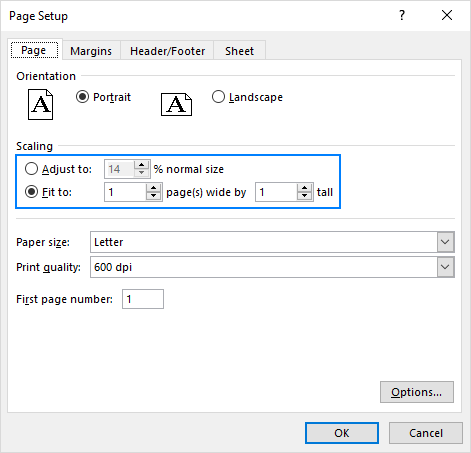
If the Adjust To number is low, a printed copy will be difficult to read. In this case, the following adjustments might be useful:
- Change page orientation. The default Portrait orientation works well for worksheets that have more rows than columns. If your sheet has more columns than rows, change the page orientation to Landscape.
- Adjust margins. The smaller the margins, the more room there will be for your data.
- Specify the number of pages. To print an Excel spreadsheet on a predefined number of pages, on the Page tab of the Page Setup dialog, under Scaling, enter the number of pages in both Fit to boxes (wide and tall). Please note that using this option will ignore any manual page breaks.
Print to file – save the output for later use
Print to File is one of the most rarely used Excel print features underestimated by many. In short, this option saves output to a file instead of sending it to a printer.
Why would you want to print to file? To save time when additional printed copies of the same document are needed. The idea is that you configure the print settings (margins, orientation, page breaks, etc.) only once and save the output to a .pdf document. Next time you need a hard copy, simply open that .pdf file and hit Print.
Let's have a look at how that works:
- On the Page Layout tab, configure the required print settings and press Ctrl + P.
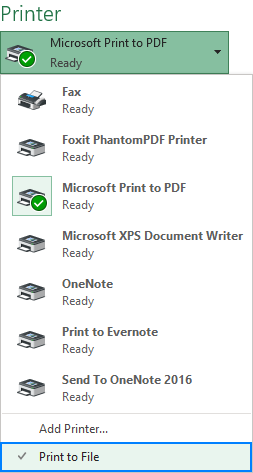
- In the Print Preview window, open the Printer drop-down list, and select Print to File.
- Click the Print button.
- Choose where to save a .png file containing the output.
Print preview in Excel
It's always a good idea to preview outputs before printing to avoid unexpected results. There are a couple of ways to access print preview in Excel:
- Click File > Print.
- Press the print preview shortcut Ctrl + P or Ctrl + F2.
Excel Print Preview is an extremely helpful tool in terms of saving your paper, ink and nerves. It not only shows exactly how your worksheets will look on paper, but also allows making certain changes directly in the preview window:
- To preview the next and previous pages, use the right and left arrows at the bottom of the window or type the page number in the box and hit Enter. The arrows only appear when a selected sheet or range contains more than one printed page of data.
- To display page margins, click the Show Margins button in the bottom-right corner. To make the margins wider or narrower, simply drag them using the mouse. You can also adjust the column width by dragging the handles at the top or bottom of the print preview window.
- Though Excel Print Preview does not have a zoom slider, you can use a common shortcut Ctrl + scroll wheel to do a little zooming. To get back to the original size, click the Zoom to Page button in the lower-right corner.
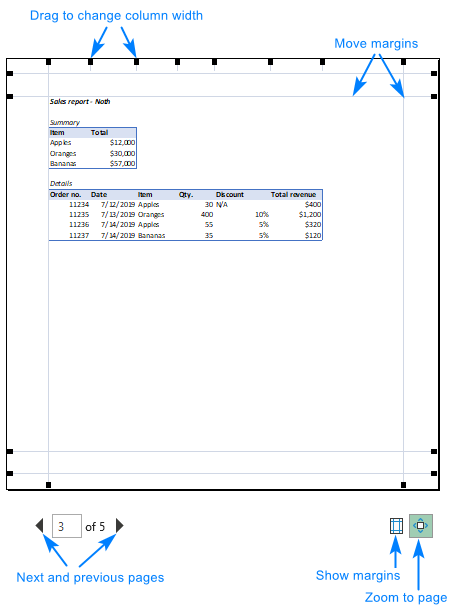
To exit Print Preview and return to your worksheet, click the arrow in the top-left corner of the Print Preview window.
Excel print options and features
The most frequently used print settings are available in the Print Preview window discussed above. Even more options are provided on the Page Layout tab of the Excel ribbon:

Apart from configuring page margins and paper size, here you can insert and remove page breaks, set print area, hide and show gridlines, specify the rows and columns to repeat on each printed page, and more.
Advanced options for which there is no space on the ribbon are available in the Page Setup dialog box. To open it, click the dialog launcher ![]() in the Page Setup group on the Page Layout tab.
in the Page Setup group on the Page Layout tab.
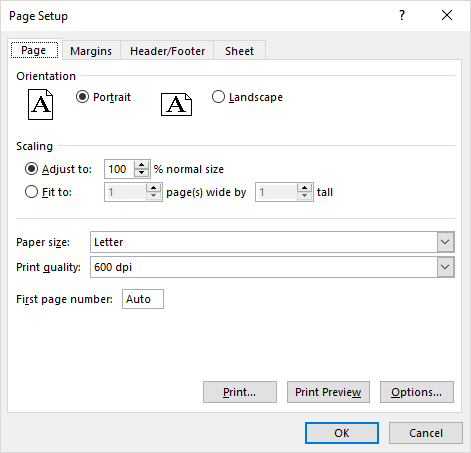
Note. The Page Setup dialog box can also be opened from the Print Preview window. In this case, some of the options, for example Print area or Rows to repeat at top, may be disabled. To enable these features, open the Page Setup dialog from the Page Layout tab.
Excel print area
To ensure that Excel prints a specific part of your spreadsheet and not all the data, set the print area. Here's how:
- Select one or more ranges that you want to print.
- On the Page Layout tab, in the Page Setup group, click Print Area > Set Print Area.
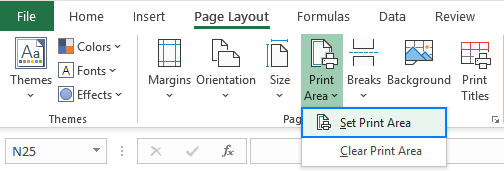
The Print Area setting is saved when you save the workbook. So, whenever you print this particular sheet, a hard copy will only include the print area.
For more information, please see How to set print area in Excel.
How to add a print button to Excel Quick Access Toolbar
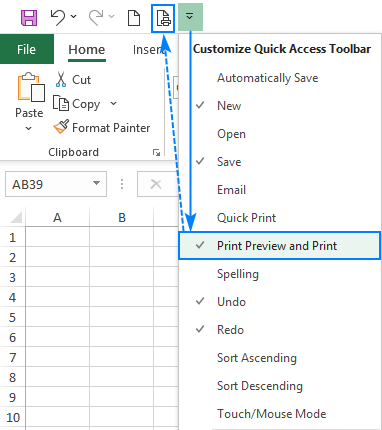
If you frequently print in Excel, it may be convenient to have the Print command on the Quick Access Toolbar. For this, just do the following:
- Click the Customize Quick Access Toolbar button (the down arrow at the far-right of the Quick Access toolbar).
- In the list of the displayed commands, select Print Preview and Print. Done!
How to insert page breaks in Excel
When printing a huge spreadsheet, you can control how the data is split over multiple pages by inserting page breaks. Here's how it works:
- Click on the row or column that you want to move to a new page.
- On the Page Layout tab, in the Page Setup group, click Breaks > Insert Page Break.
A page break is inserted. To visually see what data falls on different pages, switch to the View tab and enable Page Break Preview.
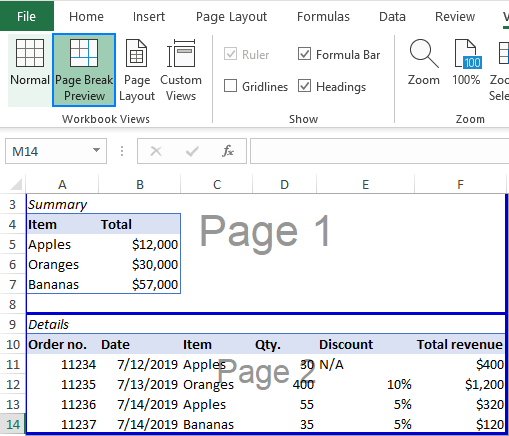
If you'd like to change the position of a certain page break, move it wherever you want by dragging the break line.
For more information, please see How to insert and remove page breaks in Excel.
How to print formulas in Excel
To get Excel to print formulas instead of their calculated results, you just need to show formula in a worksheet, and then print it as usual.
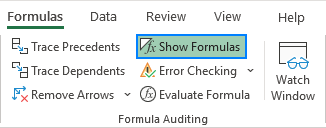
To have it done, switch to the Formulas tab, and click the Show Formulas button in the Formula Auditing group.
How to print a chart in Excel
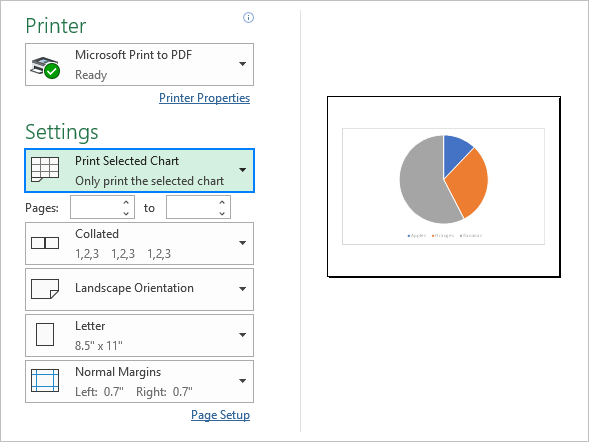
To print only a chart without worksheet data, select the chart of interest and press Ctrl + P. In the Print Preview window, you will see a chart preview on the right and the Print Selected Chart option selected under Settings. If the preview looks as desired, click Print; otherwise adjust the settings:
Tips and notes:
- To print all the contents of a sheet including the chart, press Ctrl + P without selecting anything on the sheet, and make sure the Print Active Sheets option is chosen under Settings.
- It's not possible to adjust the scaling of a chart in the Print Preview window. If you wish the printed chart to fit the full page, resize your graph to make it bigger.
How to print gridlines in Excel
By default, all worksheets are printed without gridlines. If you want to print Excel spreadsheet with lines between your cells, here's what you need to do:
- Switch to the Page Layout tab.
- in the Sheet Options group, under Gridlines, check the Print box.

What to change the printed gridlines color? The detailed instructions can be found in How to make Excel print gridlines.
How to print titles in Excel
In a multi-page Excel sheet, understanding what this or that data means can be tricky. The Print Titles feature lets you show the column and row headers on every printed page, which will make reading a printed copy a lot easier.
To repeat header row or header column on every printed page, carry out these steps:
- On the Page Layout tab, in the Page Setup group, click Print Titles.
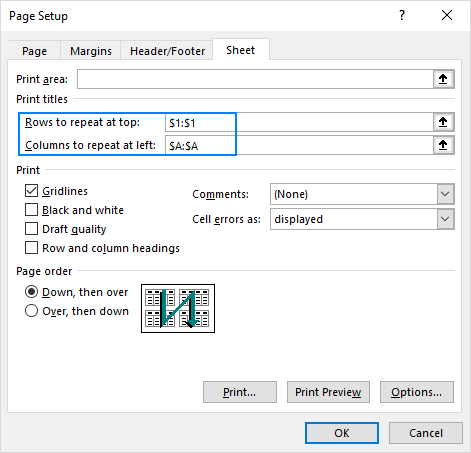
- On the Sheet tab of the Page Setup dialog box, under Print titles, specify which rows to repeat at top and/or which columns to repeat at left.
- When done, click OK.
For more information, please see How to print row and column headers on every page.
How to print comments in Excel
In case your notes are no less important than the spreadsheet data, you may want to get comments on paper too. For this, do the following:
- On the Page Layout tab, in the Page Setup group, click the dialog launcher (a small arrow in the lower-right corner of a group).
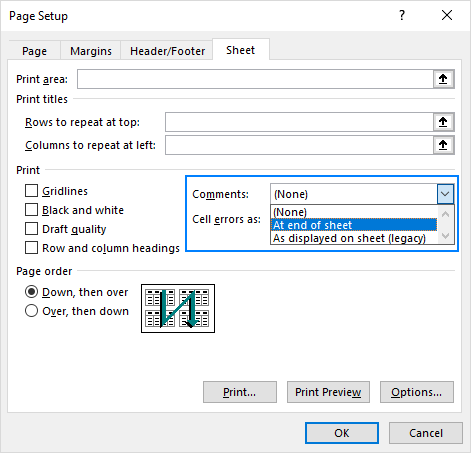
- In the Page Setup window, switch to the Sheet tab, click the arrow next to Comments and choose how you want them printed:
For more details, please see How to print comments in Excel.
How to print address labels from Excel
To print mailing labels from Excel, use the Mail Merge feature. Please be prepared that it may take you a while to get the labels right on the first try. The detailed steps with a lot of useful tips can be found in this tutorial: How to make and print labels from Excel.
 by
by
2 comments
My sheet prints with huge right margin, squeezing the sheet to the left and unreadable. Something is overwriting the steps I set according to your instructions.
Hi!
You may have activated the Fit Sheet on One Page option. Your table is too large for one page.