In this article you will learn how to save your Excel chart as an image (.png, .jpg, .bmp etc. ) or export it to another file such as a Word document or PowerPoint presentation.
Microsoft Excel is one of the most powerful tools for data analysis that provides plenty of features and special options to visualize your data. Charts (or graphs) is one of such options and creating a chart in Excel is as easy as selecting your data and clicking an appropriate chart icon.
But what has strengths usually has it weaknesses. The weak point of Excel charts is the lack of an option to save them as images or to export to another file. It would be really nice if we could simply right-click a graph and see something like "Save as image" or "Export to". But since Microsoft did not bother to create such features for us, we'll figure something out on our own :)
In this article I will show you 4 ways of saving an Excel chart as an image, so that you can insert it in other Office applications like Word and PowerPoint, or use to create some nice infographics:
Copy a chart to a graphics program and save as picture
A friend of mine told me once how she usually copies her Excel charts to Paint. What she does is create a chart and click PrintScreen, then open Paint and pastes the image of the entire screen. After that she crops the redundant screen areas and saves the remaining part to a file. If you do it this way too, forget about it and never use this childish method again! There is a quicker and smarter way :-)
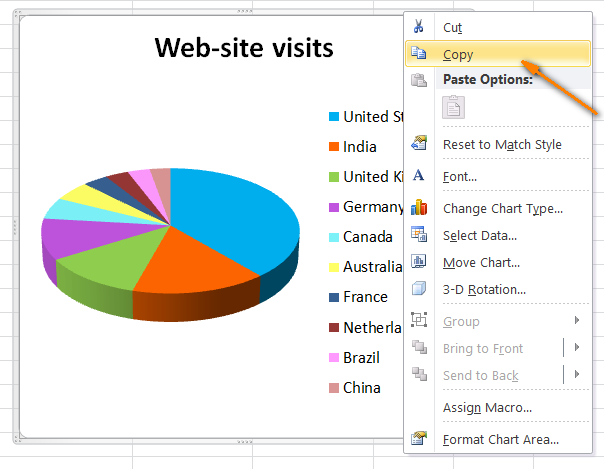
As an example, I created a nice 3-D Pie graph in my Excel 2010 that visually represents the demographics of our web site's visitors and now I want to export this Excel chart as image. What we do is as follows:
- Right-click somewhere on the chart border and click Copy. Do not place the cursor within the chart; this may select individual elements rather than the whole graph and you won't see the Copy command.
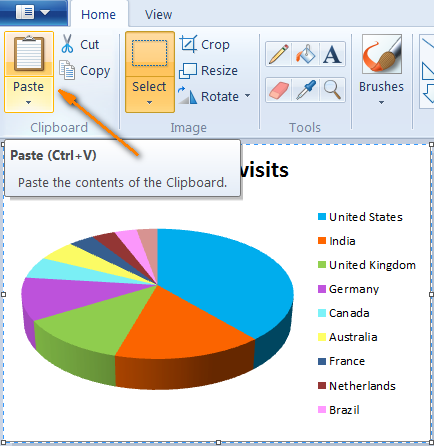
- Open Paint and paste the chart by clicking the Paste icon on the Home tab or pressing Ctrl + V:
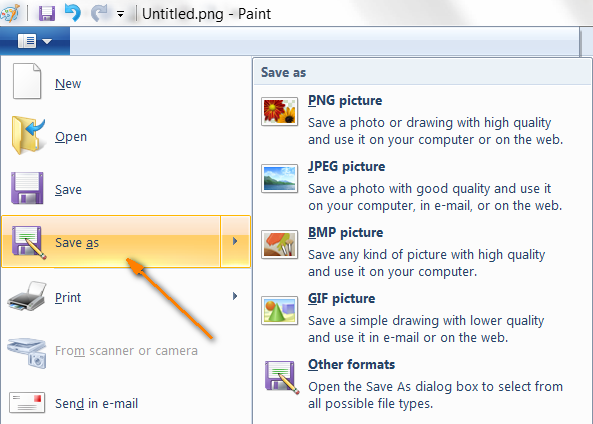
- Now all that is left to do is save your chart as an image file. Click the "Save as" button and choose from available formats (.png, .jpg, .bmp and .gif). For more options, click the "Other formats" button at the end of the list.
It is that simple! In a similar fashion you can save your Excel chart to any other graphics painting program.
Export an Excel chart to Word and PowerPoint
If you need to export an Excel chart to some other Office application such as Word, PowerPoint or even Outlook, the best way is to paste it directly from the clipboard:
- Copy your chart as described in step 1 above.
- Click in your Word document or PowerPoint presentation where you want to paste the chart and press Ctrl + V. Instead of Ctrl + V, you can right-click anywhere in the file and you will see a handful of additional Paste Options to choose from:
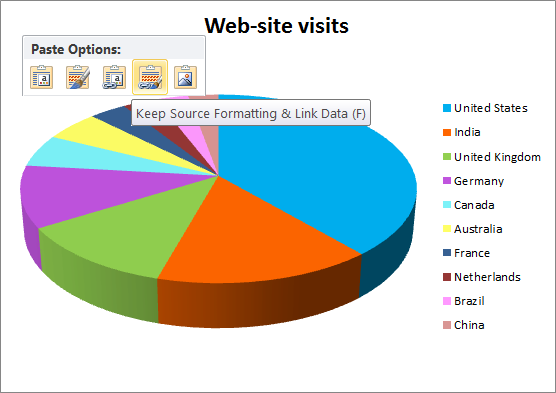
The main advantage of this method is that it allows you to export a fully-functional Excel chart to another file, rather than a mere image. The graph will retain the connection with the original Excel worksheet and refresh automatically whenever your Excel data are updated. In this way, you won't need to re-copy the chart with each data change.
Save a chart to Word and PowerPoint as image
In Office 2007, 2010 and 2013 applications, you can also copy an Excel chart as an image. In this case, it will behave as a usual picture and won't update. For example, let's export our Excel chart to a Word 2010 document.
- Copy the chart from your Excel workbook, switch to your Word document, place the cursor where you want to inset the graph, and then click on a tiny black arrow at the bottom of the Paste button residing on the Home tab:
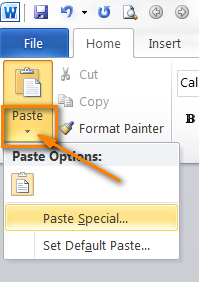
- You will see the "Paste Special..." button as shown in the screenshot above. Clicking it will open the Paste Special dialog and you will see a number of available image formats including Bitmap, GIF, PNG and JPEG.
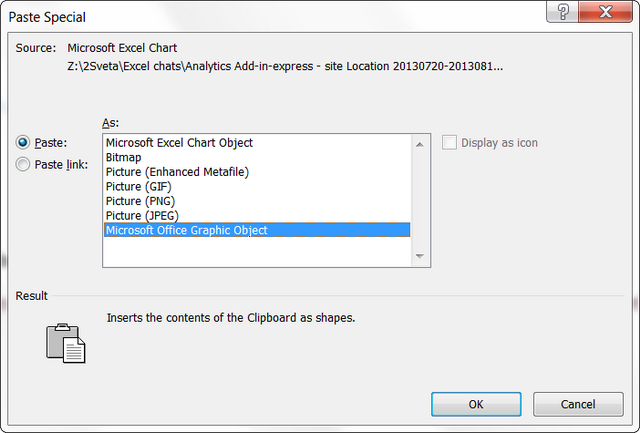
- Choose one of the formats and click OK.
Probably the Paste Special option is available in earlier Office versions as well, but I haven't used them for quite a while, that is why cannot state with certainty :)
Save all charts in an Excel workbook as images
The methods we have discussed so far work well if you have one or a couple of charts. But what if you need to copy all charts in the entire Excel workbook? It would take quite a lot of time to copy / paste them individually. Good news is that you needn't do that! Here's how you can save all charts in a workbook at once:
- When all of your charts are ready, switch to the File tab and click the Save As button.
- The Save As dialog will open and you choose Web Page (*.htm;*html) under "Save as type". Also, make sure the "Entire Workbook" radio button next to Save is selected, as shown in the screenshot:
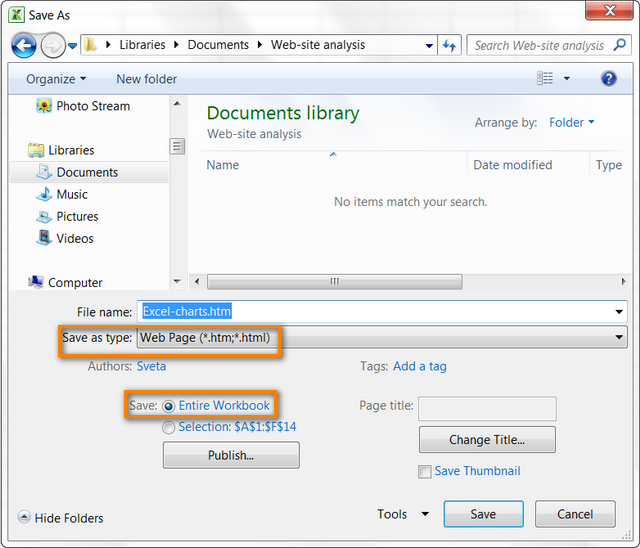
- Choose the destination folder where you want to save your files and click the Save button.
The .png images of all charts will be copied to that folder along with html files. The next screenshot shows the content of the folder where I saved my workbook. The book contains 3 worksheets with a graph in each and as you can see, all the three .png images are in place!
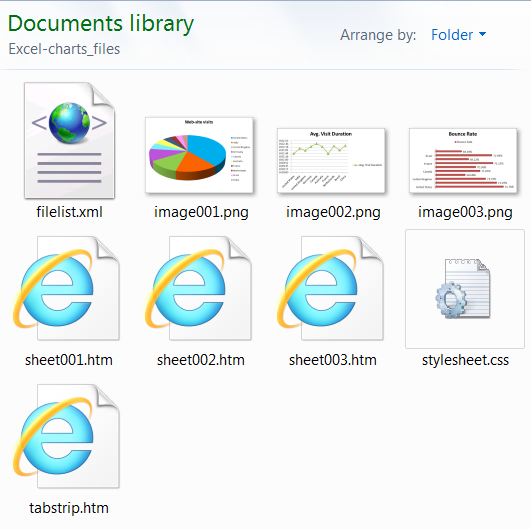
As you know, PNG is one of the best image-compression formats without any loss of picture quality. If you prefer some other formats for your pictures, you can easily convert them to .jpg, .gif, .bmp etc.
Save a chart as image using a VBA macro
If you need to export your Excel charts as pictures on a regular basis, you can automate this work using a VBA macro. The best part is that a variety of such macros already exist, so there is no need to reinvent the wheel :)
For instance, you can use the tried-and-true solution published by Jon Peltier on his blog. The macro is as simple as this:
ActiveChart.Export "D:\My Charts\SpecialChart.png"
This line of code lets you export the selected chart as a .png image to the specified folder. Even if you have never written a single macro before, you can create your first one right now in 4 easy steps.
Before you take on the macro, create a folder where you want to export the chart. In our case, it is My Charts folder on disk D. Well, all preparations are done, let's take on the macro.
- In your Excel workbook, switch to the Developer tab and click on the Marcos icon in the Code group.

Note. If this is the first time you are creating a macro, most likely the Developer tab won't be visible in your workbook. In this case, switch to the File tab, click Options > Customize Ribbon. In the right hand part of the window, in the Main Tabs list, select Developer, and then click OK.
- Give your macro a name, for example SaveSelectedChartAsImage and choose to enable it in your current workbook only:

- Click the Create button and you will have the Visual Basic Editor open with the outlines of a new macro already written for you. Copy the following macro in the second line:
ActiveChart.Export "D:\My Charts\SpecialChart.png"

- Close the Visual Basic Editor and click the Save As button on the File tab. Choose to save your workbook as Excel Macro-Enabled Workbook (*.xlsm). And that's all, you did it! :)
Now let's run the newly created macro to see how it works. Oh wait... there's one more thing for you to do. You should select the Excel chart that you want to export because as you remember, our macro copies only the active chart. Click anywhere on the chart's border and if you see a light gray border surrounding it, then you did it correctly and your entire graph is selected:

Switch to the Developer tab again and click on the Macros icon. This will open a list of macros in your workbook. All you need to do is to select SaveSelectedChartAsImage and click the Run button:
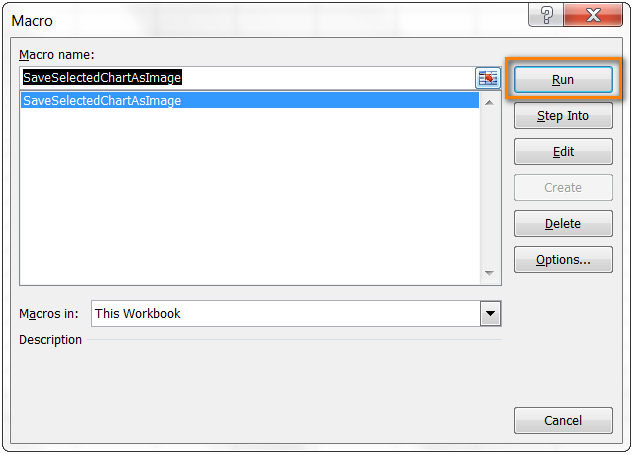
Now open your destination folder and check if the .png image of your chart is there. In a similar way you can save a picture in other formats. In your macro, you will just need to replace .png with .jpg or .gif like this:
ActiveChart.Export "D:\My Charts\SpecialChart.jpg"
Tip. If you want to save an Excel worksheet as a JPG, PNG, or GIF image, read this guide.
That's all for today, hope you find the information helpful. Thanks for reading!
 by
by