The tutorial shows how to create reusable pieces of content for Outlook emails by using Quick Parts, AutoText and Shared Templates.
Like many Outlook users, you may often need to send the same text over and over again - new offers to your business partners, replies to prospective clients, reports to supervisors, and so on. Do you still do it the long and tedious keystroke way? In this case, you'll certainly find Quick Parts very useful. Not only will they save you a surprising amount of time, but also introduce consistency and accuracy in your emails.
What is Outlook Quick Parts?
Outlook Quick Parts is a gallery of reusable pieces of content that you can quickly insert into your email messages as well as appointments, meeting requests, contacts, and tasks. Microsoft defines this feature as building blocks
.
Quick Parts were introduced in Outlook 2007 as a more versatile replacement for AutoText from previous versions. These snippets of predefined content are not limited to text only - they can include images, tables, graphics, and formatting.
The Quick Parts feature works the same way in all versions of Outlook for Office 365, Outlook 2021, Outlook 2019, Outlook 2016, Outlook 2013, Outlook 2010, and Outlook 2007.
How to create Quick Parts in Outlook
To begin with, type the desired text, format it the way you want, and include graphics if needed. Technically, it does not matter where you create a new building block - the steps are the same for emails, appointments, contacts and tasks.
When your new piece of content is ready, here's what you do to add it to the Quick Part Gallery:
- Select the content that you want to store.
- On the Insert tab, in the Text group, click Quick Parts > Save Selection to Quick Part Gallery…

- In the dialog box that pops up, specify some attributes. For the most part, you'll only need to a give a unique name to your new building block and can leave the other fields in their default values, as shown in the screenshot below.
- When done, click OK to save the new entry.

Once a Quick Part is created, you can access and reuse it at any time from everywhere including emails, meeting requests, tasks, etc.
Quick Parts attributes
By specifying the following details, you can better organize Quick Parts for your specific needs:
Name - type a unique name for your new Quick Part. Because a building block can be inserted by name, short and meaningful names can save you a lot of time.
In the gallery, the names are listed in alphabetical order. So, if you want a specific entry to appear at the top of the list, you can prefix the name with a number or underscore, e.g. "1map" or "_map".
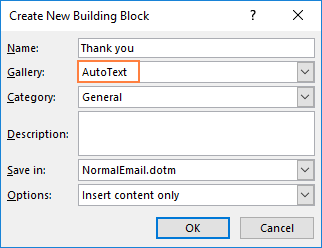
Gallery - select the gallery in which you want the new building block to appear. Outlook can save entries in many different galleries, but generally you'll use Quick Parts and AutoText.
Category - categories belong to galleries and you can regard them as kind of sub-folders for further grouping. The default category is General. If you have over 10 reusable pieces, it's a good idea to organize them in your own categories. For this, click the drop-down arrow and choose Create New Category.
Description - optionally, type some text that describes the entry. But you may not bother about this attribute, as you'll never see it or use it.
Save In - Save to the default NormalEmail.dotm template if you want the new Quick Part to be available in all emails and other Outlook items. If you use your own Outlook templates, you can isolate your building blocks by template. A template must be open to appear in the drop-down list.
Options - defines how the entry is inserted:
- Insert content only - the default option that you will use in most cases.
- Insert in its own paragraph - inserts the content into its own paragraph, even if the cursor is in the middle of another paragraph.
- Insert content in its own page- inserts the content into its own page; is more useful for Word Quick Parts.
How to use Quick Parts in Outlook
There are three ways to insert building blocks into Outlook items. The below instructions are for emails because we use them most often. The techniques for tasks, appointments, and contacts are exactly the same.
Insert Quick Parts by pressing F3
The fastest way to put a reusable piece of content into an email message is this:
- In a message, type the quick part name where you want the content to appear.
- Press F3, and the name is immediately replaced with the full content. Done!
For example, to insert the Quick Part named "Map", you type "map" and press F3. The image below shows the result:
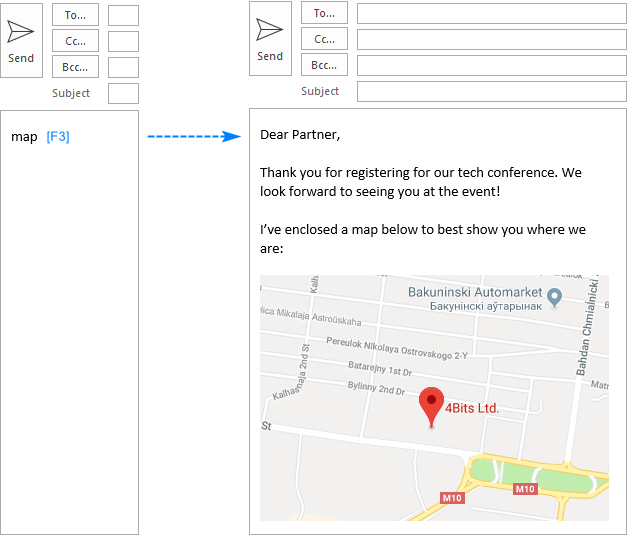
In most cases, you do not need to enter the whole name. It is enough to type the part of the name until it becomes unique.
Let's say, you have two Quick Parts named "Thanks for support" and "Thank you":
- To insert the entry named "Thanks for support", type "thanks" and press F3.
- To insert the "Thank you" entry, you must at least type "thank" and a space character before pressing F3.
Auto-complete Quick Parts with the Enter key
In Outlook 2016 and higher, Quick Parts can also be auto-completed by hitting the Enter key.
You just start typing the name and as soon as it becomes unique the "Press ENTER to Insert" suggestion appears. Press the Enter key and the content is inserted straight away.
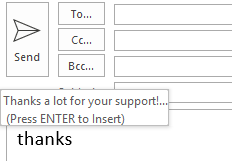
Notes:
- Auto-completing does not work for pieces that contain images or other graphics.
- Auto-completing is not available in Outlook 2013, 2010 and 2007. In these versions, press F3 to quickly insert Quick Parts by their name.
Insert Quick Parts by choosing from the gallery
If you have many building blocks and you cannot remember the name of the particular snippet that you want to use, find it in the Quick Parts Gallery:
- In a message, position the cursor where you want to insert the Quick Part.
- Go to the Insert tab >Text group and click Quick Parts.
- Do one of the following:
- If you see the desired building block in the gallery, simply click on it:

- If you wish to insert a Quick Part at the beginning or end of your email message, right-click the entry of interest, and choose the corresponding option from the context menu:

- If you don't see the building block in the gallery, right-click on any entry, and then click Organize and Delete. In the Building Blocks Organizer, select the needed piece and click Insert.

- If you see the desired building block in the gallery, simply click on it:
How to rename and edit Quick Parts
To modify an existing Quick Part, here's what you need to do:
- On the Insert tab, in the Text group, click Quick Parts.
- Right-click the entry you want to change and click Edit Properties…
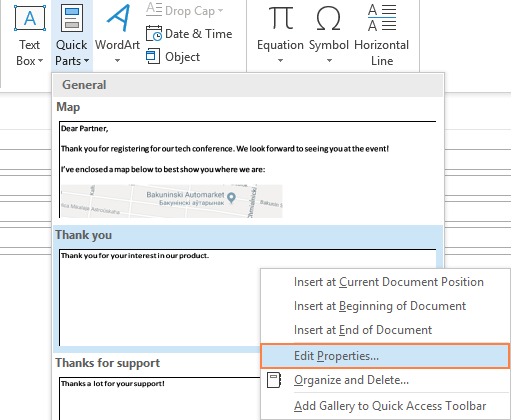
- In the Modify Building Block dialog box, type a new name in the corresponding box and, optionally, choose another gallery, category and template. When done, click OK.

- When asked if you want to redefine the building block entry, click Yes.
How to quickly modify multiple Quick Parts
If you'd like to change several entries, this can be done faster via the Building Block Organizer:
- On the Insert tab, in the Text group, click Quick Parts.
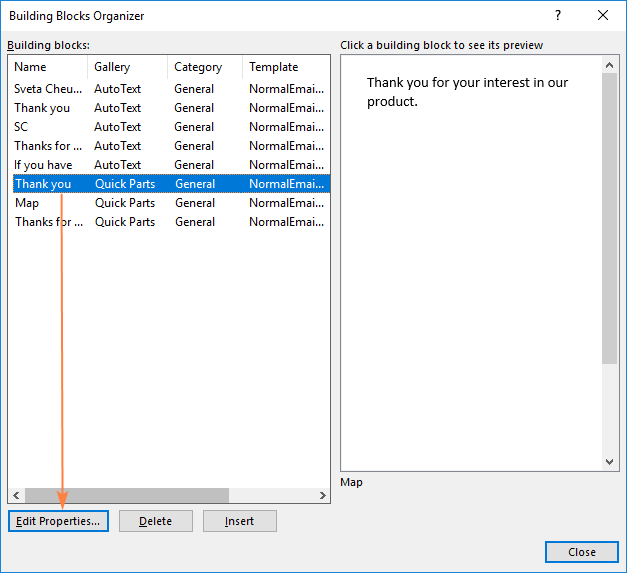
- Right-click anywhere in the gallery pane and choose Organize and Delete from the context menu.
- In the dialog box that appears, select the entry you want to modify and click Edit Properties…
- Make the changes and click OK to save them.
How to change the content of a Quick Part
The Modify Building Block dialog box only allows renaming Quick Parts and changing their attributes, but not the content.
To change the Quick Part's content, you need to replace it with a new one. Here's how:
- Insert the building block into an email and make the changes you want.
- Save the modified building block with the same name.
Note. To replace the original entry in the gallery, the new entry's name and all the attributes must be the same as the original.
How to delete Quick Parts in Outlook
If you want to permanently remove a certain building block from the gallery, this is what you need to do:
- On the Insert tab, in the Text group, click Quick Parts.
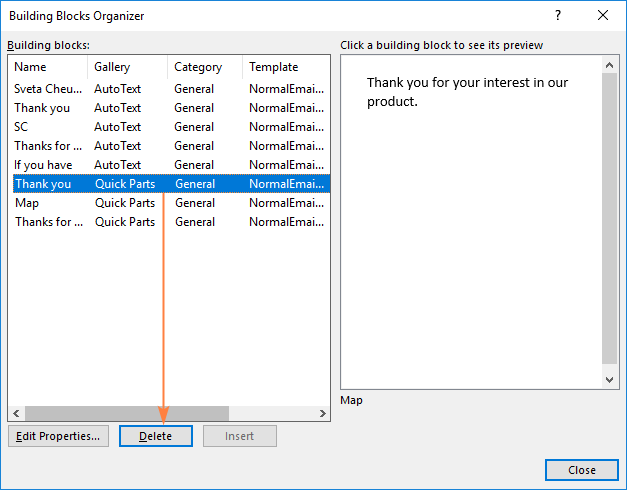
- Right-click on any entry, and then click Organize and Delete.
- Select the entry you wish to remove and click the Delete button.
- When asked if you really want to delete the selected building block, click Yes.
Outlook AutoText
In Outlook 2003, AutoText was the only type of the available building blocks. In Outlook 2007, Quick Parts appeared, and AutoText became its part.
In the modern versions of Outlook, the only difference between Quick Parts and AutoText is that they are different galleries. In all other respects (creating, editing and inserting), they are absolutely the same.
To add a new AutoText entry, select the text that you want to store and do one of the following:
- Press Alt + F3.
- On the Insert tab, in the Text group click Quick Parts > AutoText > Save Selection to AutoText Gallery.

Or you can create a Quick Part as usual, but choose to save it to the AutoText Gallery:
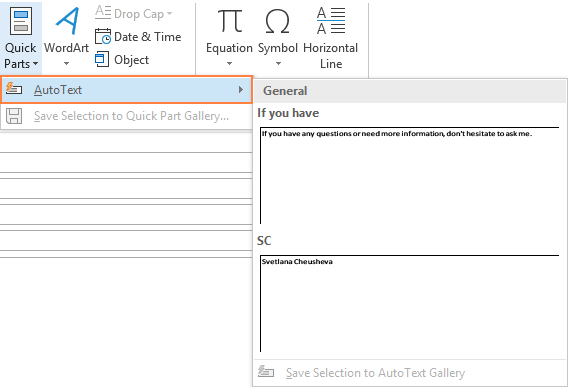
To view the existing AutoText entries, click Quick Parts > AutoText:
Where are Quick Parts located?
Outlook Quick Parts are stored in the NormalEmail.dotm file, which is located here:
C:\Users\User Name\AppData\Roaming\Microsoft\Microsoft\Templates\
If you want to export your quick parts from one computer to another, simply paste the NormalEmail.dotm file to the Templates folder on another PC.
Using Outlook Quick Parts - tips and tricks
Below I will share a few little secrets can make a great difference in the way you use Quick Parts in Outlook.
Add Quick Parts to Quick Access Toolbar
To always have the building blocks at your fingertips, add them to the Outlook Quick Access Toolbar. For this, just right-click the Quick Parts button, and then click Add to Quick Access Toolbar:
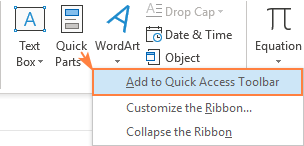
That's it! The Quick Parts Gallery is now easily accessible from almost everywhere.
Add Quick Parts to Outlook ribbon
As you already know, Quick Parts reside on the Insert tab. If you plan to frequently use them in your work, it can be more convenient to have your building blocks on the default Message tab. To have it done, carry out these steps:
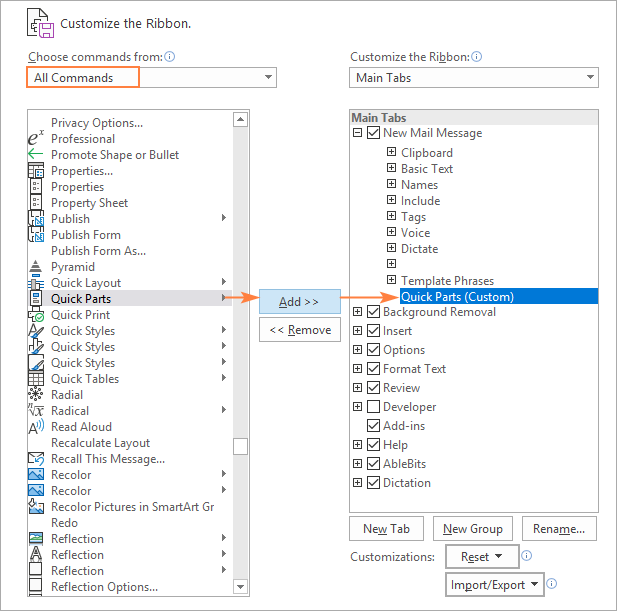
- Right-click anywhere on the ribbon, and then click Customize the Ribbon… .

- Because custom buttons can only be added to custom groups, you will have to create one:
- In the right part of the Outlook Options dialog box, under Customize the Ribbon, select the New Mail Message tab and click the New Group button.
- Click the Rename button and name the newly added group as you like, e.g. Quick Parts.
- In the Choose commands from drop-down list, select All commands, find Quick Parts in the list, and click Add.
- Click OK to save the changes and close the dialog box.
Back up and restore Outlook Quick Parts
As mentioned above, Outlook Quick Parts are located in the NormalEmail.dotm file, which is stored here:
C:\Users\%username%\AppData\Roaming\Microsoft\Templates\NormalEmail.dotm
To back up your Quick Parts, close Outlook and copy this file to a save location.
To restore Quick Parts, copy the file from your backup location to the Templates folder, with Outlook closed.
Please note that aside from Quick Parts, the NormalEmail.dotm file also contains settings for all the styles that you have added or modified. So, when you back up and restore Quick Parts, your custom styles are also copied and restored.
How to add attachments to Quicks Parts
Sorry, bad news first - there is no way to add an attachment to a Quick Part :(
The good news is that there are at least two other ways to automatically add attachments in Outlook:
- Outlook email templates with attachments.
- Use Shared Email Templates to automatically attach files to new messages, replies and forwards.
Shared Email Templates - awesome alternative to Quick Parts
The Quick Parts and AutoText galleries surely beat manual copying and pasting. But I personally do not use them in my work. Why? Because I have a better choice - Shared Email Templates for Outlook.
The Email Templates tool has a number of unique features that make it superior to Outlook Quick Parts:
- Reply faster. To get to Quick Parts, you have to switch between tabs and navigate through menus. Email Templates, residing on a special pane in every message that you compose, is one click away.
- Organize better. Quick Parts has no hierarchy. Email Templates allows creating a tree-view with as many subfolder levels as you want.
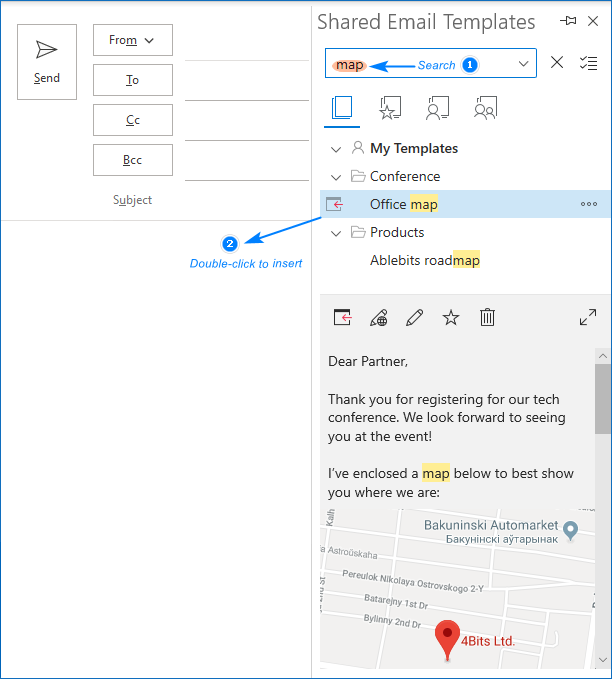
- Find quicker. The Quick Parts gallery can become disorderly if you add too many pieces. The search option on our add-in's pane makes finding the right piece super-easy.
- Share easily. There is no easy way to share your Quick Parts with someone. With our tool, you can create teams, invite members, share templates, and give different permissions to your teammates depending on their roles.
- Edit comfortably. Previewing and editing the Quick Parts content is quite complicated and time-consuming. Email Templates allows editing directly on the preview pane or in browser.
- Attach files. It's not possible to add attachments to Quick Parts. With Email Templates, you can attach files, fill in the Subject line, populate To, Cc and Bcc fields, and a lot more!
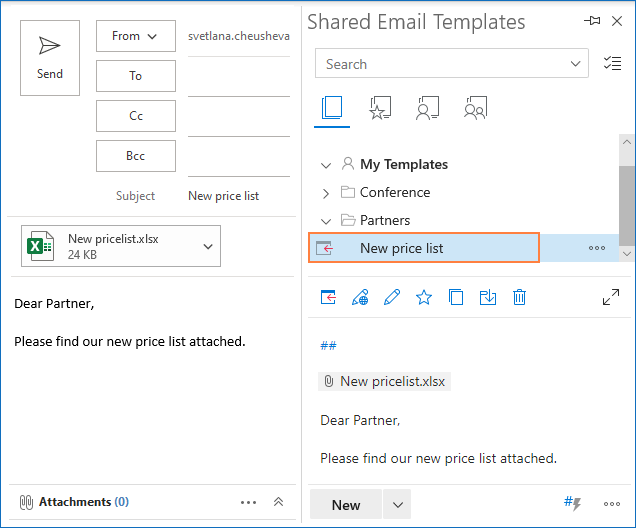
As an example, let's create a template for sending a new price list to your partners. So, you compose the message, add the desired graphics and formatting, and then do the following:
- Select all the content that you want to include in a template.
- On the add-in's pane, select the folder where your new template should be stored, and click the New button.

- Type an appropriate name for your template, and for the most part the work is done.

- Optionally, you can automate a couple more things with macros. As an example, we will add attachment and fill in the Subject line. For this, click the Insert macros button and select the desired macro from the list.

- Click the Save button, and the new template is added to your collection.
And now, whenever you want to reply with template, simply double click its name.
Voilà, your response is ready to go - the text is inserted, the attachment is added, and the Subject line is filled, all with a mouse click!
This is only a quick and short introduction to our new Templates tool, but there is much more to it! If you are curious to discover other useful features, you are welcome to try:
 by
by
6 comments
Can Quick Parts be used for header items (To, CC, Subject)?
Hi Brandon,
Thank you for your question. Quick Parts only work in the body of an email message; they can’t be applied to email fields like To, CC, or Subject. If you’d like to reuse text for those fields, you can create an Outlook template (.oft file) or use Quick Steps to prefill recipients and subject lines.
Can Quick Parts be used when setting up an appointment? For example, when you set up a meeting with a customer and you want to include a standard agenda, can you do this with Quick Parts. If not, is there another option
Hi Cyndi,
Yes, you can use Quick Parts for meetings and appointments in exactly the same way as for emails.
However, there are a few better ways to set up a meeting agenda template in Outlook. You can find the examples and detailed instructions here: How to create a meeting template in Outlook.
Any idea if this can be done on the mac version? I am currently looking for this exact thing!
Many thanks in advance.
Marcus
Hi Marcus,
You can try our Shared Email Templates. This tool works for Windows, Mac, and Outlook Online.