In this article, you'll learn how to create and use color categories in the new Outlook to make the most of your email experience.
In modern email communication, the sheer volume of messages can easily become overwhelming. To help users manage their workloads more effectively, Microsoft Outlook offers color categories. These visual markers allow you to classify emails, calendar events and tasks, making it easier to identify and group related items.
In the new Outlook, available both as a desktop application and a web-based platform, Microsoft has refined its user interface, including some changes to how color categories are managed.
Note. This article covers color categories in the new Outlook and web. If you are using the classic (old) application, please refer to Outlook categories: how to create, edit, and use.
Color categories in the new Outlook
Color categories are customizable tags that you can assign to various Outlook items, including emails, tasks, meetings and appointments. Each category is represented by a specific color, which helps you visually identify the nature, priority, or context of an item. For instance, you might use a red category to indicate high-priority emails, green for personal emails that are not urgent, and blue for work-related calendar events.
Outlook provides several default color categories, but you can also create your own to suit your specific organizational needs. Additionally, you can assign more than one category to the same item, offering flexibility in tagging communications that belong to multiple projects. It's worth noting that color categories are for your personal organization - other people won't see the categories you've assigned, even when you send emails or share calendar events.

How to access and view categories in new Outlook
In the new Outlook and the web app, there are three main ways to access, view and manage your categories.
From a message
You can easily view categories directly from an email:
- Right-click on any message in any folder.
- From the context menu, select Categorize > Manage Categories.
This allows you to quickly get to the categories without leaving your inbox.

From the ribbon
Another way to access your categories is via the ribbon:
- Select any message in your inbox or another folder.
- On the new Outlook ribbon, click Categorize > Manage Categories.
This is a convenient method when working with multiple items, as the ribbon is always visible when you're composing or viewing your messages.

Note. If no message is currently selected, the Categorize button will be inactive (grayed out), so make sure to select a message first.
From settings
The Settings menu is the central hub for managing various features in the new Outlook, including categories:
- Click the Settings gear icon in the upper-right corner of the new Outlook app.
- In the Settings menu, go to Accounts > Categories.
- If you have multiple accounts, select the appropriate one from the dropdown list to view categories specific to that account.
The below screenshot shows the default categories in the new Outlook.

In Outlook on the web, Categories are under the General settings:

These methods provide quick access to view, add, and modify your categories, making it easier to stay organized across all your Outlook platforms.
How to create a new category in Outlook
Creating custom categories in the new Outlook is straightforward. Here's how you can do it:
- Depending on your work preferences, you can start creating a new category in any of three ways:
- From a specific email. Right-click an email or calendar item, and then click Categorize > New category.
- From the ribbon. Select Categorize > New category on the ribbon.
- From settings. Click the Settings gear icon, then go to Accounts > Categories > Create Category.

- Give your new category a name, select a color, then click Save.

- Your newly created category will be added to the list and becomes available in any Categorize menu throughout the new Outlook app. You can assign it to emails, calendar events, and tasks.

How to use categories in new Outlook
In the new Outlook and web app, you can easily add color categories to emails, calendar events, and tasks. Here's how to use them:
Categorize emails
To assign a color category to an email in the new Outlook, just do this:
- Locate the email in your inbox or any other folder.
- Right-click the message, hover over Categorize, and select the category you want.
If you have many categories, you can use the search box to quickly find the right one.

If you're viewing the email in the reading pane, click the Categorize button on the Home tab of the ribbon, and then choose a category from the dropdown list.

Apply categories to calendar items
You can also categorize meetings and appointments in two ways:
From the calendar view. Right-click the event in your calendar, select Categorize, and choose a specific category from the list.

From an open calendar item. If you have a calendar item open, click Categorize on the Meeting or Appointment tab of the ribbon, and then choose the desired category.

Categorize tasks
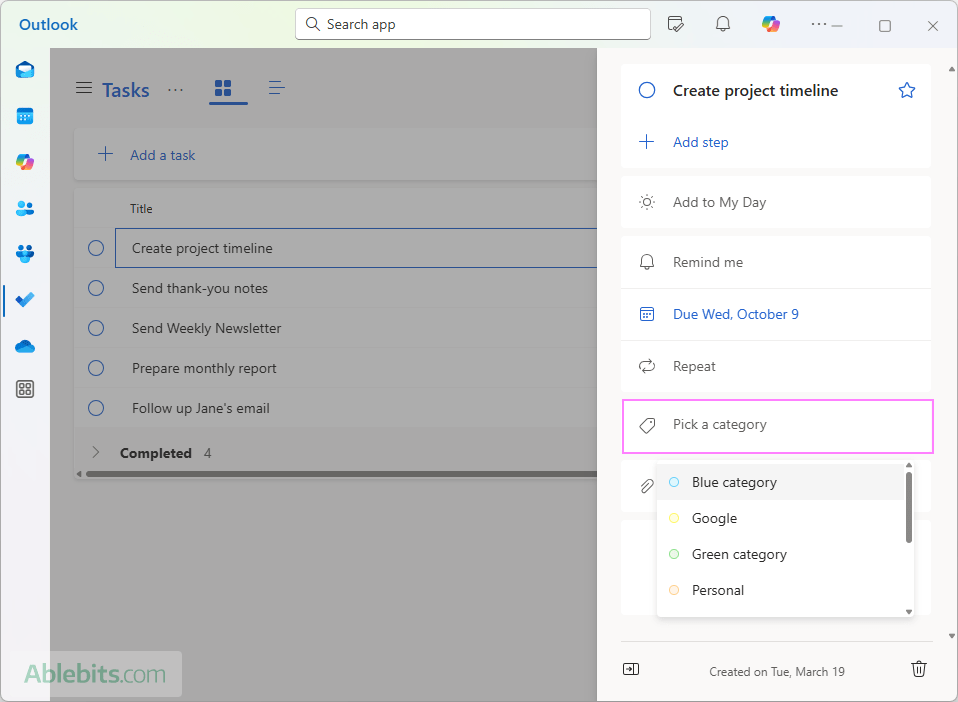
Assigning categories to tasks (To Do items) in the new Outlook works a bit differently. The context menu is not available. Instead, when you select or right-click a task, a pane appears on the right side of the screen, where you can choose an action.
To assign a category to a task, you can either:
- Click Pick a category, and choose the category from the list.
- Alternatively, start typing the category name directly in the box, and Outlook will show a list of matching categories for you to select.
How to edit categories in new Outlook and web
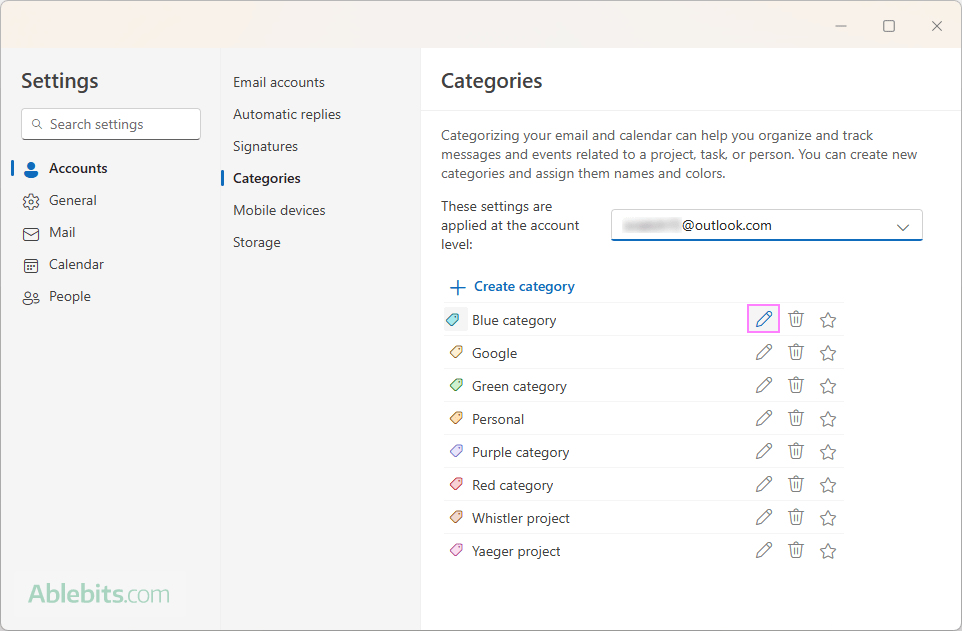
The new Outlook lets you modify both the default categories and custom ones you've created. Default categories come with generic names based on colors, such as "Red" or "Blue," but you may want to rename them to something more meaningful that aligns with your workflow.
- On the ribbon, click Categorize > Manage categories. Alternatively, go to Settings > Accounts > Categories to access the same interface.
- Click the Edit button (pencil) next to the category you would like to modify.
- Rename the category or choose a different color.
- Click Save to apply the changes.
By customizing categories in this way, you can create a more personalized and efficient organizational structure in your Outlook.
How to clear categories in new Outlook
To clear the categories assigned to an email or a calendar event, do this:
- Right-click the item from which you want to remove categories.
- From the context menu, choose Categorize.
- To remove all assigned categories, select Clear all categories.
- To clear a specific category, click on its name (assigned categories will have a checkmark next to them).
This will unassign the categories, helping you manage and adjust your item classifications as needed.

How to delete categories in new Outlook and web
If a category is no longer needed, you can permanently remove it in just a couple of steps:
- Access the category settings.
- Click the Delete button (trash bin) next to the category you would like to remove.
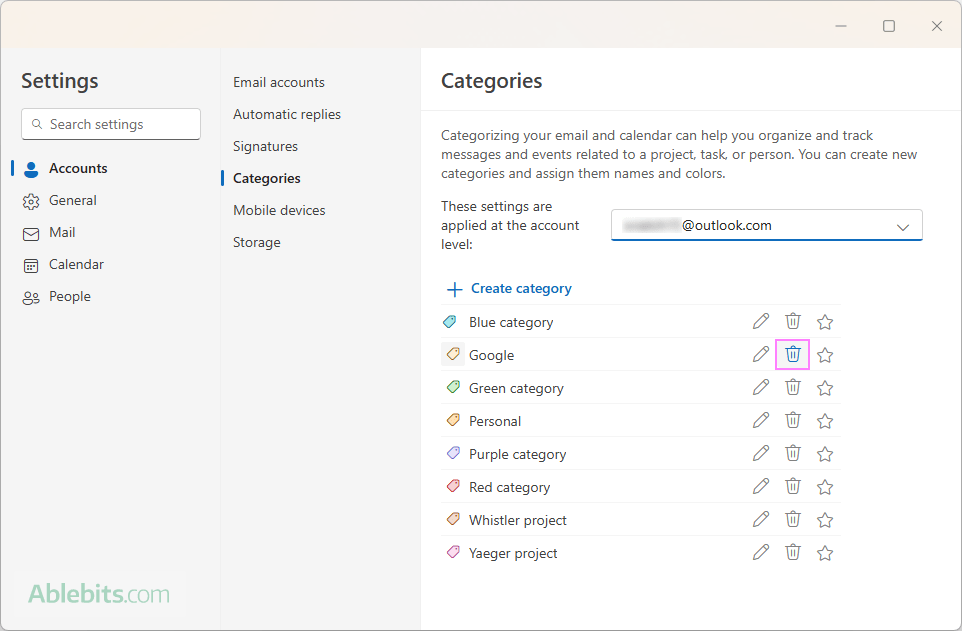
Once deleted, the category will no longer be available for use, and it will be removed from any items previously tagged with it.
How to sort by category in new Outlook and web
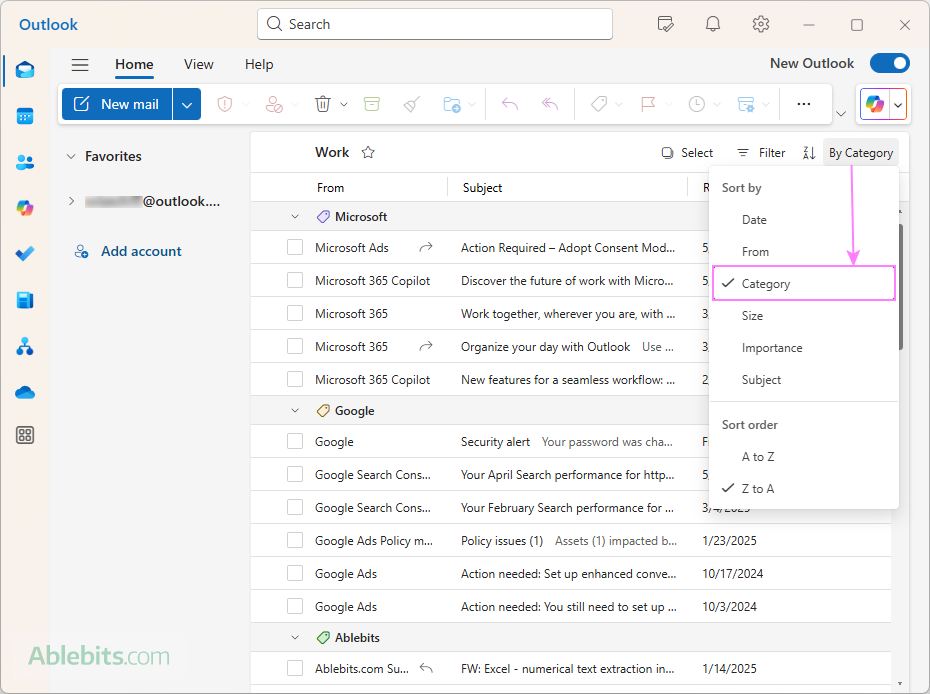
To sort emails by category in the new Outlook, just do this:
- Go to your Inbox or any other mail folder you want to sort.
- Click the Sort button in the upper-right corner. By default, this is usually set to By Date.
- From the drop-down list of options, choose Category.
Your emails will now be grouped by the color-coded categories you've assigned to them, very much like in the classic desktop Outlook application.
How to filter by color category in new Outlook and web
The new Outlook app has a very convenient category filtering feature that many users might not be aware of.
To quickly filter emails by a specific category, you simply click on the category tag assigned to any email in your Inbox. This will show you all emails in that category.
When filtering emails by category as explained above, you'll see all messages tagged with that category across all folders in the selected account. To limit the filter to a specific folder, say Inbox, just click on the folder name displayed next to the Subject line.
To exit the filtered view, click the left-pointing arrow in the search box. This will return you to your regular inbox view.
Currently, the filter by category feature in the new Outlook behaves in this way: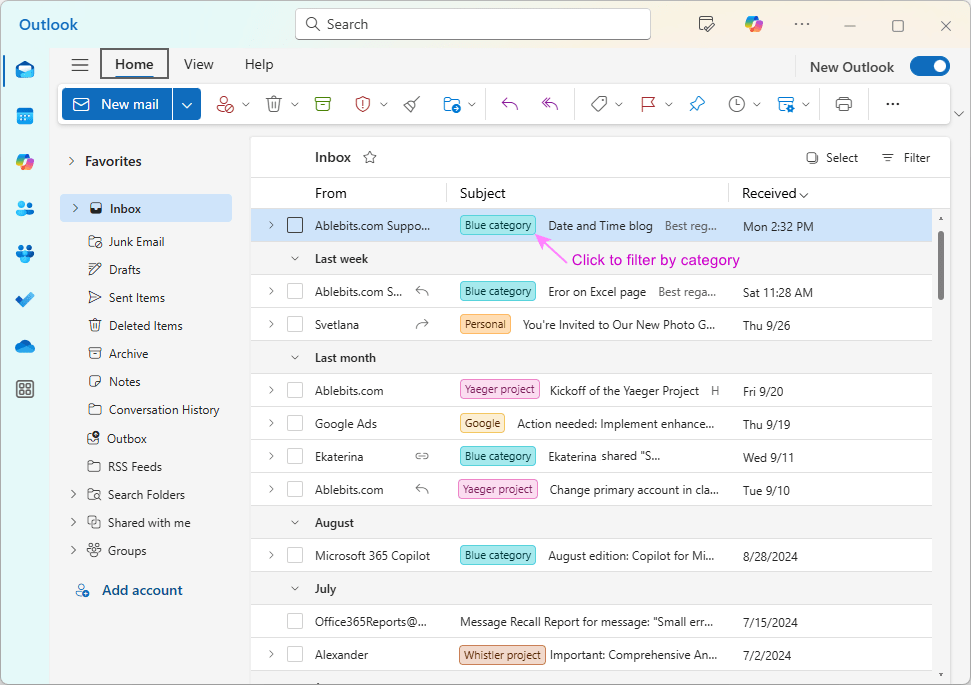
Filter specific folder
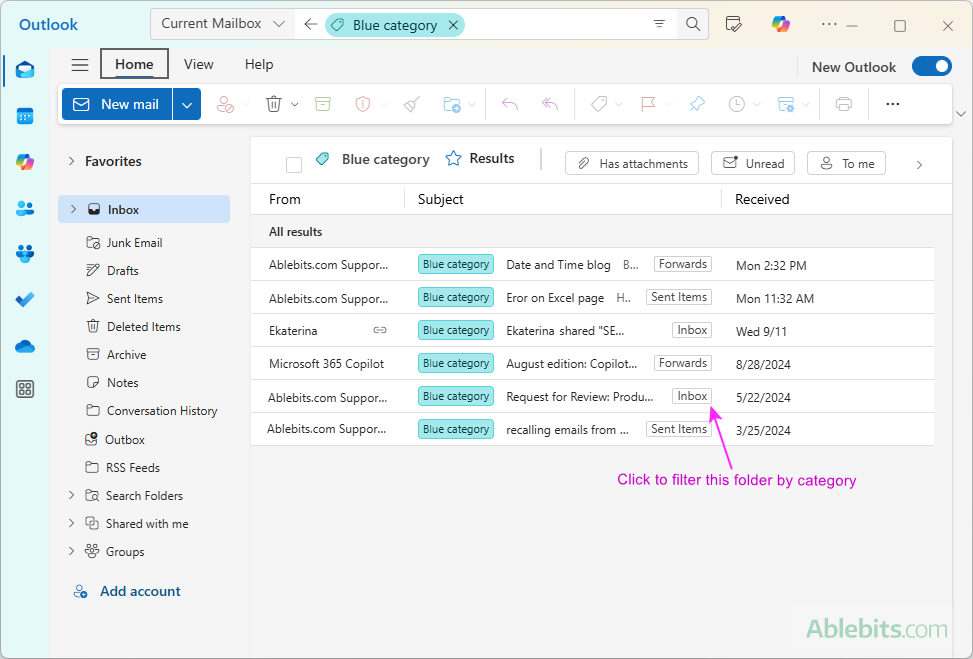
Clear the filter

Notes on filtering behavior
How to add certain categories to folder pane (Favorites)
In addition to filtering, the new Outlook app has one more very useful feature - favoriting categories - which allows you to quickly view all emails associated with a specific category.
- Open the Categories settings by navigating to Categorize > Manage categories.
- Click the star icon next to the category you want to favorite.
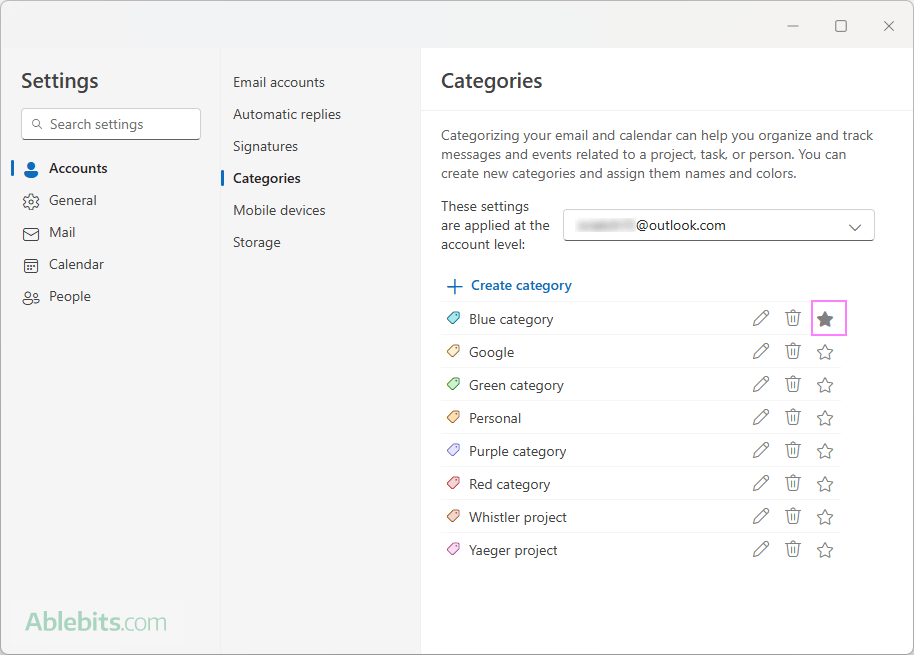
This will place the category on the folder pane under Favorites. Thus, you will be able to see all the emails tagged with that category across your Inbox and other folders.

How to search by category in Outlook
To search by category in the new Outlook and web, you can make use of the Search Folder functionality. Here's how:
- In the Navigation pane, right click Search folder, and then click Create new search folder.

- In the New Search Folder dialog window, choose Categorized Mail from the Select a type dropdown box.

- Give your search folder a meaningful name.

- In the Select a category dropdown, choose the categories you want to include in the search. If you accidentally select a wrong category, simply click on it again to unselect.

- Once you've selected your categories, click Create to save the folder.

The newly created search folder will now appear in your folder list, automatically updating as you categorize or uncategorize more items in any of your folders.

Tips for managing color categories in new Outlook
Customize category names
You can change the default category names to reflect specific workflows or priorities. For instance, instead of using generic names like "Red" or "Green," you can rename them to "Urgent" or "Personal" for added clarity.
Add multiple categories to a single item
One of the most powerful aspects of Outlook categories is that you're not limited to assigning just one per item. You can add multiple categories to a single email, calendar event, or task. This is particularly useful for cross-project or hybrid work tasks.
Assign categories automatically
For an even smoother process, you can set up rules that automatically assign categories to incoming emails based on sender, subject, or other criteria.
Syncing categories across devices
If you're using multiple devices, the new Outlook syncs your categories across them, ensuring that the same organizational system follows you whether you're using Outlook on your phone, desktop, or browser.
In conclusion, by getting the hang of Outlook categories, you're not just organizing your inbox - you're making your day so much easier. Whether it's emails, meetings, appointments or tasks, color categories keep everything in check and help you stay on top of things. Once you start using them, you'll wonder how you ever managed without them ?
 by
by