This tutorial provides simple steps to make email templates with images in Outlook 365 - 2016, including the classic desktop version, new Outlook, and web app.
Using email templates in Outlook isn't just about saving time - it's about crafting emails that look great every time you send them. Adding images to your templates can make your messages stand out, be it a company update, a creative newsletter, or a personal note. The good news? Setting up an email template with pictures is super easy! In this guide, I'll show you how to create one step-by-step, so your emails look polished and ready to impress.

How to create an Outlook email template with images
First, let's see how to make a traditional .oft template with pictures in the classic (old) desktop application, including Outlook 365, 2024, 2021, 2019, and earlier versions.
Step 1: Create a new message
Start by opening the classic Outlook app. On the Home tab, click New Email to compose a new message. Write the content you want to include in your email template and format it as desired (adjust font style, size, and color as needed).
Step 2: Add an image to the email
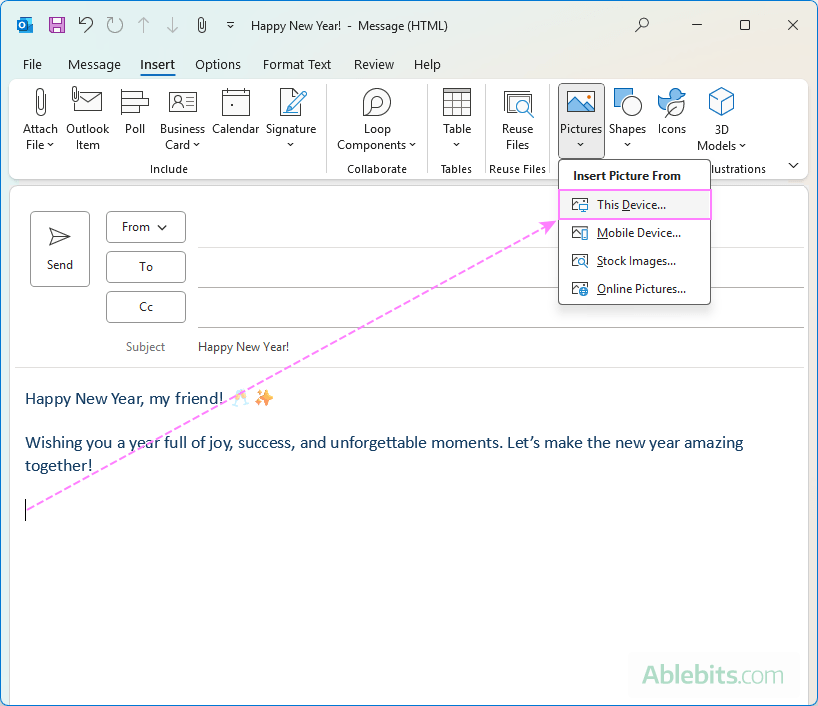
To insert a picture into your message, do this:
- Place your cursor where you want the visual to appear.
- Navigate to the Insert tab and click Pictures.
- Choose from the following options:
- This Device - upload an image from your computer.
- Mobile Device - upload from your phone or tablet.
- Stock Images – select from free pictures provided by Microsoft.
- Online Pictures - search the web.
- Once your image is inserted, resize or reposition it by clicking and dragging its corners, or adjust it using the formatting options in the ribbon.
Step 3: Save as template
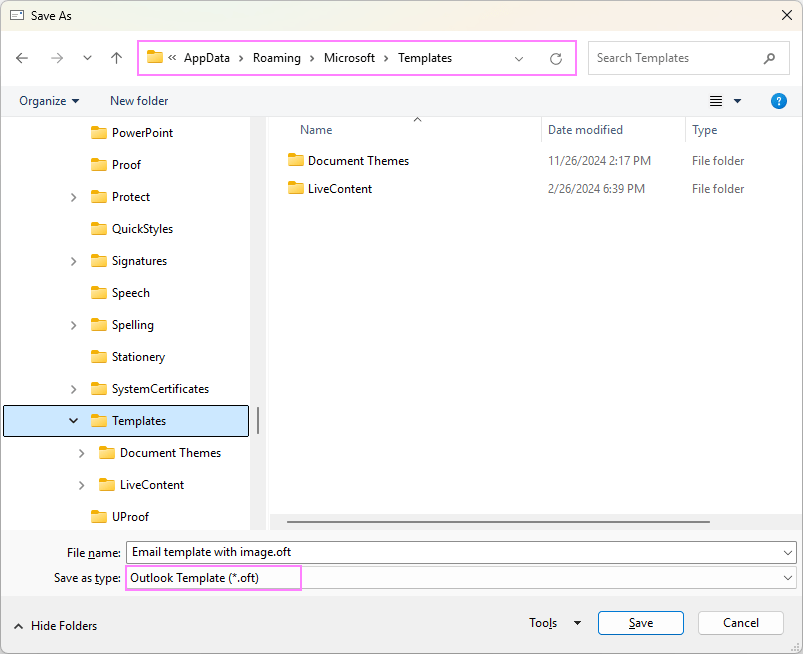
When you're happy with the design of your email, save it as a template:
- Click File > Save As.
- In the Save as type dropdown menu, select Outlook Template (*.oft).
- Enter a file name for your template and click Save.
Step 4: Use your email template
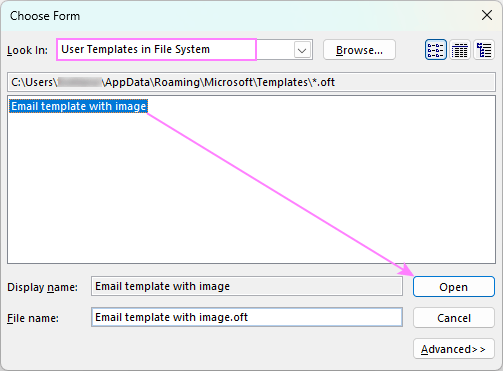
To create a new message from your template with image, do this:
- Go to Home > New Items > More Items > Choose Form.
- In the Look in dropdown menu, select User Templates in File System.
- Choose your email template with picture and click Open.
- Customize the email with any new information or adjustments, and then send it just like any other email.
By following these simple steps, you can create professional, visual-rich email templates in Outlook that you can easily reuse and customize.

Tips:
- Add a background image. To add depth and style to your messages, you can set a background image for the email template.
- Share your template. Save your template to a shared OneDrive folder instead of the default local location to share the template with others, so that everyone on the team can access and use it whenever needed.
For more details, please visit how to make and use email templates in Outlook.
How to add an image to email template in new Outlook and web
Though email templates in the new Outlook and web app are primarily designed for text content, you can still incorporate small, lightweight pictures into them. Here's how:
Step 1: Access My Templates pane
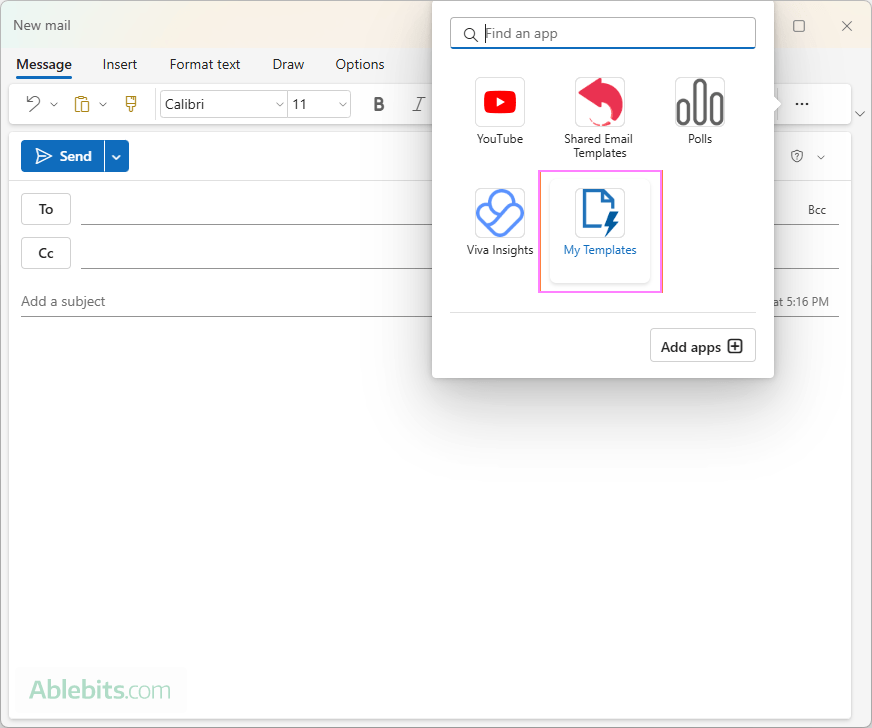
- When composing a new message or replying to an existing one, head over to the Message tab.
- Click Apps in the ribbon. If you don't see this option, click More options (…) in the top-right corner and select Apps under Add-ins.
- In the small window that pops up, click My Templates. The templates pane will appear on the right side of your screen.
Step 2: Create a new template
- Click the + Template button to start crafting your template.
- Enter a name for your template, and type in the content.
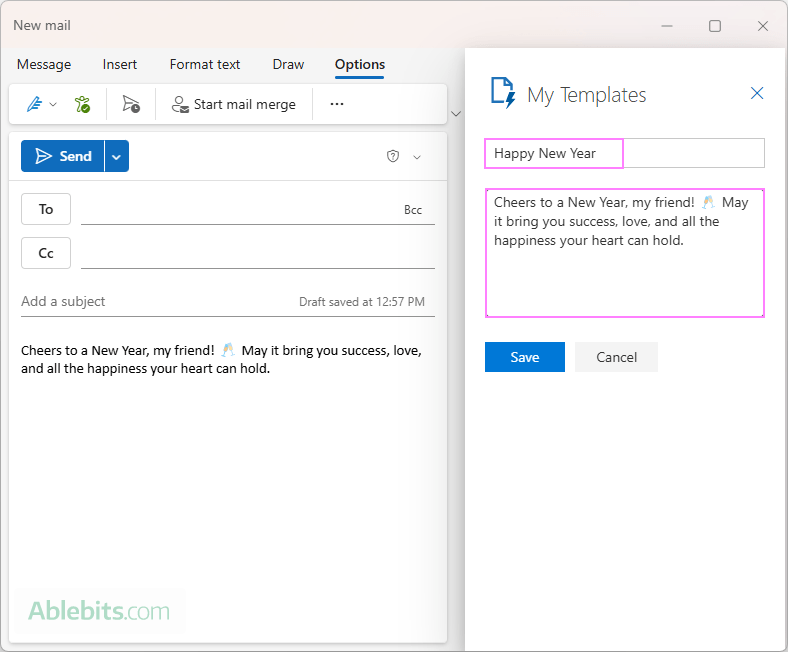
Step 3: Add an image
In addition to the text content, you can add an image to the email template by using the traditional copy / paste keyboard shortcuts.
If your picture won't copy directly from the software program where it's open, first insert it into your email by clicking the Insert tab > Pictures. Then, copy the picture from the mesage body (Ctrl + C) and paste (Ctrl + V) it into the template content box.

Step 4: Save template with picture
Once you're satisfied with your template, click Save.
Step 5: Use your template
To use the template with picture in future emails:
- Open the My Templates pane by going to the Message tab > Apps > My Templates.
- Click on the canned response you want to use. The text content and visuals will immediately appear in the body of your email.
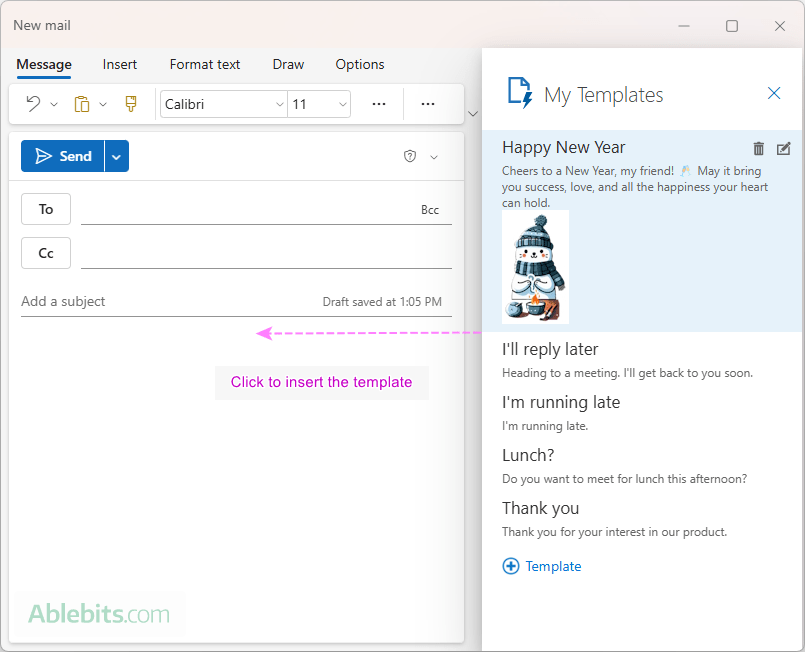
That's how you can create simple templates with visuals in the new Outlook and web app, helping you respond efficiently and with style.
Important note! The new Outlook and web version have a 32KB limit on the combined size of all templates. To avoid exceeding this limit, ensure your images are very small and lightweight.
For more information, please refer to Email template in new Outlook and web.
Make a shared email template with image in Outlook (old, new and web)
If you're tired of dealing with the complexities of .oft templates in the old Outlook and the limitations of built-in templates in the new Outlook, let me introduce you to a smarter, more flexible solution - Shared Email Templates.
No matter which Outlook version you're using - classic desktop, new app, or web - you can easily add images to your templates in a few simple steps:
- Use the Insert Picture option. When creating a new template or editing an existing one, click the Insert Picture button on the editing toolbar of the Shared Email Templates pane.

- Choose the image source. You can insert visuals from various sources:
- OneDrive, SharePoint, or a direct URL
- Your user profile, team properties, or company account
- Azure AD profile photos

- Select your image. Browse and pick the picture you'd like to incorporate into your email template.

- Customize image settings (optional).
- Adjust the visual size to fit your design.
- Make the image clickable by adding a hyperlink.
If you don't need these options, simply leave the fields blank.

- Personalize your template (optional). Add a personal touch by including dynamic details like the recipient's name in the greeting line, pre-filling the subject line, and more.
- Save the template. Once you're ready, save your template.

To insert your newly created template into an Outlook message, double-click on it or use the Paste button next to it.

That's it! In a single click, you've got a perfectly formatted email complete with visuals, ready to send.
An advantage of this approach is that the image embedded in the email template will automatically update whenever the original picture stored in OneDrive or SharePoint is changed. This ensures your template always contains the most up-to-date visuals without requiring any manual effort on your part.
Want to give it a try? Download the free version of Shared Email Templates on Microsoft Marketplace and see how much faster and easier Outlook email communication can be.
That's how you can make attractive, personalized email templates with pictures in different Outlook versions. Try it out and watch your emails go from basic to brilliant ?
 by
by