A comprehensive guide on creating, adding and updating email signatures in the new Outlook and Outlook online.
In professional communication, email signatures are like your digital business card. They share your important contact details and help you make a lasting impression. In the new Outlook, setting up and using email signatures is super easy. Let me show you how:
Note. This guide covers creating email signatures in the new Outlook. If you're using the old desktop application, please refer to How to make and change signatures in classic Outlook.
How to make email signature in new Outlook
Creating a signature in the new Outlook app is a simple process. Follow these steps to make a new signature for your emails:
- In the upper-right corner of the new Outlook app, click the Settings gear icon. Alternatively, on the View tab, select View Settings.
- In the Settings menu, go to Accounts > Signatures.
- Signatures in the new Outlook are account-specific. If you have multiple accounts, select the one you want from the dropdown list in the upper right corner.
- Click the New signature button.

- Give your signature a short, meaningful name that you can easily recognize.
- In the editor box, type your signature. Customize it using formatting options like font, color, and styles to achieve the desired look. You can also add elements such as hyperlinks, emojis or images (e.g. your photo or a company logo).
- Once you're satisfied with the design, click Save.

Your new signature is now ready and can be applied automatically to all outgoing emails or selected manually as needed.
How to set up signature in Outlook on the web
To add a new signature in the Outlook web app and Outlook.com, the steps are:
- Click the Settings icon in the upper-right corner of the Outlook window.
- In the Settings window, navigate to Account > Signatures.
- Under the Email signature section, type the name and content of your signature. Use the available formatting options to customize it for a personalized touch.
- When you're done, click Save.
And there you have it! Your new signature is now ready to use in your emails.

Tip. If you already have a signature, e.g. one created earlier in the desktop Outlook app, and you'd like to add another, click the New signature button to set up and manage multiple signatures.
Note. In earlier versions of Outlook on the web (work and school accounts) and Outlook.com, the signature settings were under Mail > Compose and reply. A while ago, they moved to the Account tab as shown above.
How to add hyperlink to signature in new Outlook
Just like the classic app, the new Outlook lets you make any text or image in a signature a clickable hyperlink. Here's how you can do it:
- Select the place. In the signature editor, place the cursor where you want to insert a link. Alternatively, select the text or image you want to make clickable.
- Add the link. In the formatting toolbar, click the Insert link icon, or press the Ctrl + K keyboard shortcut.

- Enter link details. In the Insert link pop-up dialog box, enter the text you want to display and the full web address (URL) in the corresponding fields. If you've selected text in the signature, it will be added to the Display as box automatically.

- Format the link (optional). By default, the link will appear with the traditional blue underline formatting. To make a link with no underline, select it and click the Underline icon in the toolbar, or press the Ctrl + U shortcut. You can also change the font color from blue to match the main font color of your signature.

- Save the signature. When done, click Save to apply the changes.
The screenshot below shows an example of a new Outlook signature with a hyperlink formatted to blend in with the signature's style, which is still a clickable link.

This method allows your Outlook signature to maintain a polished look while incorporating clickable links.
How to add picture to new Outlook signature
To personalize your Outlook signature, you might want to add your photo, social media icons, a company logo, or other graphics.
Here's how to add an image to a signature in the new Outlook app and web version:
- Insert a picture. In the signature editor, place the cursor where you want to add an image and click the Insert pictures inline button in the toolbar.

- Upload a picture. Browse your computer, select the image you want to use, and click Open. The selected image will be inserted into your Outlook signature.
- Customize the image (optional). Right-click the inserted image to resize it, add alternative text, or make other adjustments.

- Make the image a clickable link. To turn the inserted image into a clickable link, select it and click the Insert link icon in the toolbar. Then, enter the URL you want to link to in the Web address (URL) box.

- Save the signature with picture. When you are happy with your signature, click Save to apply the changes.
And that's it! Your Outlook signature now includes an image, making it more visually appealing and professional.
For more information, see Adding an image / photo to the new Outlook signature.
How to automatically add signature in Outlook
To save time and maintain consistency, you can set default signatures that will be automatically added to each outgoing email. Different signatures can be used for new messages and replies/forwards. Here's how to do it in the new Outlook and web:
- First, get to your signatures. In the new Outlook app, go to Settings > Accounts > Signatures. In the web version, navigate to Settings > Mail > Compose and reply.
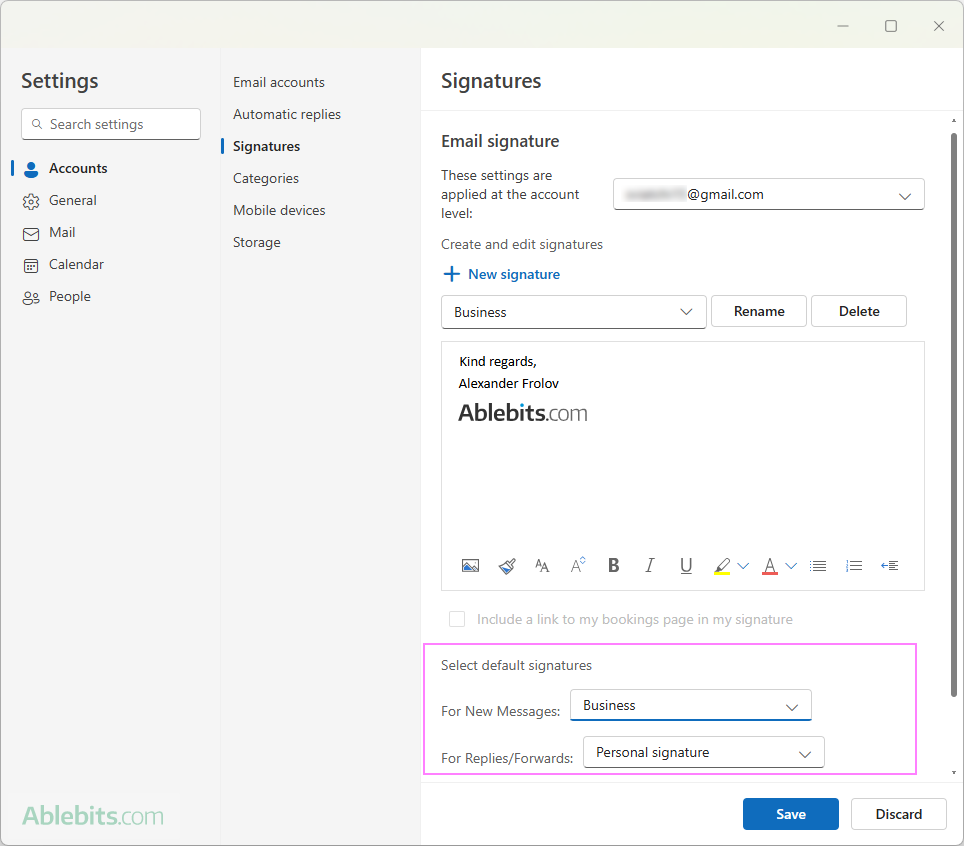
- Under Select default signatures, choose which signature to add to new messages and which one to replies and forwards. This can be the same or two different signatures.
- Click Save to apply your settings.

For more information, see How to set up auto signature in new Outlook.
How to insert signature in new Outlook and web manually
If you've created multiple signatures for different occasions or purposes, you can manually insert the most appropriate one while composing an email. Here's how:
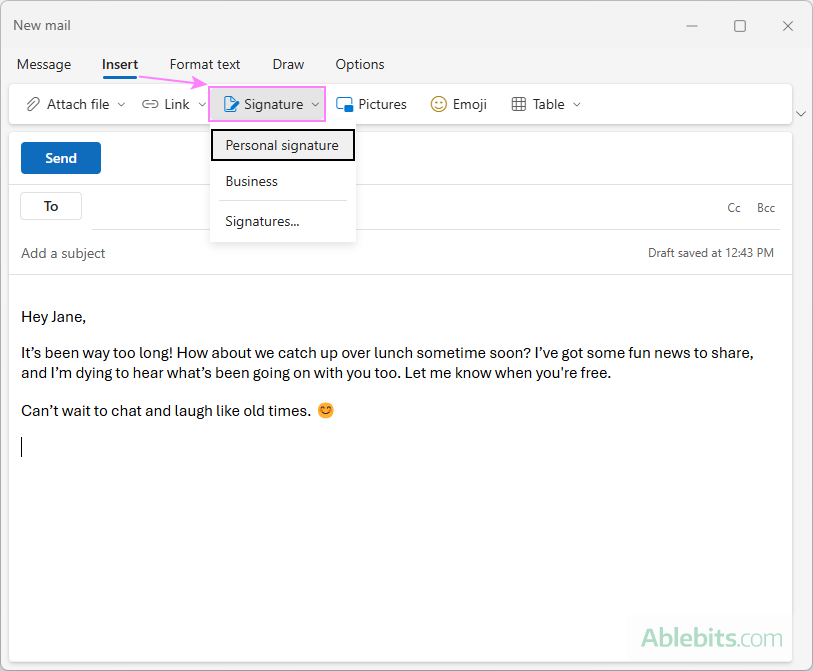
- In a new message or reply, switch to the Insert tab, and click Signature.
- Choose the specific signature you want to use from the drop-down menu.
- Once your email is ready and the signature is in place, click Send.

This option allows you to select a tailored signature depending on the context of the email.
How to update an existing signature in new Outlook
If you want to change the look or content of an existing email signature, here's how you can edit it in the new Outlook and web app:
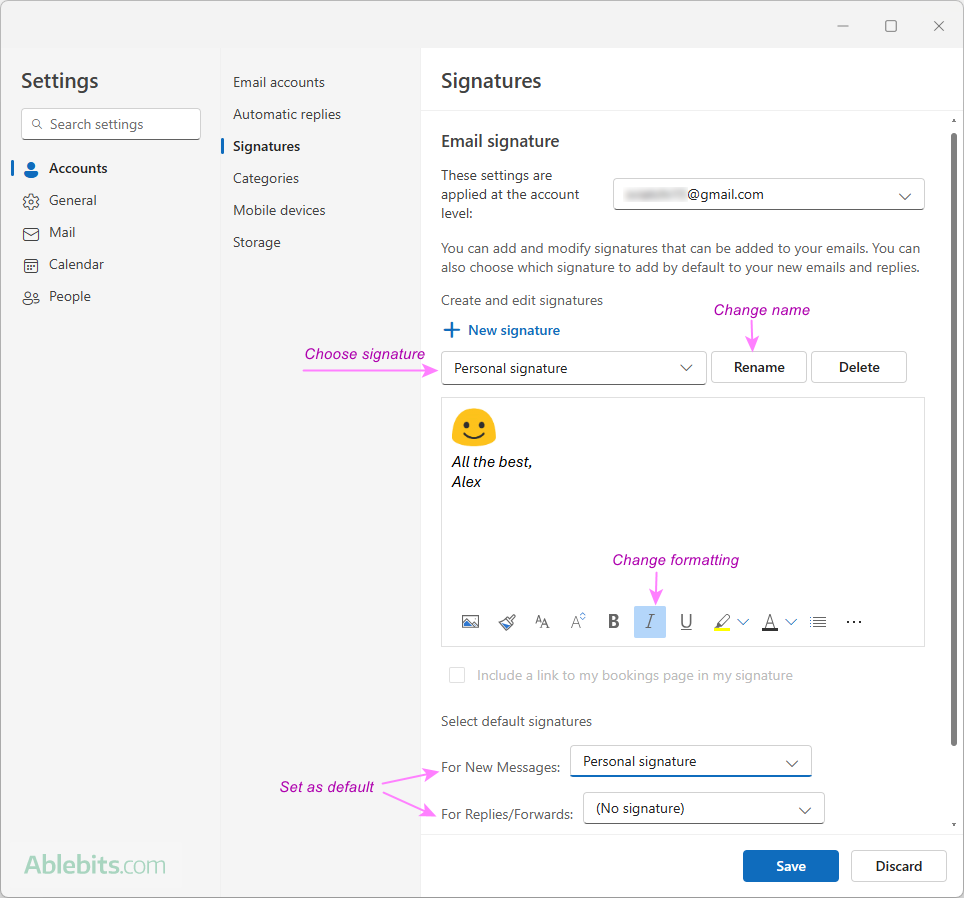
- Access your current signatures by clicking Settings > Accounts > Signatures.
- From the list of existing signatures, choose the one you want to edit.
- To modify the text of the signature, make the changes directly in the editing box.
- To adjust the signature's appearance, use the formatting options (fonts, colors, styles) at the bottom of the editor.
- If you'd like to change your default Outlook signatures, simply select the desired ones from the New messages and Replies/forwards dropdowns. You can choose any of your existing signatures - not just the one you've edited.
- Once you've made your edits, click Save to apply the updates.

For more information, see How to update signatures in new Outlook and web.
How to delete a signature in new Outlook and web
If you no longer need a specific email signature, you can easily remove it from Outlook. Follow these steps to permanently remove a signature:
- In the new Outlook app, click Settings > Accounts > Signatures.
- From the list of signatures, select the one you want to remove.
- Click the Delete button.
Once deleted, the signature will no longer be available for use in your emails.

Where are new Outlook signatures stored?
Unlike the classic Outlook application, where email signatures are stored locally on your computer, the new Outlook stores signatures in the user's mailbox on the cloud. This means you can't import, export, or back up a signature file for the new Outlook.
However, the advantage is that when you switch devices, your signatures in the new Outlook are synchronized automatically. In contrast, signatures in the old Outlook are not synced and will need to be recreated on each new device.
Note. Due to the difference in storage methods between the old and new versions, some email accounts may not have synchronized signatures in classic and new Outlook.
Now that you know how to create, update, and manage your email signatures in the new Outlook and web, you're all set to leave a lasting impression with every email you send. Whether it's a quick note or a detailed message, your signature will add that extra touch of professionalism and personality.
 by
by