The tutorial shows how to keep formatting of numbers, dates, percentage and currency when doing a mail merge from Excel to Word or change it to your liking.
In one of our previous articles, we looked at how to mail merge from Excel to Word to send personalized letters or email messages. As it turned out, using Word's Mail Merge to automate the creation of a document from an Excel worksheet may present lots of challenges. Some fields might not be populated or filled with wrong information. Numbers properly formatted in Excel may not appear correctly in a Word document. Zip codes may lose leading zeros. The troubleshooting tips below will help you fix typical Mail Merge formatting problems.
How to mail merge and keep formatting
When performing a mail merge from an Excel worksheet, some of your numeric data may lose formatting after coming through the merge. The problems typically occur with numbers formatted as percentage or currency, or numbers containing leading zeros such as zip codes.
Cause: By default, Microsoft Word uses the OLE DB connection, which pulls in the information but not formats. As a result, in a Word document, the data appears in the format in which it is stored internally in Excel, and not in the format applied to cells.
To illustrate the problem, please have a look at the source data formats in an Excel worksheet:

Now, see what happens in a Word mail merge document:

- Zip code - appears without a leading zero. In Excel, a leading zero is displayed because a cell has a custom number format such as 00000. In Word, an underlying value (2451) shows up.
- Currency - appears without the currency symbol, thousands separator, and decimal places. In Excel, the number is formatted as Currency ($3,000.00). In Word, a number in its pure form is displayed (3000).
- Percentage - normally, appears as a decimal number corresponding to the percent; in some cases - a floating-point number. For example, 30% formatted as Percent in Excel may appear as 0.3 or 0.299999999 in Word.
- Date - appears in the default format set in your Region settings. In our case, Excel's date 20-May-22 is transformed into 5/20/2022 in Word.
Solution: For Word to display postal codes, dates, prices, percentages and other numeric values in the right format, connect to your Excel workbook using Dynamic Data Exchange (DDE).
How to use Dynamic Data Exchange to connect to Excel sheet
Before starting a mail merge, perform the following steps in Microsoft Word.
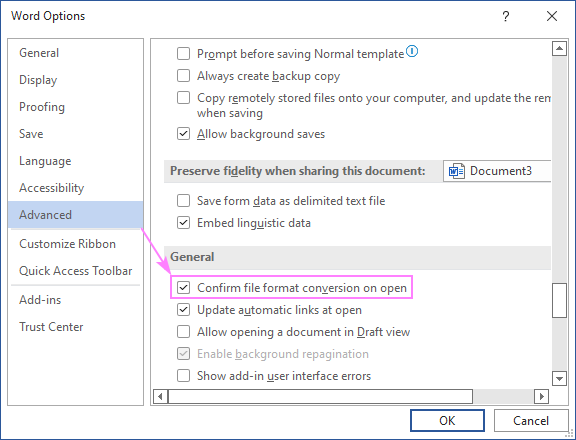
- Go to File > Options > Advanced.
- Scroll down to the General section, select the check box Confirm file format conversion on open and click OK.

- Start your Mail Merge as usual (the detailed steps are here). When it comes to selecting recipients, choose Use an existing list.
- Browse to your spreadsheet, select it, and click Open (or double-click the file).
- In the Confirm Data Source dialog box that opens, check the Show all box in the lower left corner, then choose MS Excel Worksheets via DDE (*.xls), and click OK.

- Click Entire Spreadsheet, and OK.

It may take Word quite a while to connect to your Excel data source via DDE, so please be patient - this will save you even more time in the long run :)
Tip. To prevent multiple prompts displayed by Word every time you open the data file, clear the Confirm file format conversion on open check box after connecting to your mailing list.
Now, all numeric values in the Word mail merge document retain their original formats.

How to format specific mail merge fields
Connecting to an Excel worksheet via DDE is the fastest way to fix all formatting problems in one go. If this solution is not applicable to you for some reason, you can control the formatting of Excel data in Word by adding a numeric switch (formerly called a picture switch) to a particular merge field.
A numeric switch is a kind of mask that lets you format the contents of a field in a Word document the way you want. To add a numeric switch, perform these steps:
- Select the merge field whose format you want to change. This can be Date, Currency, Percent or some other field.
- Press Shift + F9 to display the coding of the selected field or Alt + F9 to expose the codes of all the fields in your document. A generic field code looks something like { MERGEFIELD Name }.
- Add a numeric switch code to the end of the field.
- With the cursor positioned anywhere in the field, press F9 to update it.
- Press Shift + F9 or Alt + F9 again to hide the field code, and then preview the result.
The following examples will get you through a few typical scenarios.
Mail merge: number format
To get numbers to appear in the right format (the same or different than in your Excel file), use the following numeric switch codes.
| Numeric switch | Example | Description |
| \# 0 | 3000 | Rounded whole number |
| \# ,0 | 3,000 | Rounded whole number with a thousand separator |
| \# ,0.00 | 3,000.00 | Number with two decimal places and a thousand separator |
For example, to format a whole number with a thousand separator, use the numeric switch \# ,0 so the Number field changes to:
{ MERGEFIELD Number\# ,0 }

Mail merge: currency format
To format currency in mail merge, these are the codes to use:
| Numeric switch | Example | Description |
| \# $,0 | $3,000 | Rounded whole dollar with a thousand separator |
| \# $,0.00 | $3,000.00 | Dollar with two decimal places and a thousand separator |
| \# "$,0.00;($,0.00);'-'" | ($3,000.00) | Dollar, with brackets around negative numbers, and a hyphen for zero values |
For example, to apply a dollar format in mail merge, add the numeric switch \# $,0 to the Currency field:
{ MERGEFIELD Currency\# $,0 }
As a result, the number 3000 gets formatted as $3,000 with no decimal places.

Tip. The above examples are for the mail merge dollar format. Instead of the dollar sign ($), you can use any other currency symbols, e.g. € or £.
Mail merge: percentage format
The way you format percentages in a Word mail merge document depends on how the source values are formatted in your Excel sheet.
If the General or Number format is used in Excel, a corresponding number will appear in Word. To format that number as a percent, add one of the following numeric switches.
| Numeric switch | Excel value | Word value | Description |
| \# 0.00% | 30 | 30.00% | Formats a number as a percent with two decimal places |
| \# 0% | 30 | 30% | Formats a number as a rounded whole percent |
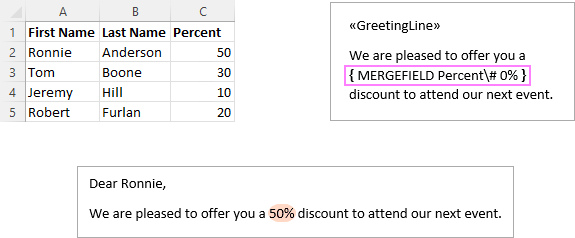
For instance, to format a number as a whole percent, edit the Percent field as follows:
{ MERGEFIELD Percent\# 0% }
As a result, the number 50 is formatted as 50%.

If the Percent format is applied to Excel cells, Word will display an actual value behind the percentage formatting, which is a decimal number. For example, an Excel value of 50% will appear as 0.5 in Word. To convert it to a percent, you need to first multiply a decimal by 100, and then use an appropriate numeric switch. Here are the detailed steps:
- Select the merge field that you want to format as a percent, e.g. «Percent». Note, the quotation marks should be included in the selection.
- Press Ctrl + F9 to wrap the selected field in another one like this: { «Percent» }
- Edit the field so that you get one of the following:
- Rounded whole percent: {=«Percent»*100 \# 0%}
- Percent with two decimal places: {=«Percent»*100 \# 0.00%}
- Place the cursor anywhere in the field and press F9 to update it.

Note. A merge field containing a formula will display a value, not the field name, even when not in the preview mode. Don't worry, it's a normal behavior. To make sure the value is not static, click the arrows in the Preview Results group to switch between the recipients. To view the field code, select the value and press the Shift + F9 keys together. If all done correctly, you will see something like this:
{ ={MERGEFIELD Percent }*100 \# 0% }
Mail merge: date and time format
As with numbers and currency, you can change the date format in mail merge by using a numeric switch. The table below lists codes for a few commonly used date/time formats.
| Numeric switch | Example |
| \@ "M/d/yyyy" | 5/20/2022 |
| \@ "d-MMM-yy"} | 20-May-22 |
| \@ "d MMMM yyyy"} | 20 May 2014 |
| \@ "ddd, d MMMM yyyy" | Fri, 20 May 2022 |
| \@ "dddd, d MMMM yyyy" | Friday, 20 May 2022 |
| \@ "dddd, MMMM dd, yyyy" | Friday, May 20, 2022 |
| \@ "h:mm AM/PM" | 10:45 PM |
| \@ "HH:mm" | 22:45 |
| \@ "HH:mm:ss" | 22:45:30 |
For example, to apply a full date format, change the Date merge field format in this way:
{ MERGEFIELD Date\@ "dddd, MMMM dd, yyyy" }

Tips and notes:
- In a date/time numeric switch, the uppercase M is used for months and lowercase m for minutes.
- Aside from the codes listed above, you can use any other custom date and time formats.
How to change format of the current date and time in Word mail merge
To insert today's date and current time in a mail merge document, you can use the following shortcuts:
- Alt + Shift + D - insert the DATE field that displays the current date.
- Alt + Shift + T - insert the TIME field that displays the current time.
This will add the date and time in the default format. To change it, you can use a numeric switch as described above. Or you can apply the desired date/time formatting in a visual way.
- Select the Date or Time field the format of which you want to change.
- Press Shift + F9 to display the field coding, which may look something like { DATE \@ "M/d/yyyy" }
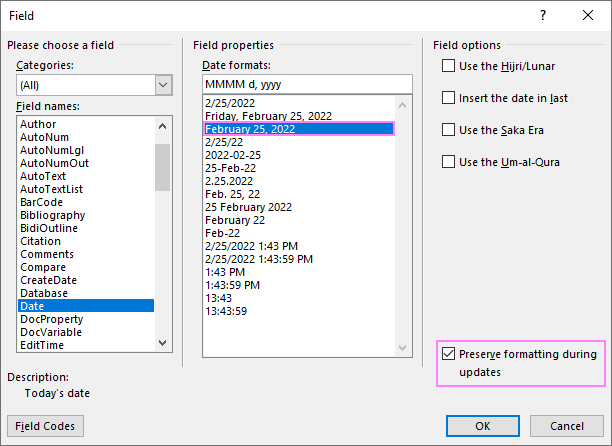
- Right-click the selected field and choose Edit Field… from the context menu.

- In the Filed dialog box, select the desired format for the Date field, and click OK.

Tip. If you want to preserve formatting during updates, select the corresponding check box in the lower right corner.
How to avoid losing leading zeros in mail merge
In all numeric values, leading zeros are dropped during a mail merge. For zip codes and other numbers to come through a mail merge without losing zeros, they should be formatted as text.
To have it done, select the column with numbers and choose Text in the Number Format box on the Home tab.

Alternatively, you can right-click the selected column, and then click Format Cells… . In the Format Cells dialog box that opens, on the Number tab, select Text, and then click OK.

Important note! If Special (such as Zip code) or Custom (such as 00000) format is applied to your Excel cells, changing it to the Text format will cause leading zeros to disappear. After formatting cells as Text, you will have to review each cell and type missing zeros manually. To avoid this daunting task, connect to your Excel sheet via DDE. This will retain the original Excel number formats including preceding zeros.
That's how to resolve mail merge formatting issues and format the fields the way you want. Thank you for reading!
 by
by
12 comments
Can some please help with the Lakhs number format formula for numbers. i am getting it in thousand
Hi! If your question is related to Excel, please ask your question in the appropriate section. Only the thousands separator is used in numeric formats. Read more: Custom Excel number format.
how to change as dd/mm/yyyy i.e. 20/09/2023
I had formatted on Excel as Date and time and Word automatically converted reformatted it to a string of numbers that made no sense. To fix it, I added ' before the dates and times and reformatted the cells as text. This resolved the issue when mail merging. I hope that helps.
Is there a way to get rid of AM/PM and get CORRECT hours "post meridiem"?
"22:00" from Excel imported to Word looks by default "10:00 PM", so does the field switch \@ "h:mm AM/PM"
Switch \@ "h:mm" = "10:00" - this is not the correct time.
ATM the only workaround I know is an extra Excel text field "=TEXT(E2;"[gg]:mm")"
OMG!!!
I've found the solution: \@ "HH:mm"
Your explanation for "How to use Dynamic Data Exchange to connect to Excel sheet" doesn't work for me, as the options under "General" look nothing like what your screen shot does. Specifically, there is no, "Confirm file format conversion on open"
I am using Outlook 365.
Perhaps this option is found elsewhere in my version?
Hi Craig,
Please read the instructions carefully: "Before starting a mail merge, perform the following steps in Microsoft Word." Word, not Outlook :)
I have just checked the "General" section in my Word 365 - the "Confirm file format conversion on open" option is first in the list, exactly as shown in the screenshot.
Inv. Date
44700
date of invoice come in numeric format in mail merge i want to convert it in date formate
Please check out the Mail merge: number format section of the tutorial.
I have a number merged into a word doc from an excel sheet. the number appears perfectly in excel as a whole number percentage (ex. 97%) but when I merge into the word doc, it appears as 0.96399999999.
How do I format it to look like it does in excel? as a whole number percent?
what is the formula or switch code to use?
Hi Connie,
To get the percentage to display correctly, you can either use Dynamic Data Exchange to connect to your Excel sheet or perform the steps described in Mail merge: percentage format.