In this tutorial, we'll have an in-depth look at how to mail merge in Outlook 365, Outlook 2021, Outlook 2019, Outlook 2016 and earlier.
Whenever you need to send personalized emails to multiple recipients, mail merge is a real time-saver. It works great for sending out business updates, season's greetings, and the like, so that every recipient gets a personal email with their own information, without knowing who else this message has been sent to.
There are a few ways to do a mail merge in Outlook, and we are going to look closely at each method.
What is Mail Merge?
Mail merge is a process of creating mass emails tailored for each recipient by taking data from a database, spreadsheet, or other structured file.
Basically, you prepare your message template putting placeholders where appropriate, and a mail merge pulls the recipient's details (such as a name, email address, etc.) from a source file and inserts them into an email in the place of the placeholders.
Eventually, everyone's happy - recipients feel unique and valued getting an individual message addressing their specific concerns, and you enjoy an improved engagement rate ;)
How to do a mail merge in Outlook
If all the people you want to address are already in your Outlook Contacts folder, you can perform a mail merge directly from Outlook. For convenience, we'll break down the whole process into 6 meaningful steps.
Step 1. Select your Outlook contacts
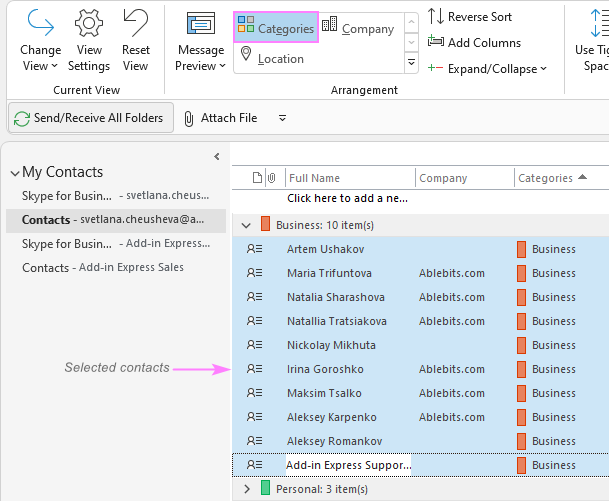
First off, you need to choose which of your contacts to send an email to. For this, switch to your Outlook Contacts (the CTRL + 3 shortcut will take you there right away), select the desired folder on the left pane, and then pick the people of interest.
Useful tips:
- To visually see the fields that will be used in the merge, select the Phone or List view on the Home tab, in the Current View group.
- You can sort contacts by Category, Company or Location by clicking the corresponding button on the View tab in the Arrangement group.
- For only the relevant contacts to be visible, perform a search based on the company, country or category.
- Outlook contacts contain a total of 92 fields, many of which are empty. To make the mail merge easier, you can display only relevant fields, and then use the fields in the current view for the merge.
- To remove irrelevant columns from view, right-click the column name, and then click Remove This Column.
- To add more columns to the current view, right-click any column name, click View Settings > Columns….
The screenshot below shows Outlook contacts grouped by category, with the Business category contacts selected:
Step 2. Start mail merge in Outlook
With the contacts selected, go to the Home tab > Actions group, and click the Mail Merge button.

Step 3. Set up mail merge in Outlook
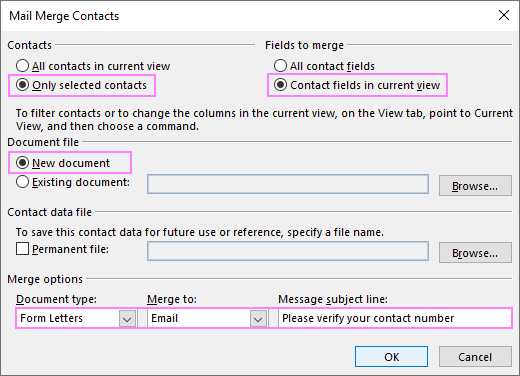
In the Mail Merge Contacts dialog box, select the options that work best for you.
Under Contacts, choose one of the following:
- All contacts in current view - if you've filtered your view so that only the target contacts are visible.
- Only selected contacts - if you've selected the contacts that you want to email to.
Under Fields to merge, select either:
- All contact fields - if you want all of the contact fields to be used in the merge.
- Contact fields in current view - if you've configured your view so that only the fields to be included in the merge are displayed.
Under Document file, select either:
- New document - to create the document file from scratch.
- Existing document - to browse for the existing document that you wish to use for the merge.
Under Contact data file, select the Permanent file check box if you wish to save the selected contacts and fields for future use. The comma-delimited data will be saved in a Word document (*.doc).
Configure Merge options in this way:
- For Document type, pick Form Letters.
- For Merge to, select Email.
- For Message subject line, type whatever subject you see fit (you will be able to edit it later).
Here are the settings for our sample mail merge:
Note. If you've selected the Contact fields in current view option, make sure all the fields intended for the merge (including the Email field!) are displayed in the current view.
When done, click OK. This will open the mail merge document in Word.
Step 4. Create mail merge document in Word
Normally, the document opens in Word with the Mailings tab selected, ready for you to choose the merge fields. You can think of them as kind of placeholders that will tell Word where to insert personal details.
To add a merge field to the document, use one of these buttons in the Write & Insert Fields group:

Insert a greeting
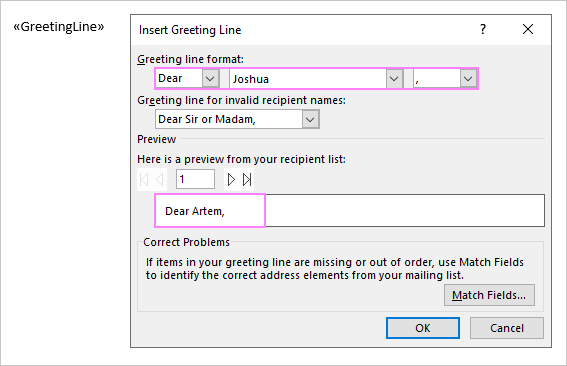
As all good communication starts with a greeting, this is what you need to add in the first place. So, click the Greeting Line button on the ribbon and select the desired greeting format for your email. Additionally, specify what greeting to use when no information is found for a particular recipient.
Click OK, and you'll have the «GreetingLine» placeholder inserted in the document.
Useful tips:
- Instead of the default "Dear", you can type any greeting you like such as "Hello, "Hey", etc.
- Under Preview, click the Next / Previous button to view exactly how the greeting line will look for each recipient.
- If the information in the greeting line is wrong, click the Match Fields button to identify the correct field.
- In a similar fashion, you can add the Address Block if needed.
Type the message text
After the greeting line, press Enter to start a new line in your document and type the text of your message. Remember to add a signature at the end, as your default Outlook signature won't be inserted.
Insert merge fields
To include other personal details in a message, insert the corresponding merge fields where appropriate. Here's how:
- Place the cursor exactly where you want to insert specific information.
- Click the Insert Merge Field button on the ribbon.
- In the dialog box that pops up, select the required field, and click Insert.
- After inserting all the fields, click Close to close the dialog box.
As an example, we are adding a mobile phone:
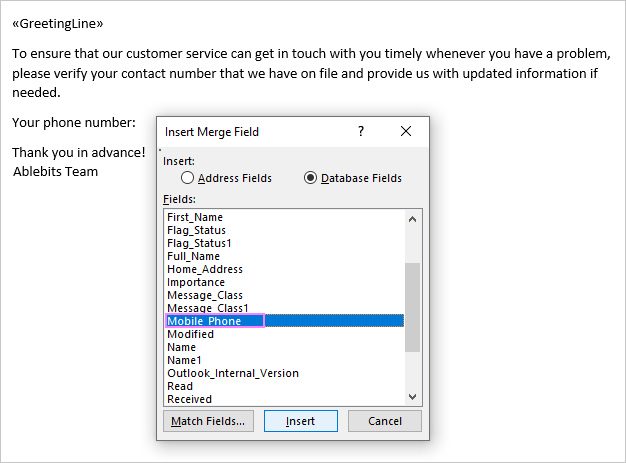
When all done, your finalized document may look something like this:

Tip. If some important fields are missing in the Insert Merge Field dialog box, though you are pretty sure you set up the contacts right in Outlook, try exporting your Outlook contacts to Excel first, and then use an Excel sheet as data source. Regrettably, you never know exactly what is going on inside of Outlook :(
Step 5. Preview mail merge results
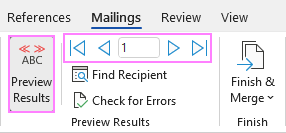
Before sending out your personalized mailings, it's a good idea to preview the results to make sure the content of each email is okay. To have it done, click the Preview Results button on the Mailings tab, and then use the arrow buttons to view all the emails.
Step 6. Send out personalized bulk email
Just a couple more clicks, and your mailings will be on their way.
- On the Mailings tab, in the Finish group, click Finish & Merge, and then select Send E-mail Messages….

- In the Merge to E-mail dialog box, review the message options, and if everything is correct, click OK to run the merge.

Clicking OK sends email to the Outbox folder. The sending will be performed based on your current settings: immediately when connected or every N minutes.
Tip. If you are looking for Outlook Mail Merge with attachment, then try out the Shared Email Templates tool that includes this and many other useful features.
How to mail merge from Word using Outlook contacts
In situation when you already have the text of your email written in Word, you can start a mail merge process from there. The final result will be exactly the same as when started from Outlook.
In Word, a mail merge can be done in two ways: by using the Mail Merge Wizard or the equivalent options on the ribbon. If you perform the merge for the first time, the wizard's guidance may come in handy, so we are going to use it.
- In Word, create a new document. You can type the text of your message right now or continue with a blank document.
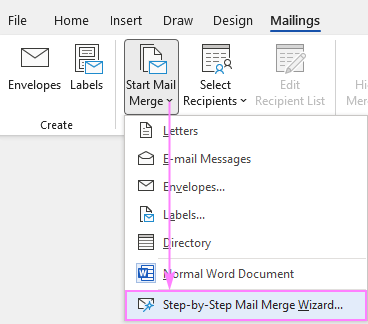
- Start the Mail Merge Wizard. For this, go to the Mailings tab, and click Start Mail Merge > Step-by-Step Mail Merge Wizard.
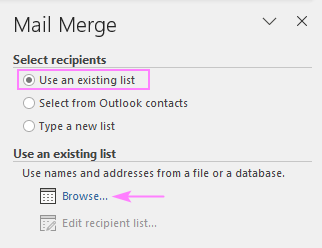
- The Mail Merge panel will open on the right side of your document. In step 1, you choose the document type, which is E-mail messages, and then click Next to continue.

- In step 2 of the wizard, leave the Use the current document option selected and click Next.

- In step 3, you are requested to select recipients. As we are going to use Outlook contacts again, click Select from Outlook contacts. Since there may be more than one Contacts folders in your Outlook, click Choose Contacts Folder, and then pick the folder you want to use.

Note. To be able to use Outlook contacts for mail merge from within Word, Outlook should be set as your default email program.
- After selecting the Contacts folder, the Mail Merge Recipients dialog box will appear, where you can choose the target people. To refine the distribution list, the Sort, Filter and Find duplicates options may prove useful.

- In step 4 of the wizard, you write the message and insert the merge fields where needed. The process is exactly the same as in the previous example, so we won't dwell on it and just show the outcome:

- Step 5 lets you preview all the emails that will actually go out and exclude particular recipients.

- In the last step, click Electronic Mail, and then configure the final Message options:
- In the To drop-down box, pick Email_Address.
- In the Subject line box, type the message subject.
- In the Mail format drop-down box, choose the preferred format: HTML, plain text or Attachment.
Click OK to run the mail merge.

How to do mail merge from Excel data source
In case the information for the mail merge is stored outside of Outlook, you can use an Excel worksheet or Access database as a data source when doing a mail merge in Word. The steps will be exactly the same as in the above example. The only difference is step 4 of the Mail Merge Wizard, where you select the Use an existing list option, and then browse for your Excel file.
For this example, the following Excel sheet is used:
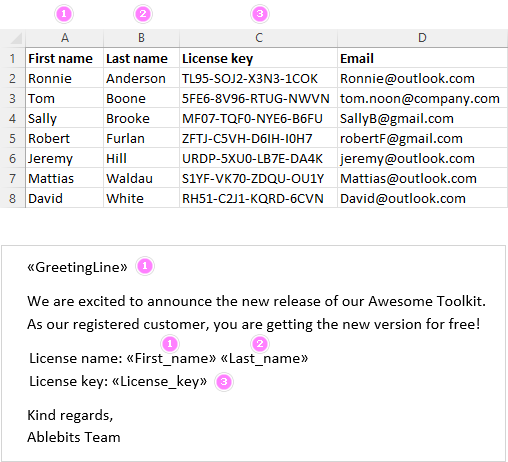
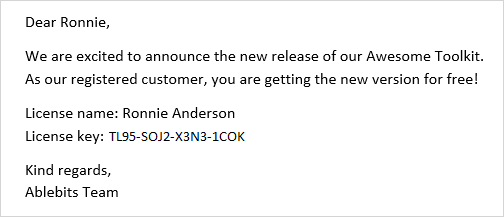
In the result, you get this personalized message:
If you feel like you need more detailed instructions, please check out this end-to-end tutorial: How to mail merge from Excel to Word.
Outlook Mail Merge add-in for personalized mass mailings
If you are looking for a way to send custom-tailored bulk email campaigns from your personal Outlook mailbox, then you will surely appreciate the brand-new Mail Merge feature included with our Shared Email Templates. How does it differ from Outlook's one? Here are the key points:
- You can create and run mail merge campaigns directly in Outlook without Word or any other application.
- You can add attachments and images to your mail merge.
- You can create robust and beautiful designs with the help of inbuilt mail merge templates or your own HTML-based ones.
- You can personalize your mass mailings with any custom merge fields.
- Due to a set of adaptive layouts, your messages will look great in any email client, whether it's Outlook for Windows, Gmail, or Apple Mail.
- A mail merge can be run in any Outlook app: for Windows, for Mac, and Outlook Online.
They say a look is better than a thousand words, so let's see it in action :)
1. Make a mailing list in Excel sheet
Your distribution list is an Excel table that contains the recipients' email addresses and personal data for merge fields.
- The workbook must be stored in OneDrive.
- All the data must be within an Excel table.
- Email addresses should be placed in the leftmost column, named Email.
Here's an Excel table that we are going to use for this example:

2. Create a mail merge template
To create a mail merge template, this is what you need to do:
- On the Shared Email Templates pane, right-click any of your template folders, and then pick New Mail Merge Template from the context menu:

- Choose one of the canned layouts or click Custom HTML to paste your own template, and then click Next:

- Choose your prefered color theme and click Finish:

- A mail merge template is ready for your use - simply replace the placeholder texts, images and hyperlinks with the real ones.
Tip. When copying from another source, use the Ctrl + Shift + V shortcut to paste text without formatting.
3. Personalize your email template using merge fields
Email personalization is done with the help of the ~%MergeField macro. In our online docs, you can find the detailed instructions on how to use it. Here, I will just show you the result:
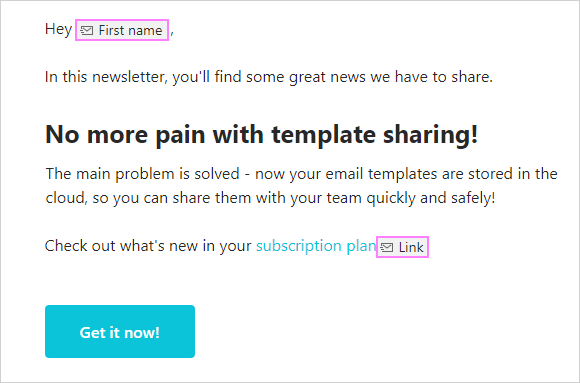
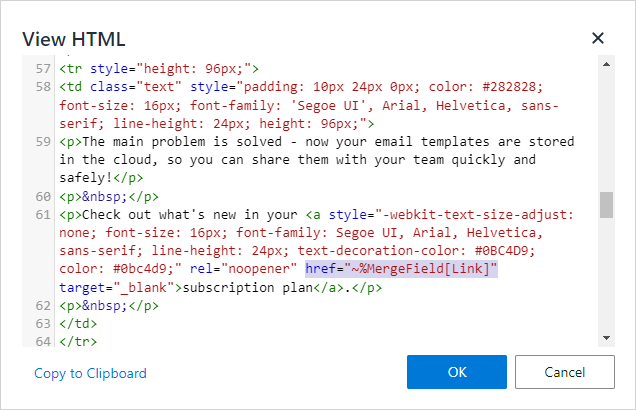
As you see, we have inserted two merge fields: First name and Link. The first one is obvious - it pulls the information from the First name column to address each contact by name. The other one is a lot more interesting - it creates an individual link for each recipient based on a webpage address in the Link column. Because we want not just to insert a contact-specific url, but make it a beautiful hyperlink, we switch to the HTML viewer and place the macro inside the href attribute like this:
<a href="~%MergeField[Link]">subscription plan</a>
Add personalized attachment
To attach the same file to all emails, use one of the ~%Attach macros. The complete list of available macros is here.
To send an individual attachment for each recipient, save all the files in a special folder on OneDrive and specify the file names in the Attachments column included in your mailing list. Yep, it's that simple :)
Personalize the email subject
Impossible as it may sound, with our Mail Merge tool, the email subject can also be personalized with ease. Here is an example:
Greetings from ~%MergeField{"column":"City"}, ~%MergeField{"column":"First name"}
Where City and First name are the names of the columns in your mailing list. For the macro to work correctly, make sure the names used in the subject line and in your Excel table match exactly including the letter case.
So, you enter the above line in the Subject field (see the next step) and each of your recipients will get an email with a personalized subject like this: Greetings from New York, Ronnie.
4. How to set up a mail merge campaign in Outlook
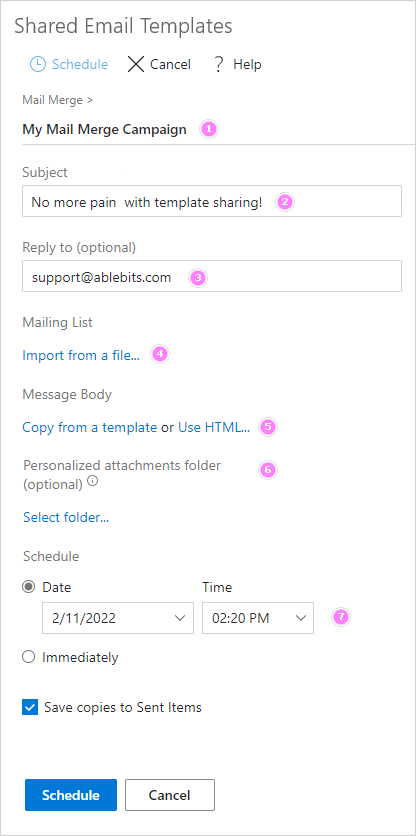
Setting up a mail merge campaign is a piece of cake - you simply click the Mail Merge button on the Shared Email Templates toolbar, and then put all the pieces together:
- Name your new campaign.
- Type the text for the Subject line.
- Optionally, specify the email address for replies.
- Import your mailing list.
- Choose an email template.
- Select the personalized attachments folder (optional).
- Schedule bulk email sending for a later date or start immediately.
That's it! When your personalized mass mailings go off, you can be absolutely confident that each email will look good in whatever email client app the recipient opens it (of course, if you've used our adaptive layouts).
Outlook Mail Merge email limits
In Outlook itself, there is no limit to a maximum number of recipients. However, such limits exist in Office 365 and Outlook.com.
Outlook 365
- 10,000 recipients per day
- 30 emails per minute
For more details, see Microsoft 365 receiving and sending limits.
Outlook.com
For free accounts, limitations vary depending on usage history.
For Microsoft 365 subscribers, the restrictions are:
- 5,000 daily recipients
- 1,000 daily non-relationship recipients (i.e. someone you've never emailed before)
For more details, please see Sending limits in Outlook.com.
Additionally, limits to the number of outgoing messages are set by Internet and email service providers to reduce spam and prevent the overloading of email servers. So, before doing a mail merge, be sure check with your mail admin or Internet service provider how many emails you are allowed to send per day and within an hour. Generally, you are unlikely to run into any issues as long as you stay under 500 messages per day.
That's how to mail merge in Outlook. I thank you for reading and look forward to seeing you on our blog next week!
Available downloads
Shared Email Templates presentation (.pdf file)
 by
by
4 comments
Useful article, and very well written.
I also wonder if there is a way we can add a time lag between sending campaign emails to avoid the getting flagged as spam. Any clues?
Hi Rohit,
Regrettably, there is no such setting in Outlook :( But such an option is available in some third-party plug-ins for Mail Merge.
Hi Svetlana, thanks a lot for your useful article. As you said, email service providers often limit the sending emails per mintue. I wander if there is a way to control the sending speed or rate? In addition, can the subject also be personalized?
Hi Yang,
Sorry, I don't know about controlling the sending speed. As for personalizing the subject, yes, it can be done with our Mail Marge tool. I've added the Personalize the email subject section with an example to the article. If you need more detailed instructions, just let me know :)