This tutorial covers how to archive emails in Outlook to free up space. You'll learn how to configure auto archiving for all folders or customize settings for a specific folder, along with solutions to common issues.
If your mailbox is getting too large, archiving old emails, tasks, notes, and other items can help you keep Outlook fast and responsive. That's where the Outlook Archive feature comes in. Available in all versions of Outlook 365, 2024, 2021, 2019 and earlier, it helps you reduce storage while keeping important data accessible.
How do you archive emails in Outlook?
There are several ways to archive emails in Outlook, but while they share the same name, they work differently and produce different results. Let's go over each method and what it does.
Archive button
Using the Archive option from the ribbon or context menu simply moves emails to the Archive folder within your mailbox. This is one of Outlook's default folders, like Inbox or Sent Items, and it cannot be deleted. Think of it as a dedicated, easy-to-access folder for storing emails you've already responded to or no longer need in your inbox. While this helps keep your inbox tidy, it does not reduce mailbox size because the emails remain in your account.
Auto archiving in Outlook
Auto Archive automatically moves older messages to a separate .pst file based on your settings. Once an email is archived, it is no longer stored in the original mailbox. Since this method creates a separate data file, it effectively reduces your mailbox size.
Clean Up Old Items tool (manual archiving)
Manual archiving works similarly to auto-archive, but instead of running automatically, you control when to run it. Since this method also moves emails to a separate .pst file, it helps reduce mailbox storage.
Online archive
Online Archive is an enterprise-level feature available to Microsoft 365 users. It functions as a secondary mailbox / account with its own folder structure, separate from your primary mailbox.
This feature is enabled and managed by your organization's administrator, who sets policies that determine when emails are automatically moved to the archive and how long they are retained. Since archived emails are stored in a separate mailbox, this method effectively frees up space in your primary mailbox while keeping older messages accessible for users.
For more information, see Microsoft docs on how to enable archive mailboxes for Microsoft 365.
Note. Auto Archive and Clean Up tool are only available in the classic desktop version of Outlook; they are not supported in the new Outlook or web app.
Does archiving emails save space in Outlook?
Archiving emails can help organize your inbox, but whether it frees up space depends on how you archive. To truly reduce mailbox size, you need to move emails to a separate storage.
So, if you're looking to free up space in Outlook, your best options are:
- Auto archive (moves emails to a local .pst file)
- Clean Up Old Items (manual archiving to local .pst file)
- Online Archive (moves emails to a separate mailbox on the server)
Tip. To find out if your mailbox is approaching its storage limit or there's still plenty of room, refer to How to check Outlook mailbox size.
Where do archived emails go in Outlook?
The location of archived emails depends on the method you used:
- Built-in Archive folder – When using the Archive button on the ribbon, the context menu, or the Backspace key, items are moved to the Archive folder within your mailbox.
- Separate .pst file – If using Auto Archive or the Clean Up tool, items are stored in a separate archive.pst file on your computer.
How to move emails to Outlook Archive folder
If you simply want to declutter your inbox (but not free up space!), you can move messages to the native Archive folder. For this, select one or more emails in the list, and then perform any of the following actions:
- Click the Archive button in the ribbon, which is located on the Home tab in all Outlook versions: classic, new, and web.
- Right-click the selected emails and choose Archive from the context menu.
- Press the Backspace key on your keyboard.
- Drag the emails into Archive in the folder pane.
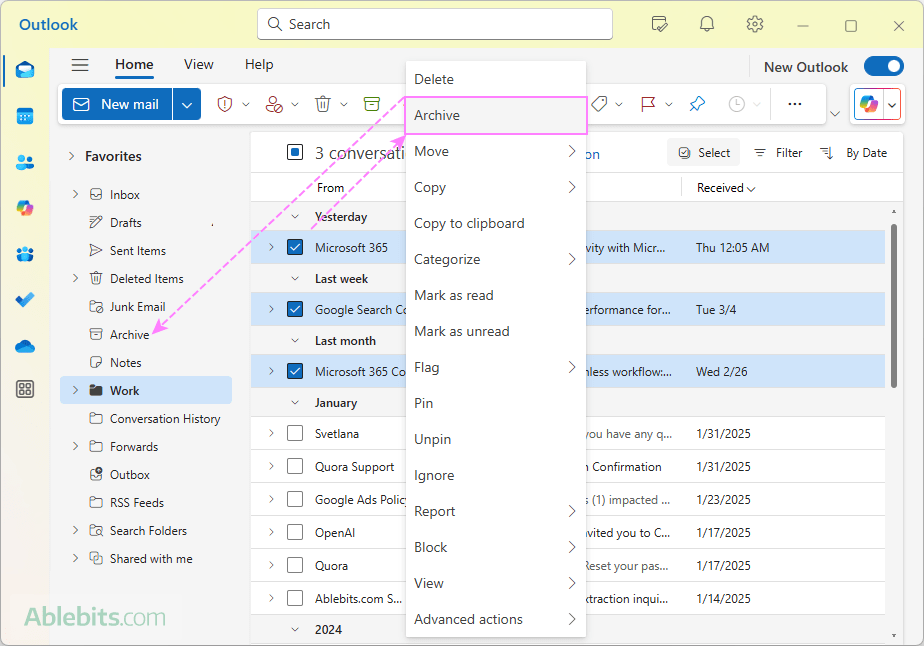
The selected messages will be moved immediately. If you move an email by mistake, simply go to the Archive folder and drag the item back to your Inbox or another folder.
Pros:
- Archived emails remain searchable – by default, Outlook searches all folders in your mailbox.
- Archived messages are accessible on any device.
Cons:
- Does not save space in Outlook, as emails remain in your primary mailbox.
How to archive Outlook emails to save space
To free up space in Outlook, you can move old items from your mailbox to another .pst file using manual archiving. To archive all or specific folders, follow these steps in classic Outlook:
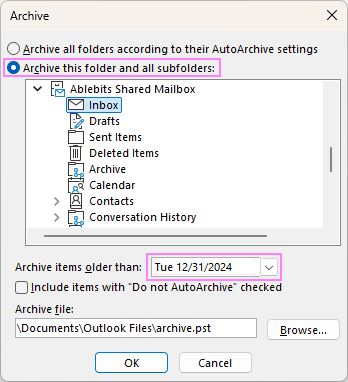
- Go to File > Info, click Tools and select Clean Up Old Items.

- In the Archive dialog box, configure the following settings:
- Select the Archive this folder and all subfolders option.
- Choose a folder to archive such as Inbox. To archive all items (emails, calendar events, and tasks), select the root folder of the target mailbox.
- In the Archive items older than dropdown menu, pick a date – emails older than this will be archived.
- Select a location to save the archive .pst file – use the default path or click Browse to choose a different location.
- Optionally, choose to Include items with “Do not AutoArchive” checked if you want to archive items that were previously excluded from auto archiving.
- Click OK to start the process.
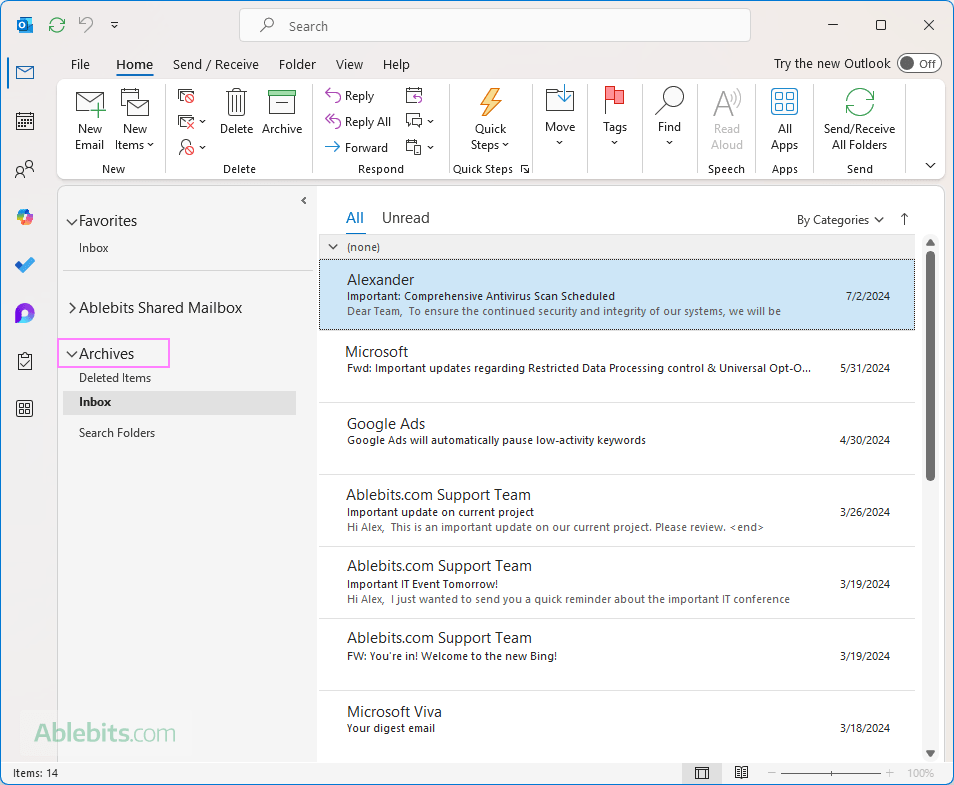
Once the process is complete, Archives will appear in Outlook as a separate mailbox beneath your primary mailbox, where you can access your archived emails.
Pros:
- Frees up space in your Outlook mailbox.
- You have full control over what gets archived and when.
Cons:
- Archived emails are stored locally, so they are not accessible from other devices.
- If the .pst file is lost or corrupted, the archived emails may be unrecoverable.
- It's a one-time process, and you'll need to repeat these steps each time you want to move older items to the archive.
Tips and notes:
- To archive different folders with different settings (say, keep Sent Items longer than Drafts), repeat these steps for each folder before clicking OK – this will store everything in the same archive .pst file. Archiving folders separately will create multiple Archives mailboxes.
- Outlook Archive maintains your folder structure. If you archive a single folder that has a parent folder, the parent folder will appear as an empty folder in the archive.
- In a similar manner, you can archive tasks, notes, meetings, appointments and other items.
- This method is only available in classic (old) Outlook.
How to auto archive in Outlook
Auto archiving in Outlook helps manage mailbox size automatically by moving old emails to an archive file at regular intervals. Here's how to set it up:
- In the classic Outlook app, go to File > Options > Advanced.
- Under AutoArchive, click AutoArchive Settings.
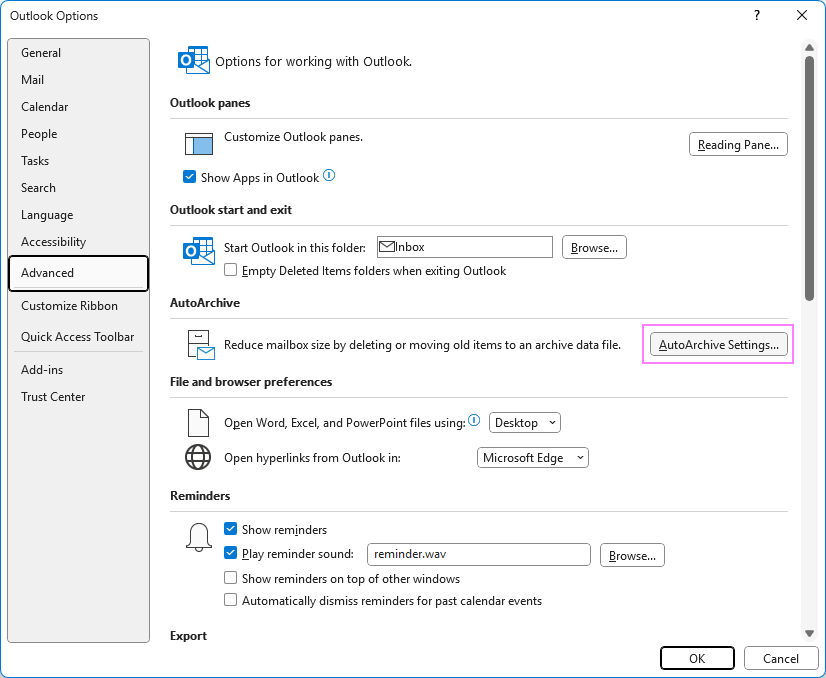
- In the dialog box that opens, everything will appear grayed out – until you check Run AutoArchive every N days. Once enabled, you can customize other options such as:
- Choose whether to archive or permanently delete old emails.
- Set the age limit for archived emails.
- Select a location for the archive file.
- Click OK to apply the settings.
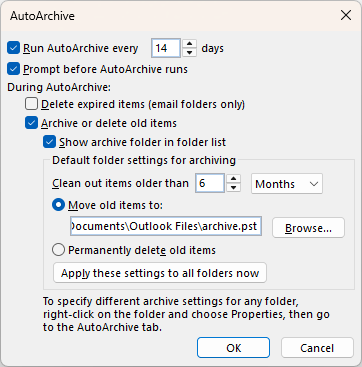
The screenshot below shows the default selections. For a detailed explanation of each option, refer to Auto Archive settings.
When archiving is in progress, the status information is displayed in the status bar.
Once the process is complete, the Archives mailbox will appear in Outlook, provided you selected the option Show archive folder in the folder list. If you cannot find archived emails in your Outlook, please refer to How to display Outlook Archives mailbox.
Pros:
- Automatically frees up space without manual intervention.
- Keeps older emails accessible in Outlook.
Cons:
- Archived emails are stored locally, meaning they are not accessible on other devices.
- If the .pst file is damaged or lost, archived emails may be unrecoverable.
Outlook Auto Archive settings
Understanding each particular setting will help you fully control the archiving process. Here's what each option does:
- Run AutoArchive every N days. Choose how often auto archive should run. Archiving large amounts of data at once can slow down your computer, so if you receive many emails daily, set it to run more frequently. To turn off auto archiving, uncheck this box.
- Prompt before AutoArchive runs. If selected, Outlook will notify you just before the process begins. This allows you to cancel it by clicking No in the prompt.
- Delete expired items (e-mail folders only). This option removes expired messages from email folders. For the sake of clarity, an expired email is different from an old message that has reached its aging period. Expiration dates are set individually when composing an email (Options tab > More options > Message options > Expires after). Some Outlook versions have this option enabled by default, so if you want to keep expired emails until they reach their aging limit, be sure to uncheck it.
- Archive or delete old items. Select this option to customize auto archive settings. If left unchecked, Outlook will use the default ones.
- Show archive folder in folder list. Select this if you want the archive folders to automatically appear in your folder list, making it easy to access. If left unchecked, you will still be able to add them to Outlook manually.
- Clean out items older than. Define the aging period after which items will be archived. You can specify this in days, weeks, or months (from 1 day up to 60 months).
- Move old items to. When enabled, Outlook moves old emails and other items to an archive.pst file instead of deleting them (selecting this radio button clears the selection of Permanently delete items). By default, the archive.pst file is stored in this location, but you can choose a different path by clicking Browse.
- Permanently delete items. This option permanently deletes old emails once they reach their aging period; no archive copy will be created.
- Apply these settings to all folders now. Click this to apply your Auto Archive settings to all folders. If you want different settings for specific folders, do not use this option. Instead, configure each folder's settings manually.
Default aging periods in Outlook Auto Archive
By default, Outlook archives items based on the following aging periods:
- Inbox, Drafts, Calendar, Tasks, Notes, Journal - 6 months
- Outbox - 3 months
- Sent Items, Deleted Items - 2 months
- Contacts - are not auto archived
You can customize these aging periods for each folder individually using the Clean Up tool.
Outlook calculates the age of an item based on specific criteria:
- Emails – the received date or the last modified date (e.g. if you edited, exported, or copied the message).
- Calendar items (meetings and appointments) - the date when you last changed and saved the item. Recurring items are not auto archived.
- Tasks - the completion date or the last modification date, whichever is later. Open tasks (not marked as complete) are not auto archived.
- Notes - the date when an item was created or last modified.
How to turn off auto archiving in Outlook
To disable auto archiving, uncheck the Run AutoArchive every N days box. Here are the detailed instructions:
- Go to File > Options > Advanced.
- Under AutoArchive, click AutoArchive Settings.
- In the dialog box that appears, uncheck Run AutoArchive every N days.
- Click OK to save the changes.
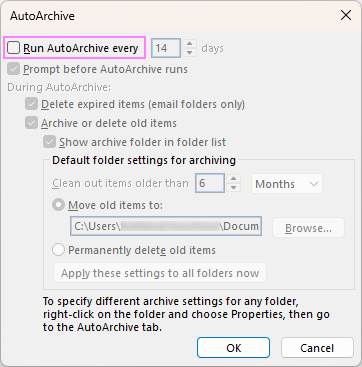
Once disabled, Outlook will no longer move or delete old items automatically.
How to disable or customize Auto Archive for a specific folder
To prevent Outlook from auto-archiving a particular folder or set custom archiving rules for it, follow these steps:
- Right-click the folder and select Properties from the context menu.
- In the Properties dialog box, go to the AutoArchive tab and choose one of the following options:
- To exclude the folder from auto-archiving, select Do not archive items in this folder.

- To apply different archiving settings, select Archive this folder using these settings, then choose the desired options.
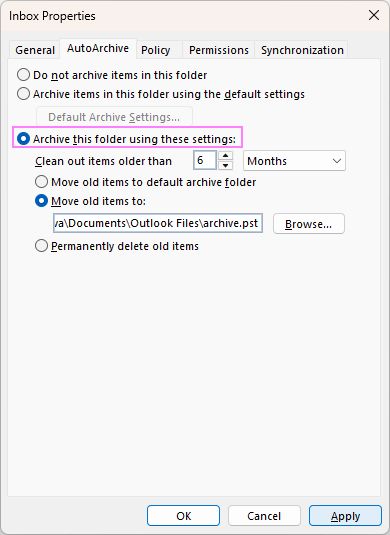
- To exclude the folder from auto-archiving, select Do not archive items in this folder.
Tip. You can use this method to automatically delete old emails from the Deleted Items and Junk E-mail folders. The detailed steps are here: How to empty Deleted Items folder automatically.
How to remove Archive folder from Outlook
The built-in Archive folder in your mailbox is a default folder and cannot be removed.
To remove the Archives mailbox (created when using Auto Archive or Clean Up tool) from your folder list, follow these steps:
- Right-click the Archives mailbox.
- Select Close Archives from the context menu.
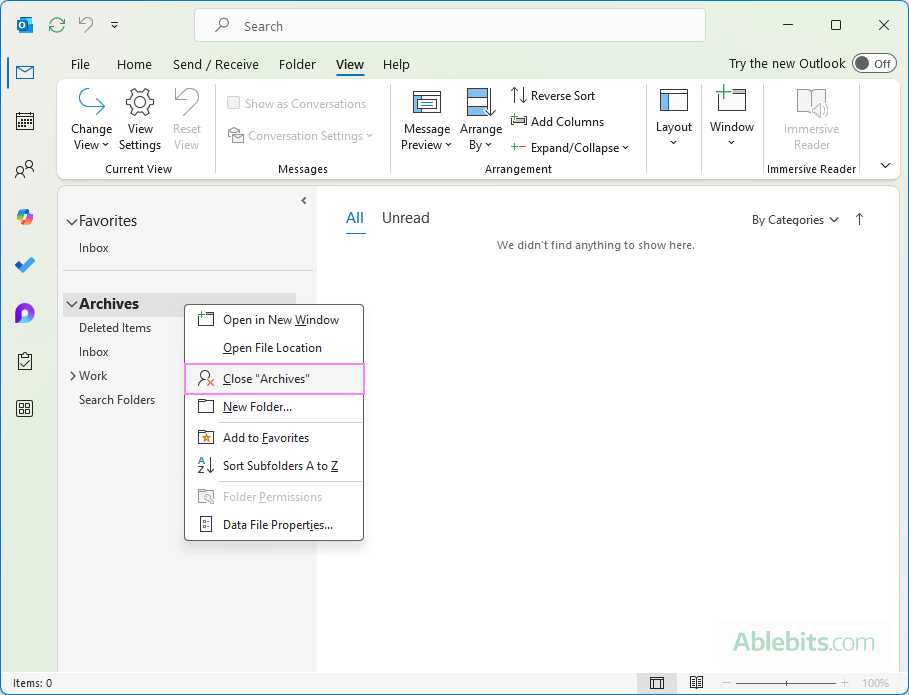
Note. This action only removes the Archives mailbox from the folder pane, but does not delete the actual archive file. You can restore archived emails any time by adding the archive folders to Outlook again.
How to archive in Outlook based on received date
By default, Outlook AutoArchive determines an item's age based on the received/completed or modified date, whichever is later. In other words, if after receiving a message or marking a task complete, you make any changes to it (such as importing, exporting, editing, copying, marking as read or unread), the modified date is updated, and the item won't be archived until another aging period passes.
If you wish Outlook to disregard the modified date, you can configure it to archive items by the following dates:
- Emails - the received date
- Calendar items - the scheduled date
- Tasks - the completion date
- Notes - the date of the last modification
- Journal entries - the date of creation
Warning! This method involves editing the Windows Registry, which can cause serious issues if done incorrectly. Be sure to back up your registry before proceeding. If you are in a corporate environment, ask your IT administrator for assistance.
Steps to archive emails by received date:
- In the Windows search box, type regedit. Select the Registry Editor and press Enter.
- Navigate to the following registry key:
HKEY_CURRENT_USER\Software\Microsoft\Office\<Office version>\Outlook\PreferencesFor Outlook 365, 2024, 2021, 2019, and 2016, the path is:
HKEY_CURRENT_USER\Software\Microsoft\Office\16.0\Outlook\Preferences
- Right-click Preferences and select New > DWORD (32 bit) Value.
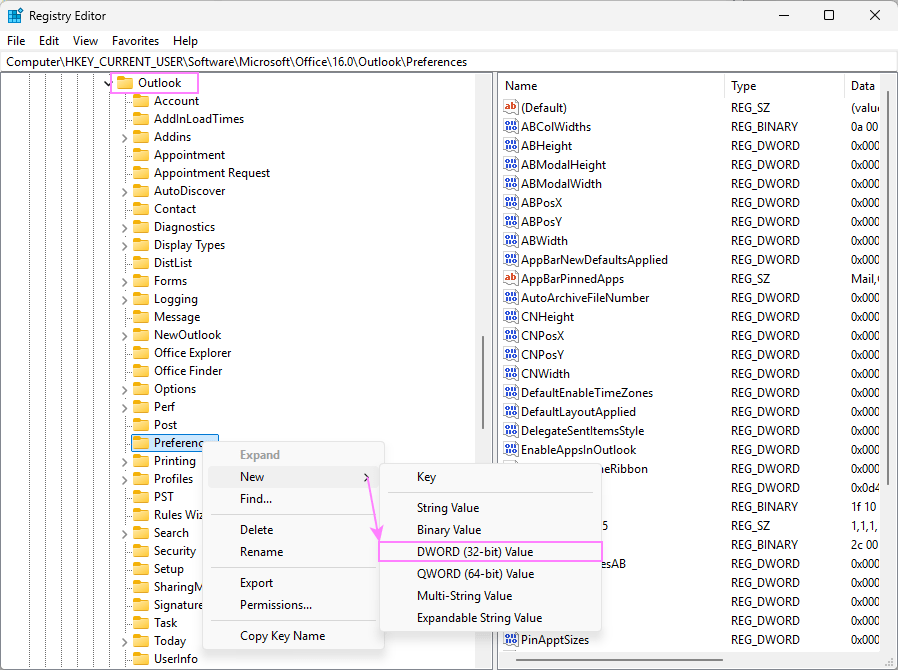
- Name the new value ArchiveIgnoreLastModifiedTime and press Enter.
- Right-click the newly created value, click Modify, type 1 in the Value data box, and click OK.

- Close the Registry Editor and restart your Outlook for the changes to take effect.
That's it! From now on, Outlook will archive emails based on their received date instead of the modified date.
Outlook archive file size limit
Like any other PST file in Outlook, the archive file has a default size limit that varies depending on your Outlook version:
- Outlook 365, 2024 – 2013, the archive file limit is 50 GB.
- Outlook 2010 and earlier, the archive file limit is 20 GB.
This limit applies to each PST file separately, including your archive file. If you reach this threshold, Outlook may stop archiving new items or behave unpredictably.
Can the archive size limit be increased?
Yes, the 50 GB default limit can be increased to 100 GB by modifying the Windows registry. However, this is not recommended unless you have a strong reason to do so, as very large PST files can slow down Outlook and increase the risk of file corruption.
If you're approaching the limit, consider these safer alternatives:
- Create a new archive PST file and start fresh.
- Clean up old items you no longer need.
- Move archived data to another storage location as a backup.
6 key facts about Outlook Archive
Here are a few important details to keep in mind when using the Outlook Archive feature:
- PST is the only file type that can be archived. Once an item is moved from the main .pst file to an archive.pst file, it no longer remains in the original folder.
- Archiving is different from exporting. Exporting creates a copy of the selected items but does not remove them from their original location or the main .pst file.
- An archive file is not the same as Outlook backup. If you want to back up your archived emails, make a copy of your archive.pst file and store it in a secure location, such as OneDrive or Dropbox.
- Contacts are never auto-archived. While Outlook does not automatically archive contacts, you can archive the Contacts folder manually if needed.
- Auto Archive is disabled for Exchange accounts with an Online Archive mailbox.
- Auto Archive and Clean Up tool are only available in classic Outlook. In the new Outlook and web, these features are not supported.
Tip. In addition to archiving old emails, Outlook provides several other tools to help free up storage space. For a complete guide, see How to clean up Outlook mailbox.
Outlook Archive not working - reasons and solutions
If your Outlook Archive isn't working as expected or you're having trouble finding archived emails, the troubleshooting steps below can help identify and resolve the issue.
Auto archiving not available in Outlook
If the Auto Archive option is inactive, your organization may have disabled it, or you might be using an Exchange Server with Online Archive enabled. Check with your system administrator for details.
Auto archive doesn't run
If Outlook Auto Archive suddenly stops working, open the AutoArchive settings, and make sure the Run AutoArchive every N days checkbox is selected.
A specific item is never archived
There are two common reasons why certain items are excluded from Auto Archive:
- The item's modified date is newer than the date set for archiving. For a solution, please see How to archive by received date.
- The Do not AutoArchive this item property is enabled for a given item. To check this, open the item in a new window, go to File > Properties, and clear the checkbox:

To check multiple emails at once, you can add the Do Not AutoArchive field to your Outlook view.
Archive mailbox not showing in Outlook
If the archive folders do not appear in Outlook, verify that the Show archive folder in folder list option is selected in the AutoArchive settings. If the Archive mailbox still does not show up, add it manually by opening the Outlook Data File.
Damaged or corrupted archive.pst file
When the archive.pst file is damaged, Outlook won't be able to store new items in it. To fix this, close Outlook and use the Inbox Repair Tool (scanpst.exe) to repair your archived .pst file. If repair fails, create a new archive file and move the old one to a backup location.
Outlook mailbox or archive file reached the maximum size
Outlook PST files have a 50 GB size limit in modern versions. If your archive or main PST file is too large:
- For the archive file, delete old items or create a new archive file.
- For the main file, manually archive or delete old emails, or ask your administrator to increase your mailbox size limit.
By following these steps, you should be able to resolve most issues preventing Outlook from archiving emails correctly.
In conclusion, properly archiving your emails helps free up space in Outlook while still keeping important messages accessible. Try it out and enjoy a more efficient mailbox 😊
 by
by
14 comments
Hi , i tried a lot and couldn't fix one of my issues since few days , kindly support . issue is the "RUN THE AUTO ARCHIVE EVERY N DAY" Option is greyed out due to which i can not enable the auto archive and all other options are also greyed out as they will appear after i check this main option.
Dear
i need the solution archive setting in out look,
how we archive the save file on server
I am interested to know if I can set up an auto-archive rule that would be linked to the completed flag. I would like to have all emails designated as complete to auto-archive upon being flagged. Hope this makes sense.
Dear Experts,
I would like to know whether we can delete all the existing email after we have archived?
Office application: Outlook 2016.
Hope to hear from you soon.
Thanks.
Your post is helpful. Thank you so much for useful information :)
Your post is very helpful and information is reliable. I am satisfied with your post. Thank you so much for sharing this wonderful post.
Hi Ban,
You can reach our support team by email support@ablebits.com.
I'm a bit confused. i've been using ablebits addin for excel, but ham hitting a wall for some configurations and settings here. how do i get to support? I have used duocircle outlook archive emailing system. is it compatible?
For Outlook 2007, if I am changing the registry to have the archive of Emails by the received date, how the Sent Items will be archived since there is no received date for them?
We recently added the Microsoft Archive account to our firm and it is set to auto-archive based on mailbox size. One User who was recently given the Archive Account had emails with flags to follow up in a Main Folder in Outlook. When she was archived, the flags no longer alert her of their due date. Can flags alert actively after an email has been archived? Thank you.
I'm a big fan of the archive button in Outlook 2016, but I only want to use it for clearing out read messages from my inbox.
The problem is I have mine set up in conversation view, and when I send a response to an email I receive, I tend to click the archive button for the whole conversation. Then I notice I only have the original sent message - the first message starting the conversation - in my sent folder. Subsequent sent messages in a conversation get archived and are disconcerting to not see in the sent folder. The sent folder also doesn't show conversations, so it makes it look like it was never sent because it's in a completely different folder (archives).
Is there a way to prevent even a manual archive from removing items from the sent folder??
Am using Windows 7 with Outlook 2007. Was set for auto archive for outlook data. Hard Drive failure 4/19/17. Have a backup file for archive entitled C:\Users\EUGENE KANE\AppData\Local\Microsoft\Outlook archive.pst which is downloaded from cloud backup but is not being recognized by Outlook. Want the old folder (pre hard drive failure) to be the current archive folder. Confused? Any ideas
Warning, you must use Outlook in non cached mode
Can anyone tell me, how to set "AutoArchive". I want archive (to an external NET-drive) all items 1 day old, but everything items must remain in the folders of Outlook 2010 (mail).