In this article, we'll explore what color categories are in Outlook and how to create, edit, use and delete them.
Outlook categories are one of those hidden gems that can make your life a lot easier, yet many users barely scratch the surface of what they can do. Imagine being able to instantly find that important email, keep track of your tasks, and manage your calendar events with just a glance. Let's dive into how you can add, customize, and use color-coded categories in Outlook to make the most of this powerful feature.
Note. This tutorial focuses on creating color categories in classic (old) Outlook. If you are using the new app or Outlook online, please refer to this tutorial: Color categories in new Outlook and web.
What are categories in Outlook?
Outlook categories allow you to visually organize related items, such as emails, contacts, appointments, and tasks, using various color codes. This helps you maintain a clearer overview of your communications and locate the information quicker.
Outlook offers six default categories, but you can also create your own custom categories. You have the option to choose different colors for the categories and give them unique names.
If needed, you can assign multiple categories to a single item, providing flexibility in how you categorize your workload.
The category colors are displayed in the list of emails (or other items) and within each open item, allowing for immediate visual recognition. Additionally, Outlook messages can be searched and filtered by category to view only those of a specific type.

Categories in Outlook are account-specific, meaning that each email account maintains its own set of categories. This is important if you have multiple accounts (e.g. work, personal, shared mailboxes), as the categories you create or modify in one account will not automatically appear in other accounts.
How to view categories in Outlook
To see a list of color categories in your Outlook, follow these steps:
- In classic Outlook, navigate to your Inbox or any other folder that contains at least one item.
- On the Home tab, in the Tags group, click on Categorize, which looks like a four colored squares icon.
- A drop-down menu will appear, showing up to ten of your most recently used categories.
- To view more categories, select All Categories from the drop-down. This will open a window showing all available categories, including their colors and names.
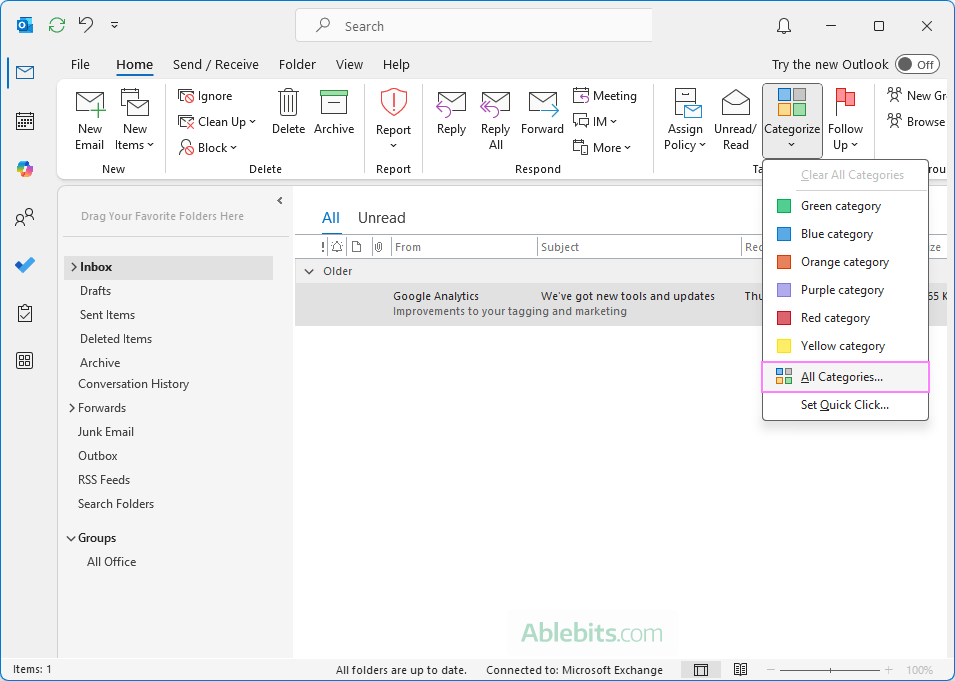
Note. If the Categories button is inactive (grayed out), most likely your current folder does not contain a single item. Switch to another folder and try again. If it's still inactive, it could also be because you do not have the necessary permissions when using a shared mailbox.
How to create custom categories in Outlook
In addition to the default color categories, Outlook allows you to create custom categories to better organize your items.
Here's how you can add a category in Outlook:
- In any message folder such as Inbox, go to the Home tab > Tags group, click on Categorize, and then select All Categories.
- In the Color Categories dialog box, click the New… button.
- In the Add New Category dialog box, type a name for your custom category, select a color, and optionally, assign a shortcut key.
- When you're done, click OK.

- The newly created category will be added to the list. Click OK to close the main dialog box.

Your custom category is ready and can now be assigned to any Outlook items - emails, calendar events, tasks, and contacts. If needed, you can always return to the All Categories dialog box to change or delete your custom categories.
How to use categories in Outlook
You can add a color category to an Outlook email in two ways: using a context menu and the ribbon.
Tip. You can also create a category shortcut to swiftly apply it to multiple items at once. Simply select the items and press the assigned shortcut key combination.
Assign a category from the message list
To apply a color category to a particular email directly from the list of messages, follow these steps:
- Right-click the email you want to categorize. If needed, you can select several emails.
- From the context menu, hover over Categorize, then select a category from the list.
Done!

Tip. If you don't see the Categorize option in the context menu, try right-clicking in the blank space to the right of the sender's name or subject.
Add category to an open message
To apply a category while the email is open, do this:
- In the open email, go to the Message tab.
- In the Tags group, click Categorize, and choose a category from the dropdown list.
- If the desired category is not visible in the list, select All Categories… to see more options.
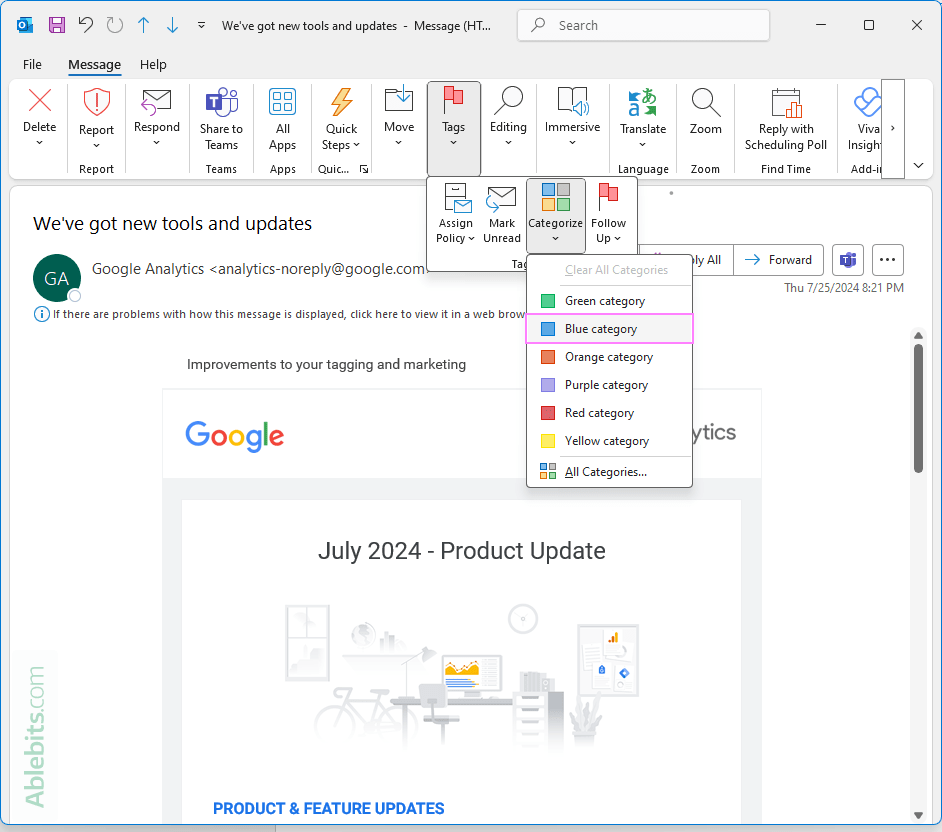
If you wish to assign multiple categories to the same email, simply repeat the action for each category you want to assign.
Tip. When using a color category for the first time, you will be prompted to rename it, making it more relevant for your workflow.

Categorize Outlook tasks, calendar events, and contacts
To maintain a consistent organizational system across all your Outlook items, you can also color code tasks, calendar events, and contacts. This works in a similar way to how you categorize emails.
For example, here's how to assign a category to a calendar item in Outlook:
- Open your Outlook calendar.
- Right click the target appointment or meeting.
- From the context menu, click Categorize, and then select a category you want.
Here's a visual example:

Alternatively, you can add categories using the Categorize button on the ribbon:
- For calendar items, the button is located on the Appointment or Meeting tab.
- For tasks and contacts, you'll find it on the Home tab.
- When working with an open item, the Categorize button will be on the specific tab for that item, such as the Appointment, Meeting, Contact, or Task tab.
This allows you to easily add categories no matter which type of item you're working with in Outlook.
How to apply the default Outlook category in a click
In classic Outlook, there's a very useful feature called Set Quick Click that many users are unaware of. This feature allows you to quickly apply a default category to emails and other items by clicking in the Categories column, which is present in table views.
To designate the default category, just do this:
- In the Tags group, click Categorize > Set Quick Click.

- In the Set Quick Click dialog box, choose a default category from the dropdown list. This will be the one you can apply with just a click.
- Click OK to save the selection.

Applying the default category
In the list of emails, click in the Categories column next to the target message to instantly apply the default category. You can also select multiple emails and click in the same column to categorize all selected items at once.

To remove / clear the default category, just click in the Categories column again. If you've categorized a certain item by mistake, press Ctrl + Z to quickly undo the action.
How to rename a color category in Outlook
The default categories in Outlook come with generic names denoting their color, like "Green Category". To make them more meaningful and personalized, you can change those to more descriptive names that are relevant to you. Here's how:
- On the Outlook ribbon, click Categorize > All Categories.
- In the dialog box that opens, select the category from the list and click the Rename button.

- In the Name box, type the new name for the category and hit Enter.
- Click OK to save changes and close the dialog box.

If you rename a color category that is already assigned to emails, calendar events, tasks, or contacts, all of those items will be updated with the new category name.
Tip. While changing the name for the category, if you want to automatically apply it to the emails or other items currently selected in your Outlook, simply check the box next to the category name before clicking OK. This saves time by applying the renamed category instantly to those items.
How to create Outlook categories shortcuts
Assigning keyboard shortcuts to frequently used categories makes it quicker to manage large volumes of items. Here's how to set it up:
- In the Tags group, click Categorize > All Categories.
- In the list of categories, select the one you wish to assign a shortcut to.
- In the Shortcut Key dropdown, choose a keyboard shortcut from the available options (say, Ctrl + F3).

- Once you've assigned the shortcut, click OK to save the changes.
Category shortcuts can be used in both the item list and while viewing individual items. For example, you can select multiple emails in your inbox and press the assigned shortcut key to apply the category instantly. Similarly, when you have an email, task, or appointment open, you can use the same shortcut to categorize it without leaving the item.
How to change categories in Outlook
To edit an existing Outlook category, follow these steps:
- Open the Color Categories dialog box: Tags group > Categorize > All Categories.
- Select the category you want to edit, and you can:
- Rename the category - click the Rename button and type a new name.
- Choose a color - pick a color that helps visually distinguish this category from others.
- Assign or change a shortcut key - select a key combination from the dropdown list for quick access.
- After making your adjustments, click OK to save the changes.
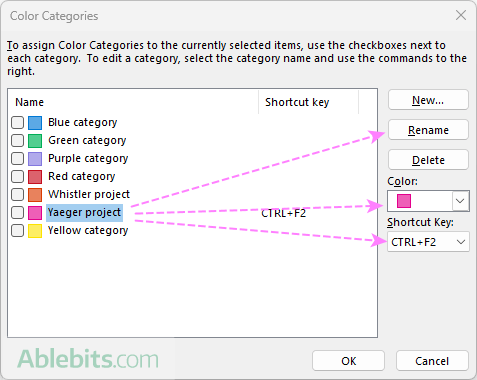
These changes will apply to all items previously assigned to that category.
How to search by category in Outlook
The standard Outlook search box does not allow direct searching by category, but you can achieve this by creating a Search Folder. Here's how:
- On the Folder tab, in the New group, click New Search Folder.
- In the New Search Folder dialog box, scroll down to the Organizing Mail section and select Categorized Mail.
- In the lower-right part of the dialog box, click Choose and select the category you want to search for. If you'd prefer to search by any category (the default option), you can skip this step.
- If you have multiple accounts in Outlook, select the appropriate one in the Search mail in box.
- Once all parameters are set, click OK.
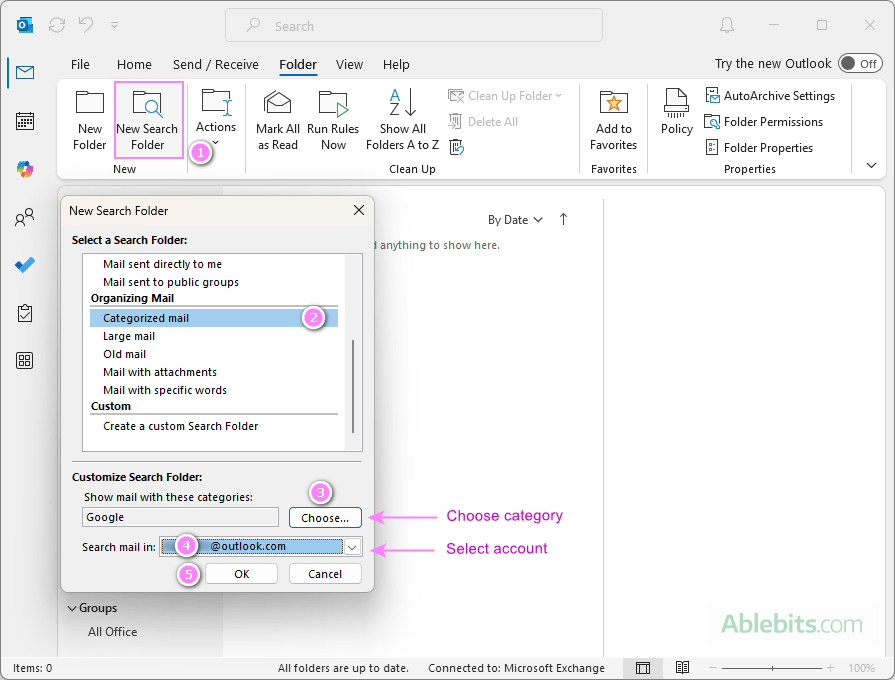
A new Search Folder will be created, showing all items in the specified category. This folder will dynamically update as you categorize more items.

How to sort by category in Outlook
Sorting items by category is a great way to quickly view everything related to a specific project or topic.
Here's how to sort by category in Outlook:
- Ensure the folder you're working in is in table view, which is the default view for email folders.
- Locate the Categories column on the right side of the screen and click on its header.
For example, see how to sort emails in your Inbox by category.

The first click will sort categories alphabetically (A to Z), placing all uncategorized emails at the top of the list. A second click will sort them in reverse (Z to A), with uncategorized emails at the bottom.
If an email has multiple categories assigned, it will appear several times in the sorted list, allowing you to view it in the context of every category it belongs to.

How to filter by category in Outlook
The fastest way to filter emails by color category in Outlook is this:
- In the list of email folders, select the folder you want to filter.
- On the Home tab, in the Find group, click Filter Email > Categorized.
- In the dropdown menu that appears, you'll see all your available color categories. From here, you can:
- Click a specific category to show only the emails assigned to that category.
- Select Any category to view all emails that have at least one category assigned.
- Pick No categories to view only uncategorized emails.
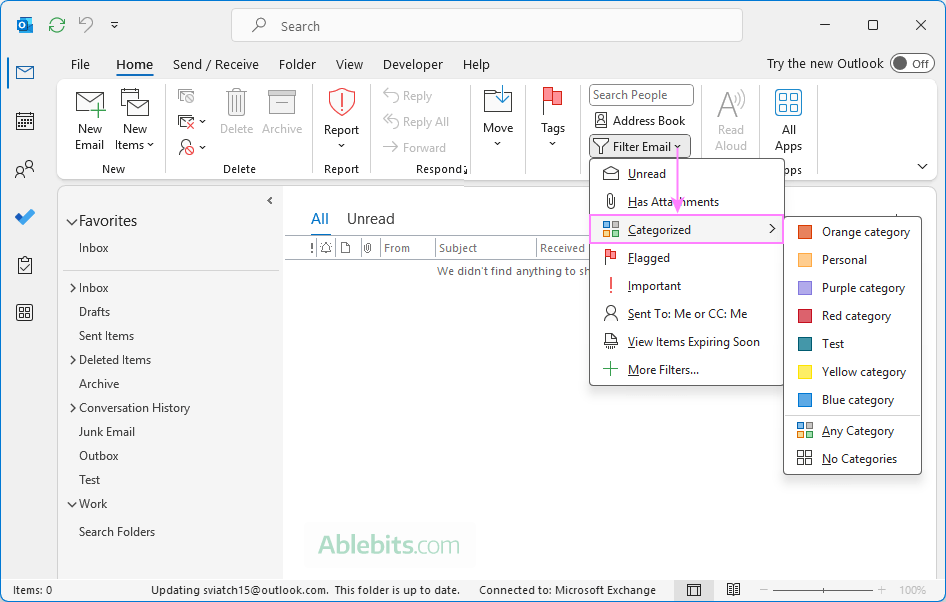
After applying a category filter, Outlook automatically inserts a shorthand version of the filter in the Search box. For example, if you select the Red Category, Outlook adds: category:="Red category".
To remove the filter and return to your normal view, click the X in the Search box.
Tip. You can also type a category filter directly into the Search box. For example, to find all emails tagged with a category name containing "project", type category:project. This is especially handy if you remember part of the category name but not the exact one.
How to clear categories in Outlook
Outlook allows you to remove either all categories from an item or just specific ones, depending on your needs.
Clear all categories
To remove all the categories you've applied to certain emails or other items, follow these steps:
- Select the message(s) in the list.
- Right-click and choose Clear all categories in the context menu.
This will instantly remove all assigned categories from the selected items.

Clear a specific category
In the item list view (e.g. your Inbox or task list), you can only clear all categories at once. To remove a specific category while leaving the others intact, you'll need to open the item:
- Open an email or other item.
- At the top of the item, right-click the category you want to remove and choose to clear it.
This method allows you to clear individual categories without affecting others.

How to delete categories in Outlook
If you no longer need a particular category, you can easily remove it by following these steps:
- Open the Color Categories dialog box.
- Select the category you want to remove.
- Click the Delete button located on the right side of the dialog box.

- A confirmation message may appear asking if you're sure you want to delete the category. Click Yes to confirm.

- Click OK to save your changes and close the dialog box.
Deleting unused categories helps keep your list tidy and uncluttered. You can always recreate the category if needed, but you will need to manually reassign it to items.
Note! Deleting a category does not remove it from the items (emails, tasks, calendar events) it was previously assigned to. The category color will disappear from the list, but the category label will remain on those items.

Outlook categories not showing
If the Categories button is missing on your Outlook ribbon, here’s how to check and restore it:
- Right-click the ribbon and select Customize the Ribbon… .
- In the list of tabs on the left, expand Home (Mail) and look under Tags. If Categorize is listed, check the box and click OK.

- If Categorize is missing, find it in the list of commands on the right. For this, choose All Commands from the dropdown menu, scroll down until you see Categorize, find Categorize Menu among the options, and click Add.

If the Categorize button is still not added to the ribbon or is inactive, try these general troubleshooting tips:
- Update Outlook to the latest version to ensure all features are up-to-date.
- Repair Outlook installation. Go to Control Panel > Programs and Features > Microsoft Office and click Change. Then select Repair and follow the prompts to complete the process.
- Create a new Outlook profile. Set up a new Outlook profile, adding all your accounts again, to ensure settings are refreshed.
By following these steps, you should be able to resolve the issue with the Categories button not showing in Outlook.
Outlook categories not working for IMAP accounts
Currently, the Categories feature isn't supported in Outlook for IMAP accounts, most likely because categories don't sync with the server. However, if you have another account type (such as an Exchange or Microsoft 365 account) that supports color categories, there's a workaround you can use:
- Create category shortcuts in a supported account. In a folder for an account that supports categories, set up keyboard shortcuts for the categories you frequently use.
- Use shortcuts in IMAP account. Open a message in your IMAP account folder and then press the assigned shortcut keys to add the color code.
This trick can let you categorize items in IMAP folders in your Outlook, although it may not work in all cases.
In conclusion, using Outlook categories can really simplify the way you classify your emails, tasks, contacts and calendar events. Whether you're juggling a busy work schedule or keeping track of personal commitments, color categories will help you stay on top of things.
 by
by
One comment
You guys do some very good Outlook tutorials. Thank you.