In this article, you will learn about Outlook digital signature, encrypting email connections with SSL /TLS, and other ways to send secure email in Outlook 365 - 2010.
Last week we dwelled on different ways to send encrypted email in Outlook. Today, let's have a closer look at another technique to safeguard your email messages - Outlook digital signature.
A valid digital signature proves the authenticity of an email and demonstrates to the recipient that the message was created by a known sender and its content have not been altered in transit.
Further on in this article, you will learn how you can quickly send secure digitally signed messages in Outlook 365, 2021, 2019, 2016, 2013 and 2010 and explorer a few other ways of email protection:
Send secure email in Outlook by using a digital signature
Digitally signing an email in Outlook is not the same as adding your text or graphical signature at the end of outgoing messages. An email message signature is simply your customized closing salutation that anyone can copy or mimic.
An Outlook digital signature is a different matter - it adds your unique digital mark to the message. By signing an email with a digital signature, you include your certificate and public key associated with your digital ID (signing certificate). In this way, you prove to the recipient that the message comes from a trusted sender and that its content is intact.
To be able to send secure Outlook emails using a digital signature, you need two basic things:
- Digital ID (email certificate). See where and how you can get a digital ID.
- Set up the signing certificate in Outlook. In the previous article, we also discussed how you can set up the encryption certificate in Outlook. To configure the signing certificate, you perform exactly the same steps with the only difference that you choose to add a Signing certificate instead of Encryption certificate.
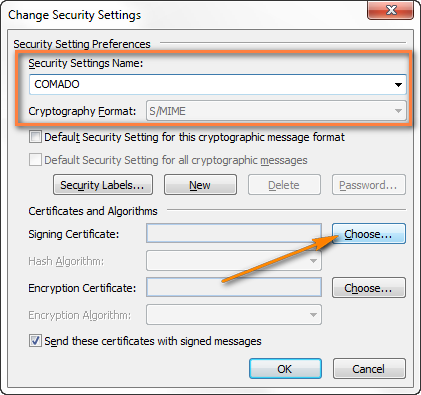
Though, if your digital ID is valid both for email encryption and digital signing (and most of email certificates are), it does not really matter which option you choose, both certificates will get configured anyway.
How to sign a single Outlook email with a digital signature
With your digital signing certificate in place, proceed with the following steps.
In a message you are composing or replying to, go to the Options tab > Permission group and click the Sign button.
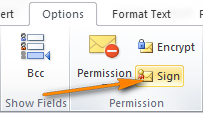
If you don't see the Sign button, then do as follows:
- Head over to Options tab > More Options group and click the little downward arrow icon (Options Dialog Box Launcher) in the lower corner.

- Click the Security Settings button and check Add digital signature to this message.
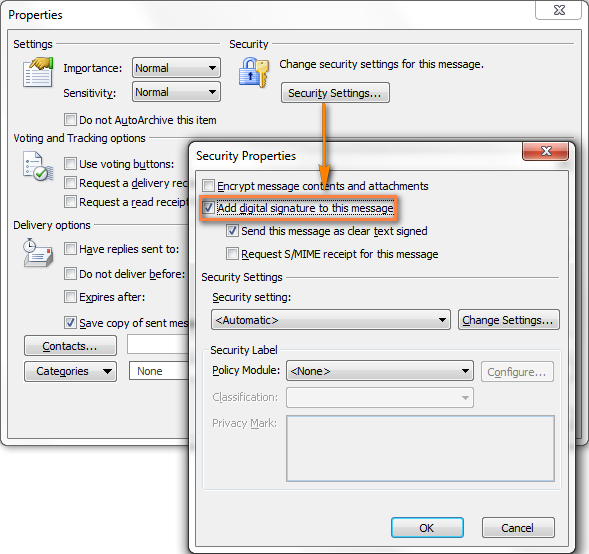
- Click OK to close the dialog and send the email as usual by clicking the Send button.
How to digitally sign all emails messages you send in Outlook
- In your Outlook, open the Trust Center dialog: go to the File tab > Options > Trust Center and click the Trust Center Settings button.
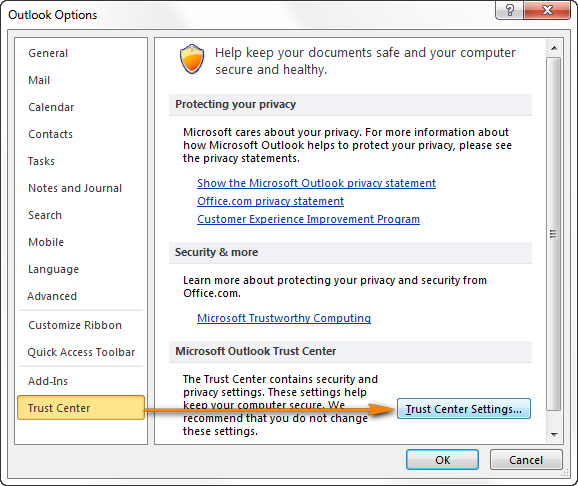
- Switch to the E-mail Security tab and select the Add digital signature to outgoing messages under Encrypted Mail.
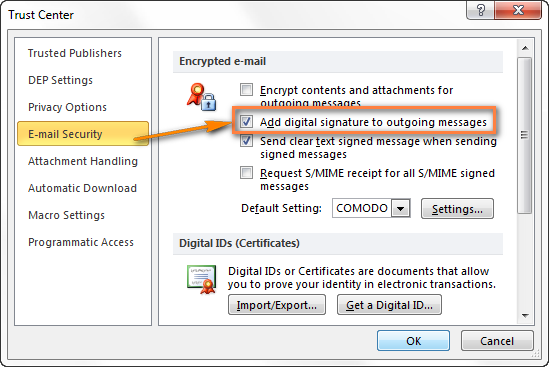
- You can select one of the additional options, when applicable:
- Select Send clear text signed message when sending signed messages if you want the recipients that don't have S/MIME security to be able to read the messages you send. This check box is selected by default.
- Check Request S/MIME receipt for all S/MIME signed messages if you wish to verify that your digitally signed email message has been received unchanged by the intended recipients. When you select this option, the verification information will be sent to you in a separate message.
- If you have several signing certificates, you can choose a proper digital ID by clicking the Settings button.
- Click OK to close every open dialog box.
Note. If you send sensitive or strictly confidential information, then you may also want to encrypt the email to ensure the complete privacy.
Other ways to send secure email in Outlook
Admittedly, email encryption and Outlook digital signature are the most common methods of sending secure emails in Outlook and other email clients. However, your choices are not limited to these two options and a few more email protection means are available to you:
Encrypting email connections with SSL or TLS
You can use Secure Socket Layer (SSL) or Transport Layer Security (TLS) encryption to secure the connection between your email provider and your computer (mobile phone or other device). These encryption methods work similarly to the protection schemes that are used to secure online transactions and purchases.
If you use a web browser to work with your email, make sure the SSL/TLS encryption is enabled. If it is active, then the website address (URL) begins with https instead of usual http, as you can see in the screenshot below:
![]()
In Microsoft Outlook, you can set up an encrypted connection in this way:
- Go to the File tab > Account Settings > Account Settings...
- Double click the account for which you want to enable the SSL connection and then click the More Settings... button.

- Switch to the Advanced tab and checkThis server requires encrypted connection (SSL) box.
- Choose the encryption type from the drop down list next to Use the following type of encrypted connections.

Which exactly encryption type to choose depends on the requirements of your e-mail provider. Usually they provide detailed instructions for configuring an encrypted connection, so hopefully you won't have any difficulties with this.
Sending password protected zip files
If you need to email some confidential information as a text document, Excel spreadsheet or other file, you can take an extra precaution against unauthorized access by zipping the file and protecting it with password.
How to compress / zip a file or folder
I believe everyone knows how to compress (or zip) files or folders in Windows. I will remind you the way just for the sake of completeness : )
In Windows Explorer, find the file or folder you want to compress, right-click on it and choose Send to > Compressed (zipped) folder from the context menu.

A new zipped folder will be created in the same location.
How to protect a compressed folder with password
If you still happen to be using Windows XP, you can protected the contents of a compressed folder with password using Windows' means. The procedure is very simple:
- Double-click the zipped folder you want to protect and click Add a Password on the File menu.
- Type the password in the Password box.
Note. Please remember that passwords for compressed files and folders are not recoverable in Windows. So be sure to use something that you can easily remember.
If you are using Windows 7 or Windows 8, you might be surprised to find out that these operating systems do not have such capability. Why Microsoft has removed the password protection feature that was used by many is a complete mystery to me. New versions of software are supposed to add new features and not the other way round, aren't they?
Anyway, if you are using Windows 7 or Windows 8, you can utilize some third-party archiving software with the password protection feature on board, e.g. 7-Zip - free open source file archiver.
I personally like the WinRar software better (you can see its dialog window in the screenshot below), but this is just a matter of preference.
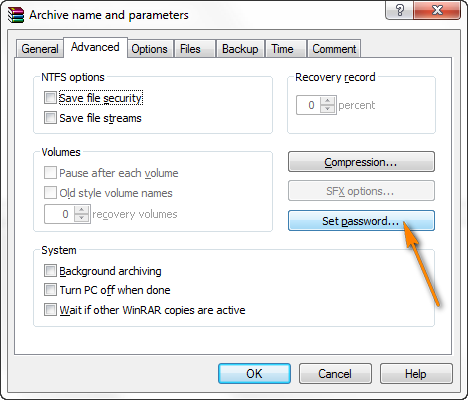
With your important document compressed and password protected, you are ready to safely email it as attachment. Just don't forget to provide the password to your recipient in a separate email message, over Skype or phone.
Tip. If you have obtained the Digital ID certificate, you can additionally encrypt your zip file and sign it with a digital signature. To do this, right-click the .exe file in Windows Explorer and choose the Sign and Encrypt option from the context menu.
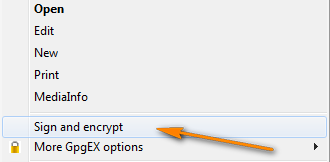
If you are sending a highly confidential document and looking for the complete privacy, you can also encrypt the entire email message including attachments as described in How to send encrypted email in Outlook.
And this is all for today, thank you for reading!
 by
by
17 comments
this is very useful site list for me thanks of lot dear
These instructions do not apply to Outlook 365 as you have indicated.
this is very useful and helpful site list you provide me thanks of lot dear
this is very useful site list you provide me thanks of lot dear
this is very useful and helpful site list you provide me thanks of lot dear
this is very useful information you provide me thanks of lot dear
We have to confirm those signatures to keep our laptops safe. This can be accomplished with the aid of putting in today’s product and if the office installation fails KB63363901
Dear sir / madam i visit on your site and learn step by step about digital signature this is amazing and very useful for us thanks of lot sir
Thank of lot to sharing a amazing information on your account thanks of lot
Dear sir thanks for share a very useful information it is very helpful for me I learn step by step thanks for us
Tanks of lot for giving a amazing information it is very helpful for me i learn step wise step very useful thanks of lot sir
thankyou for sharing this information to secure our A/C
I Learn Step By Step Your Blog ,Thanks For providing a needful Content.
Thank you so much for providing such a useful content. It's very use full for us.
id like to know why its not possible to create a 4 or 5 digit password to enter before sending an email.
Hello ,
Is it possible to create an GPO to enable "Add digitla Signature to outgoing messages" in Outlook ?
Hi,
may I know as a recipient of Outlook digital signed email (sent internally vs externally), how do I know if the email was really sent by the actual person and the contents are not changed unauthorised?
Thank you.