This easy-to-follow guide with practical examples will show you how to set up custom rules in Outlook to automate your inbox organization and focus on what truly matters.
Imagine your Outlook as a tidy room where important emails are prioritized, distractions are filtered out and everything is neatly sorted into its rightful place. That's what Outlook rules can do for you. Whether you're a super busy professional or just seeking serenity amidst the chaos, learning how to use Outlook rules is like unlocking the secret to a stress-free email life. Let's dive in and make your inbox the most organized it's ever been!
Note. This article targets the classic Outlook application. If you are using the new Outlook app or web version, please refer to this tutorial: How to set up email rules in new Outlook and Outlook 365 online.
Outlook rules
Outlook rules are automated instructions that tell the application how to handle incoming or outgoing messages. These rules can be based on a variety of factors, including the email sender, recipient, subject line, message content, and more. When an email meets the conditions specified in a rule, Outlook automatically performs the associated action.
Common actions enabled by Outlook rules include:
- Moving messages to designated folders, ensuring a tidy inbox and easier navigation.
- Deleting unwanted emails automatically, keeping your inbox free from clutter.
- Forwarding messages to another email address, which can be particularly useful for monitoring important communications or managing customer inquiries.
- Categorizing emails with colored flags, providing a visual cue to prioritize and identify emails quickly.
- Marking as read or unread, which can help in maintaining focus on the emails that require immediate attention.
For instance, you can ensure that all emails from a VIP client are immediately moved to a high-priority folder, or that any emails containing the word "invoice" are flagged for follow-up.
Advanced rule options also allow for more sophisticated email management, such as:
- Handling emails with attachments by saving them to a specific folder or forwarding them to a colleague.
- Managing emails from specific domains or distribution lists, which is particularly useful for sorting newsletters, announcements, or group communications.
- Setting exceptions to rules, so that certain emails that meet most criteria but are marked as exceptions do not trigger the rule.
Overall, by setting up rules tailored to your workflow, you can automate repetitive tasks, save time, and maintain a high level of organization within your inbox.

Note. Outlook rules are designed to run automatically on incoming (Inbox) or outgoing (Sent Items) emails. To apply them to messages in other folders, you'll need to do it manually. For detailed guidance, see How to run an Outlook rule on a specific folder.
How to create a rule in Outlook
The process differs depending on the version you are using. In classic Outlook, there are 3 ways to define rules:
How to create rules for specific emails in Outlook
To create a rule in Outlook based on an existing email message, follow these steps:
- Right-click on the message you want to base the rule on.
- Select Rules > Create Rule.

- Choose the condition(s) for the rule and what actions to take based on those conditions.
- Once you've set up the rule, click OK to close all open dialogs and save the rule.

You'll see a confirmation message indicating that the rule has been successfully created. If you want to apply the rule to messages already in the current folder, check the checkbox that says Run this new rule now on messages already in the current folder and then click OK.

For example, if you want to move messages containing a specific word in the subject line to a designated folder, here's how you can set it up:
- Choose the Subject contains condition. By default, the subject of the current message will display in the box entirely. You're free to refine this by retaining only essential keywords.
- Choose Move the item to folder, and then click the Select Folder button.
- Either select an existing folder from the list or click the New button to create a new one.
- If you've opted to create a new folder to hold these messages, give it a name.
- When done, click OK.
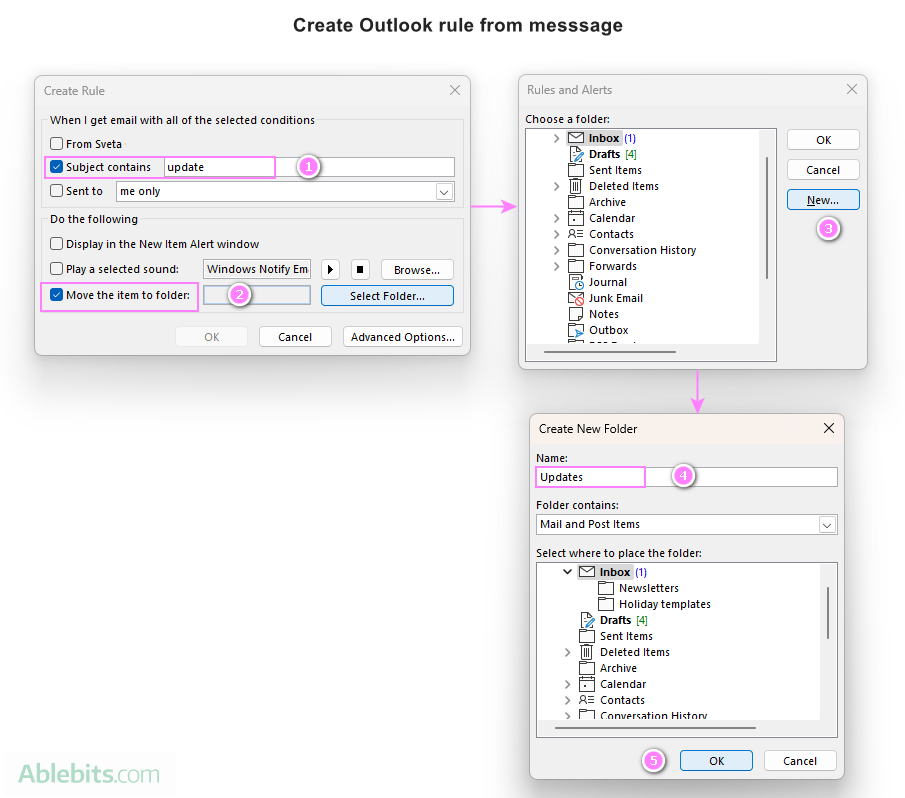
That's it! Now, all messages containing the specified word in the subject line will appear in the selected folder.
How to make an Outlook rule from a template
To set a rule using one of Outlook's built-in templates, carry out these steps:
- Access Outlook rules:
- On the Home tab, in the Move group, click on Rules > Manage Rules & Alerts.
- Alternatively, you can go to the File tab and choose Manage Rules & Alerts.

- Create a new rule. In the dialog box that opens, make sure the right account is selected in the Apply changes to this folder box, and then click New Rule…

- Select a template. Under "Step 1: Select a template," choose the template that suits your needs.
- Edit the rule description. Under "Step 2: Edit the rule description," you'll see underlined values. Click on these values to make selections according to your preferences.
- Finish and save the rule:
- Click Finish to save the rule.
- Or, you can click Next to define additional conditions, actions, and exceptions for the rule.

Some rules may only run when Outlook is running. If you encounter a warning like shown below, just click OK.

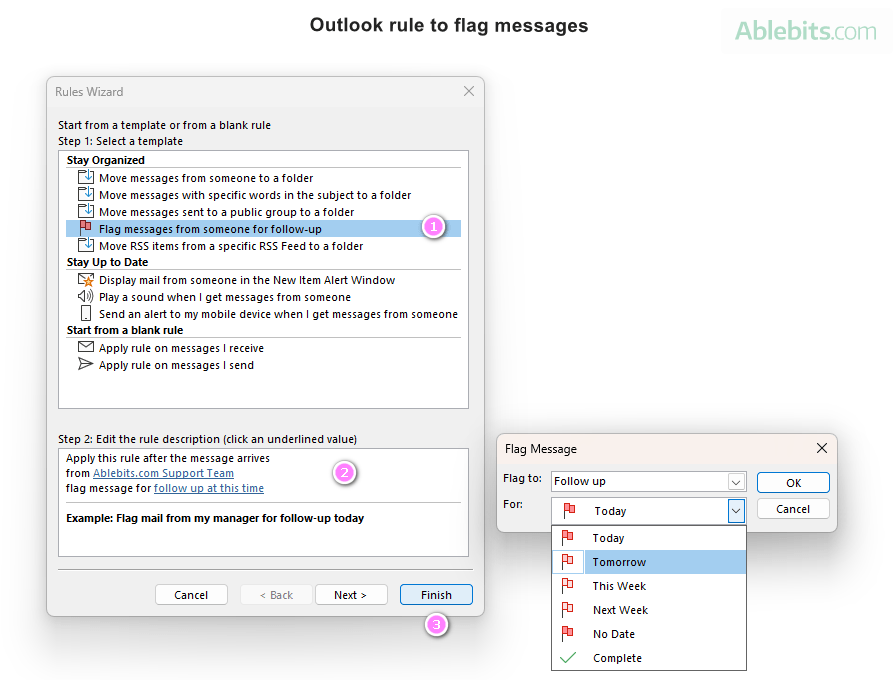
For instance, if you want to flag messages from a specific sender for follow-up, this is what you need to do:
- Choose the template Flag messages from someone for follow-up.
- In the Edit the rule description section, do this:
- Click on the underlined value "from people or public group" and select the desired sender.
- Click on the underlined value "follow up at this time" to define when the follow-up should occur.
- Review the rule description to make sure it matches your choices and click Finish.
How to set rules in Outlook from scratch
Creating rules in Outlook from scratch allows you to tailor them precisely to your needs. If none of the pre-built templates suit your requirements, you can start fresh with a blank rule. Here's how:
- On the Home tab, click on Rules > Manage Rules & Alerts.
- In the Rules & Alerts dialog, select the target mailbox in the Apply changes to this folder box (if you have multiple accounts in Outlook), and then click New Rule.
- In the Rules Wizard dialog, chose one of the following options, and then click Next:
- Apply the rule on messages I receive - trigger the rule for incoming emails.
- Apply the rule on messages I sent - apply the rule for outgoing emails.
For example, to set up an Outlook forwarding rule, choose the first option:

- Select conditions. You might want to forward emails from a specific sender, containing certain words, or marked as important. In the upper section, select all the conditions you want to apply. In the lower section, click on underlined values and make your selections. Then, click Next.

- Choose actions. Decide what to do with the message. In our case, select forward it to people or public groups. Then, click the "people or public groups" value in the lower section and specify the recipient. Click Next when done.

- Set exceptions. Optionally, set exceptions under which the rule won't apply, and click Next. For example, you might not want to forward messages from a specific sender.

- Finish and save the rule. In the final step, you do this:
- Name the rule.
- Choose suitable options. To activate the rule, select Turn on the rule. Additionally, you may also opt to run the rule on existing messages in your inbox.
- Review the rule description and make the final edits if necessary.
- If everything looks correct, click Finish.

Done! Now you have a rule in your Outlook that will automatically forward all messages marked with high importance to the specified recipient, except when the sender is the designated recipient themselves.
Examples of Outlook rules
Here are a few practical examples of Outlook rules that can help you solve common tasks and automate various aspects of email management:
- Defer delivery of emails - delay the sending of emails by a specified number of minutes, giving you the chance to check messages before they go off.
- Block emails containing certain words - automatically move messages that contain specified words to the junk folder, helping to filter out unwanted or spam emails.
- Set up an auto reply - set up an automatic out-of-office reply for POP and IMAP/SMTP accounts, ensuring that senders are notified of your absence.
- Get read receipt - request delivery and read receipts for messages that meet certain conditions, providing confirmation that your emails have been received and opened by recipients.
- Auto forward mail - automatically forward or redirect every incoming email or only specific messages that meet predefined conditions.
- Forward Outlook email to Gmail - auto-forward all or specific messages from Outlook to Gmail.
Exporting and importing rules in Outlook
Exporting and importing Outlook rules is a handy feature, especially when you want to share rules with colleagues or set up rules on multiple devices.
How to export Outlook rules
To export a set of rules from your Outlook, the steps are:
- Navigate to the File tab, then click on Manage Rules & Alerts.
- In the dialog box that appears, click Options.

- In the Options dialog box, click Export rules.

- Choose the folder where you want to save the exported rules, give a name to the .rwz file, and click Save.

Tips and notes:
- The exported Outlook rules are saved in a file with an. rwz extension, which is compatible only within Outlook.
- If you need to export rules for use in a previous version, select Outlook 2002 / 2000 / 98 Compatible Rules from the Save as type list.
How to import Outlook rules
To import rules in your Outlook, the steps are:
- On the File tab, click Manage Rules & Alerts.
- In the Rules & Alerts dialog box, click Options.
- In the Options dialog box, click Import rules.

- Navigate to the folder containing the rules you wish to import, select the .rwz file, and click Open. If you're importing rules for previous versions of Outlook, ensure to choose the corresponding file type from the dropdown list on the right.

Great! Now you have a functional set of rules in your Outlook without having to make each one from scratch.
How to edit rules in Outlook
To modify any aspect of our Outlook rules, such as the name, conditions or behavior, follow these steps:
- Open the Rules and Alerts dialog.
- On the E-mail Rules tab, select the desired folder from the Apply changes to this folder dropdown at the top. Typically, this will be the Inbox folder for different email accounts.
- Select the rule you want to modify and click Change Rule. From the list of available options, pick the change you wish to make. Usually, you click Edit the Rule Settings, and then go through the steps, to change the conditions, actions and exceptions.
- Once you've made your changes, click Apply to save them.
- After finishing editing the rules, click OK to close the dialog.
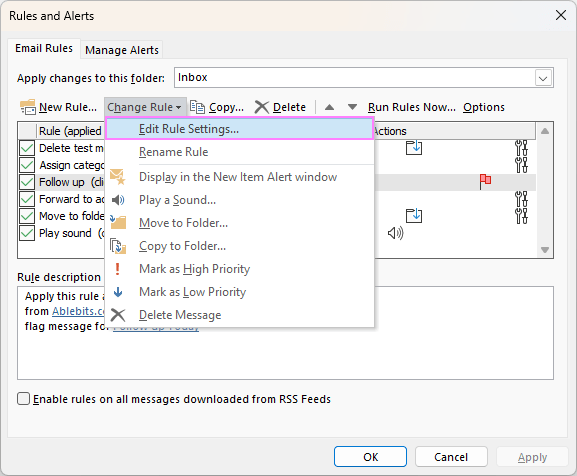
These steps will help you adjust your Outlook rules to match your changing needs, making sure that your email management stays effective and customized to your liking.
Tip. To quickly get to the rule settings, simply double-click the rule.
How to manage Outlook rules
In the Rules and Alerts dialog, you can also fine-tune your Outlook rules with these additional options:
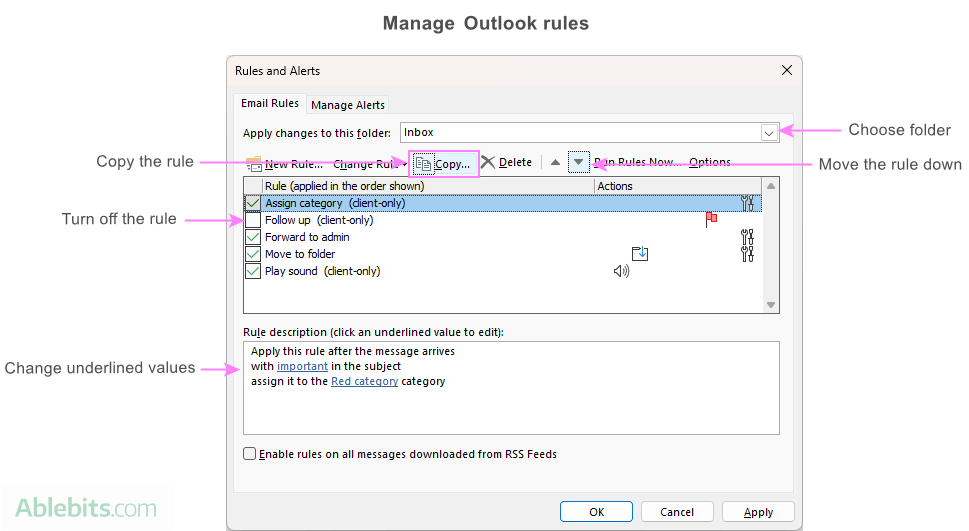
- To change the order of the rules, use the Up or Down arrow buttons. The rules are executed in the order they appear in the list, from top to bottom.
- To copy the rule to another folder, click the Copy button.
- To customize specific aspects of the rule, such as the target folder, keywords, or category, click on the underlined value in the rule description section, and make the desired adjustments.
- To temporarily disable the rule, uncheck the checkbox next to it.
How to remove rules in Outlook
To permanently delete a rule in Outlook that is no longer needed, this is what you need to do:
- Open the Rules and Alerts dialog box.
- In the displayed list, select the rule you want to remove.
- In the top menu, click Delete, and then confirm by clicking "Yes".
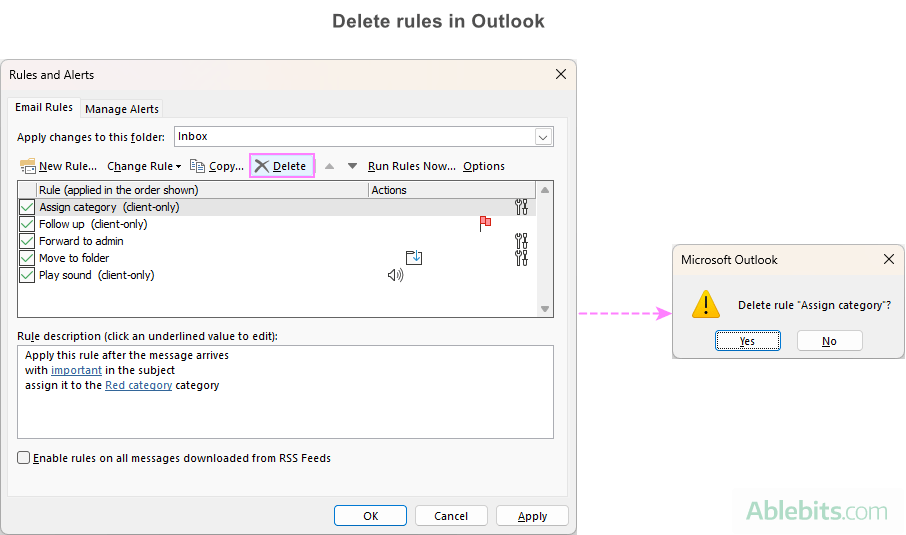
This way, you can remove unnecessary and outdated rules from your Outlook, ensuring that only the relevant and useful ones remain.
Outlook rules order of execution
The order in which you arrange your Outlook rules is crucial because it determines the sequence in which the rules are processed. Rules are executed from top to bottom as they appear in the Rules and Alerts dialog box. If an email meets the criteria of multiple rules, it will be processed by the first rule in the list, and subsequent rules that also apply to that email may be ignored.
For example, if you have a rule that moves emails to a specific folder and another rule that deletes emails from the same sender, the email will only be moved to the folder if the move rule is higher in the list. If the delete rule is higher, the email will be deleted, and the move rule will never be executed.
How to change order of rules in Outlook
To change the order of rules in Outlook, you can follow these steps:
- Open the Rules and Alerts dialog box.
- Select the rule you want to move, and then use the up or down arrow buttons to re-sort the rules.
- After arranging the rules in the desired order, click Apply to save the changes, and then OK to close the dialog.
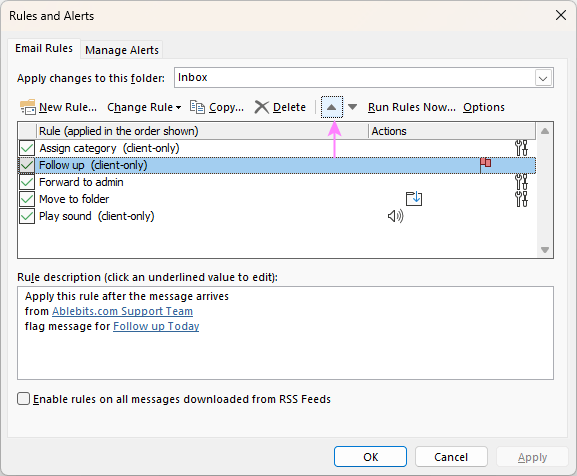
Remember, the order of rules is important because it affects how incoming emails are processed.
Stop processing more rules in Outlook
Stop processing more rules in Outlook is a setting that allows you to prevent subsequent rules from being applied to an email, even if it meets their conditions. This is useful when you have multiple rules that could potentially trigger on the same email, but you want only the most important one to take effect.
Without this option, Outlook would apply all rules that match the message in the order they appear in the Rules and Alerts dialog box. However, by enabling Stop processing more rules, you can halt this processing after a specific rule is applied, preventing further actions on the same email and avoiding conflicts.
For example, suppose you have a rule to move all emails from a specific sender to a particular folder, and another rule to delete all emails with a certain subject line. By using Stop processing more rules, you can ensure that emails from that sender are not deleted, even if they also match the subject line condition.
For many rules created from a message or template, this option is enabled by default, as indicated in the rule description:

When starting from a blank rule, you can control this feature when selecting actions in the Rules Wizard.

For existing rules, you can enable or disable this option by editing a rule.
In general, it proves to be a helpful tool to prioritize your rules, control the flow of your email processing, and avoid unwanted outcomes.
How to run rules manually in Outlook
The beauty of Outlook rules lies in their automation, working silently in the background without any human intervention. However, there are situations when you might need to apply a rule manually. For example, when you create a new rule, you may wish to run it on emails that are already in your Inbox, not just on new incoming messages.
Here's how you can manually run a rule in Outlook:
- Click the File tab > Manage Rules & Alerts.
- Once in the Rules and Alerts dialog, choose Run Rules Now.

- In the Run Rules Now dialog, select one or more rules that you want to execute.

- To run the rule on a folder other than the default one shown in the Run in Folder box, click Browse, choose the desired folder, and then click OK.

- If you want the rule to apply to subfolders of the selected folder, check the Include subfolders box.
- In the Apply rules to list, you can keep the default setting of all messages, or change it to either read or unread messages, depending on your preference.
- Once you've made your selections, click Run Now to execute the chosen rules.
By following these steps, you can trigger Outlook rules by yourself. That way, they work for both current and new emails, and help you keep your inbox neat and effective.
Server-side vs. client-only rules in Outlook
Outlook rules allow you to manage your emails effectively, whether you’re online or offline.
Server-side rules, managed by the Exchange server, operate independently of Outlook and run directly on the server. This means they remain active even when Outlook is closed, making them ideal for managing emails when you're away from your desk or when using different devices to access your emails. These rules can perform actions such as moving emails to folders, deleting them, or forwarding to another person.
Client-only rules are dependent on the Outlook client and only execute when Outlook is open on your computer. These rules are useful for tasks requiring immediate attention while you are actively working, such as displaying alerts and playing sounds, assigning categories, flagging messages for follow-up, or marking them as read.
Outlook distinguishes between these two types of rules automatically, labeling client-only rules accordingly.

Now armed with the know-how to create and manage rules in Outlook, you're well on your way to sculpting the inbox that works for you, not against you ? So go ahead, give your Outlook rules a personal touch and enjoy the benefits of enhanced email organization.
 by
by