This article covers various aspects of Outlook email signatures. You'll find detailed steps to create and change a signature in Outlook as well as make a certain signature automatic. Additionally, you'll learn how to design a professional Outlook signature with an image and clickable links. These instructions apply to all versions, including Outlook 365, 2021, 2019, 2016, 2013, and earlier.
While there are numerous articles, tips, and special tools available online for creating professional email signatures, this tutorial focuses primarily on practical "how-to" guidelines for creating, using, and modifying a signature in Outlook. Along the way, you'll also find tips for making personalized, informative, and attention-grabbing Outlook email signatures.
Note. This guide shows how to create signatures in classic desktop Outlook. If you're using the new app or online version, please refer to Outlook email signatures in new Outlook and web.
How to make a signature in Outlook
Creating an email signature in Outlook is easy. If you manage multiple email accounts, you can assign a unique signature to each. You can also automatically add a signature to all outgoing emails or set up different auto signatures for new messages and replies/forwards.
To set up a signature in Outlook, perform these steps.
- On the Home tab, click the New Email button.
- In the new email window, go to the Message tab, and in the Include group, click Signature > Signatures… .

Alternatively, you can access Outlook signatures via the File tab > Options > Mail > Signatures…
- The Signatures and Stationery dialog window will appear, showing a list of previously created signatures, if any. To add a new signature, click the New button on the E-mail Signature tab.

- In a small dialog box that pops up, enter a name for your new signature and click OK.

- If you have multiple accounts, choose the one that will use this signature from the E-mail account dropdown list.
- In the Edit signature box, type the text of your signature and format it with the desired fonts and colors.
- To have Outlook automatically add this signature to all new messages and/or replies and forwards, select it from the appropriate dropdown menu in the Choose default signature section.
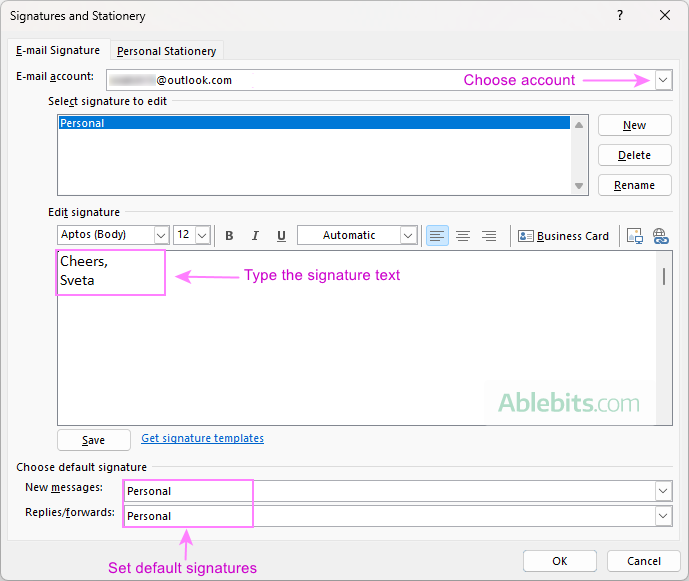
- Click the Save button under the editing box to save your new Outlook email signature, and then OK to close the window. You're all set!
Similarly, you can create different signatures for other accounts, for example, one for personal emails and another for business. You can also make multiple email signatures for the same account, for example, a longer signature for new messages and a shorter, simpler one for replies and forwards. Once you have set up more signatures, they will appear in the New messages and Replies/forwards dropdown lists.
Tip. This example features a basic text signature for demonstration purposes. If you're creating a formal email signature, consider a professional design with a clickable links and social media icons. For detailed instructions, refer to How to make a professional html email signature in Outlook.
How to automatically add signature in Outlook
To set up an automatic signature in Outlook, configure the Default signature settings as follows:
- Start by creating a new signature or editing an existing one.
- In the Choose default signature section, define your preferences:
- From the New messages dropdown list, select the signature you want to be automatically added to all new emails. If you don't want an auto signature, keep the default option (none).
- From the Replies/forwards dropdown list, choose an auto signature for replies and forwarded messages, or leave the default option (none).
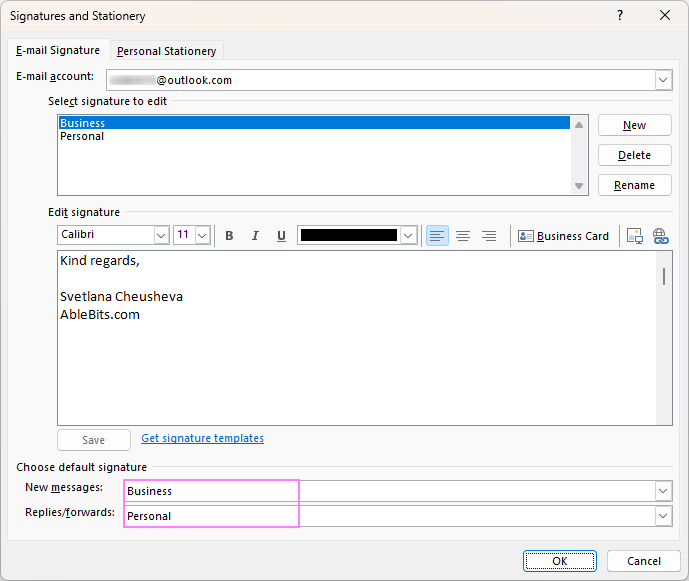
By setting these options, Outlook will automatically include your chosen signature in the corresponding messages.
For more details, see How to add auto signature in Outlook.
How to insert email signature into Outlook messages manually
If you prefer not to use an automatic signature, you can manually add it to individual messages. To do this, make sure the default signature is set to (none). When composing a new message or replying to an email, do this:
- On the Message tab, click the Signature button.
- From the dropdown list, select the signature you want to insert into the message.
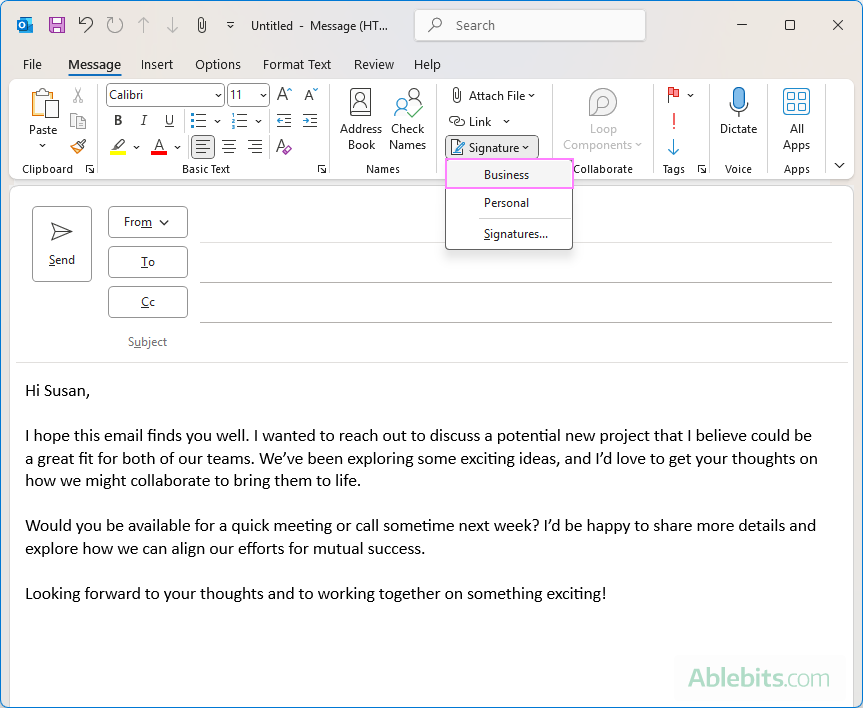
This method allows you to choose the appropriate signature for each email, giving you flexibility and control over your email communications.
How to edit signature in Outlook
Creating a signature in Outlook is simple, and updating an existing one is just as easy. Follow these steps to modify your email signature:
- Go to the File tab, click Options > Mail > Signatures… .
- In the Edit signature box, make any desired changes to the text.
- Use the mini formatting toolbar above the editing box to adjust fonts, colors, and other formatting options.
- After making the changes, click the Save button under the Edit signature box to save them, and then click OK to close the window.
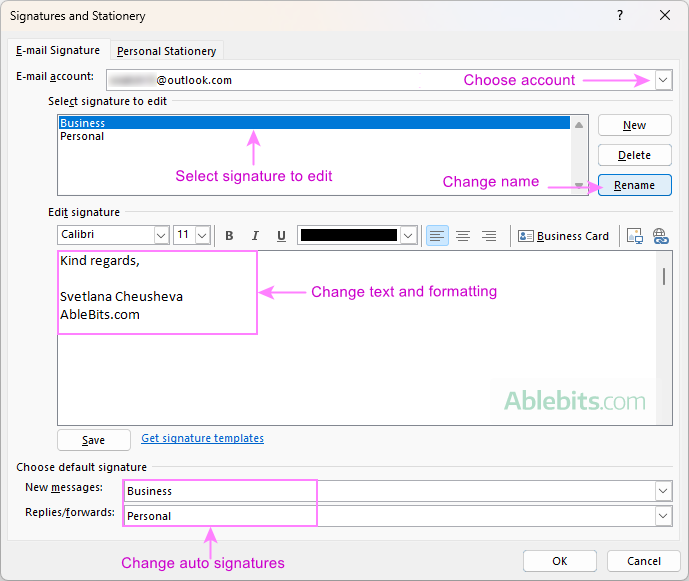
For more details, see how to change email signature in Outlook.
How to insert picture into Outlook signature
If you frequently communicate with people outside of your organization, you might want to personalize your email signature by adding a company logo, your photo, social media icons, a scanned handwritten signature, or other graphics. Here's how to do it:
- When creating a new signature or updating an existing one, click in the Edit signature box where you want to add an image.
- Click the Insert a picture button on the formatting toolbar.

- Browse your computer, select the image you want to add, and click the Insert button. Outlook allows adding pictures in the following formats: .png, .jpg, .bmp, and .gif.
- Click OK to save your Outlook email signature with the image.

For more information, see Adding image / photo to Outlook email signature.
Tip. If you've added social media icons to your signature, obviously you would want to link them to your profiles. A separate section explains how to create clickable images.
How to add hyperlink to Outlook signature
While you can simply type a full URL, linking your company name to a website address will definitely look nicer.
To turn any text in your Outlook signature into a clickable link, follow these steps:
- In the Edit signature box, highlight the text you want to turn into a link, and click the Hyperlink button on the toolbar. If the text isn't already in your signature, place the cursor where you want the link and then click the Hyperlink button.

- To make the link clickable, configure the following settings in the Insert Hyperlink window:
- In the Text to display box, type the text you want to make a clickable link. If you've already selected the text, it will automatically appear in the box.
- In the Address box, type the full URL you want to link to.
- Click OK to create the link.

- In the Signatures window, click OK to save your updated signature with the hyperlink.
Note. After entering the URL, Outlook may automatically update the Text to display. Double-check this and modify the text if needed before saving.
How to make an image in Outlook signature clickable
To make images in your Outlook email signature, like your company logo or social media icons, clickable, you can add hyperlinks to them. The steps are similar to adding a text hyperlink described above:
- Select the image. In the Edit signature box, select the image you want to make clickable, and click the Hyperlink button on the toolbar.

- Insert the hyperlink. In the Insert Hyperlink window, type or paste the URL into the Address box, then click OK.

That's it! Your image is now clickable and will direct recipients to the linked website.
Create an Outlook signature from business card
Another quick way to make a signature in Outlook is to include a business card (vCard) that contains your contact information.
- Create your business card. Business cards in Outlook are automatically created based on contacts stored in your address book. To create your own contact, do this:
- Go to the People section and click New Contact on the Home tab in the New
- In the New Contact form, enter all the details you want to appear on your business card, such as name, phone number, email address, etc.
Once you've added your information, Outlook will generate the business card for you. The major part of the work is done!
- Create a signature with your business card.
- Start making a new signature in the usual way.
- In the signature editor, click the Business Card button on the toolbar.
- This will open your list of Outlook contacts. Select your own contact and click OK.
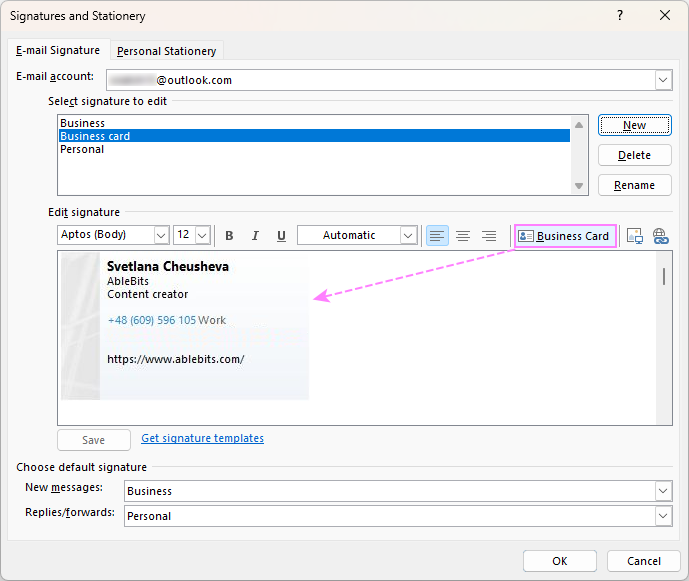
Please note that inserting a business card into your signature will automatically attach a .vcf file containing your contact details to the email. If you prefer not to include this attachment, you can copy the business card image directly from your Outlook contacts and paste it into your signature instead, avoiding the need to remove the attachment manually each time.

Creating professional Outlook email signature (with clickable links and images)
While many online email signature generators offer attractive templates, few allow exporting signatures to Outlook for free. The good news is that, with just a little time and effort, you can create a professional-looking email signature directly in Outlook with your contact details, photo, and clickable social media icons.
Since Outlook's signature toolbar has limited formatting options, the best approach is to design your signature in a new email or Microsoft Word, and then copy it into an Outlook signature. Here's how:
- Create a new message. Start by clicking the New Email button on the Home tab.
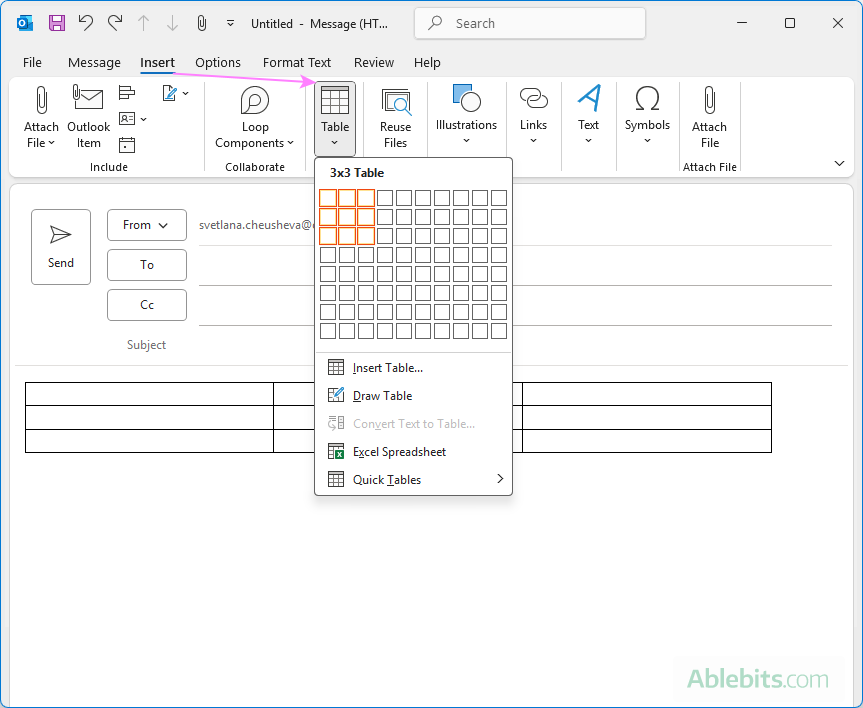
- Insert a table to structure your signature. In the new message window, switch to the Insert tab, click Table, and select the number of rows and columns corresponding to your email signature layout. The table will help you align your graphic and text elements, and bring harmony to your design. If you are unsure how many rows and columns you will need, you can start with 3 rows and 3 columns and adjust later if needed.
- Insert a logo or personal photo. Put the cursor into the cell where you want to add an image and click the Pictures button on the Insert tab. Browse for an image on your computer, select it, and click the Insert button.

- Adjust the image size. If necessary, resize the image by dragging the diagonal double-headed arrow in the corner.

- Erase unnecessary row borders. If you don't plan to include any additional text or images in the column where your picture is placed, you can clean up the layout by removing unnecessary borders. To do this, go to the Table Layout tab > Draw group, and apply the Eraser tool. Then, use the Alignment options to position your image as you like.

- Add contact details. Enter details such as your name, job title, company name, and phone numbers in other cells and format them using different fonts and colors.

- Include social media icons. You can grab social media icons from various online sources or directly from this page. Right-click each icon individually and click Save image as to download it to your computer as a .png file. Once saved, insert the icons into your signature table by placing them in the appropriate cells.


- Add links to images and text. To make the social media icons clickable, right-click each icon, and then click Link. In the Insert Hyperlink dialog box, paste the URL and click OK.
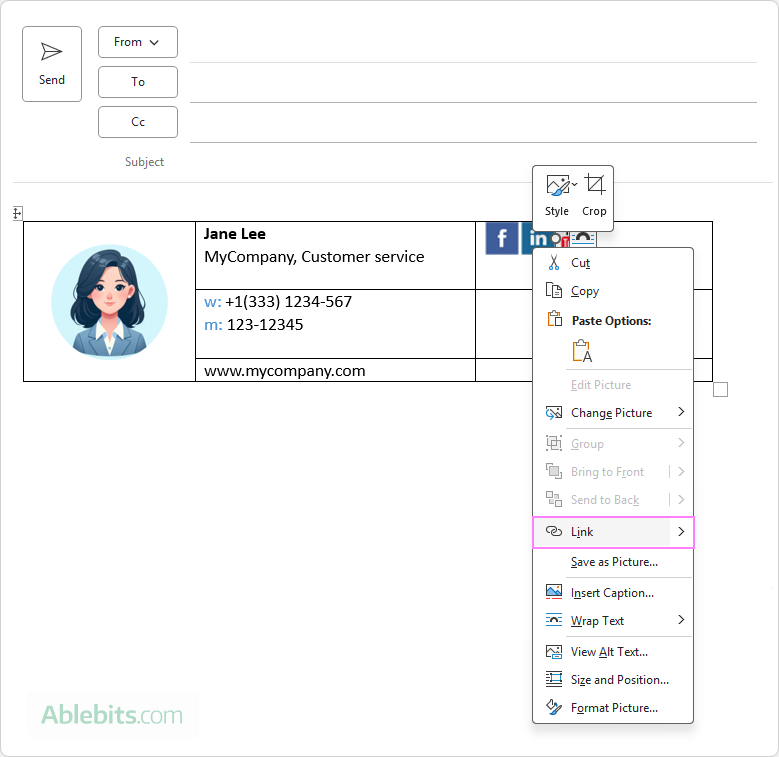
- Resize table columns. Drag to resize the table columns to remove or add extra room in cells.

- Remove table borders. Select the whole table, go to the Table Design tab, click Borders, and select No Border.

- Add dividers. Our Outlook email signature is almost finished. As a final touch, you can add dividers to separate different sections. Use the Border Painter tool to draw vertical or horizontal lines and select a Pen Color that matches your design. For a more polished look, experiment with different Line Styles and Line Weights to make the dividers thinner or thicker.

- Copy the signature. When you are happy with the design of your Outlook email signature, select the entire table holding it, and press Ctrl + C to copy it to the clipboard (or right-click and select Copy).
- Set up a new signature. Go to the Insert tab and click Signature > Signatures… > New. In the Edit signature box, paste the copied signature using the Ctrl + V shortcut or right-click and select Paste from the context menu.
And that's it! You've successfully created a professional Outlook email signature that includes images, hyperlinks, and social media icons.
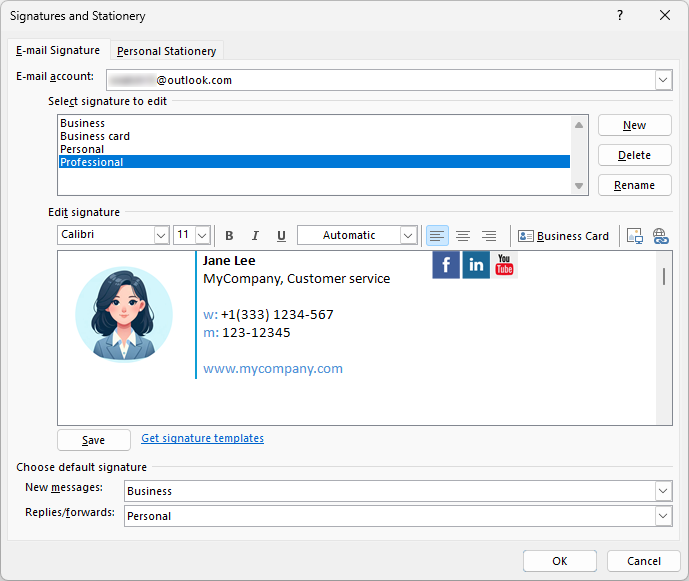
And here's another example of an Outlook email signature created using this method with a different layout and color palette:

Tip. After creating a beautiful html signature, you may also want to customize the plain text version to ensure your signature remains clear for recipients who view emails in plain text format.
Quick way to make a professional HTML email signature for Outlook
If crafting a signature manually feels too time-consuming or complicated, you can quickly design a sleek HTML signature using the visual editor included in our Shared Email Templates add-on for Outlook. Despite its name, this tool isn't just for email templates – it can help with creating professionally-designed email signatures too. Here's how:
- Choose a color theme. Start by selecting from 10 predefined color themes or set custom colors for various elements of your signature to match your branding.

- Pick a layout. Select one of 14 available layouts to set the base design for your signature. Unnecessary fields can be removed, and custom fields can be added to each section to suit your needs.

- Add signature details. Fill in details such as your name, title, contact information, social media icons, photo, logo, etc. Your changes will show up instantly in the preview for easy adjustments.

- Save the signature. Add some finishing touches, such as applying a card-like style or underlying links, and save your signature.

- Insert the signature into an email. To add your new signature to an Outlook email, simply double-click it in the Shared Email Templates pane. Alternatively, you can set it as the default signature to automatically include it in all new messages, replies, and forwards.

That's how you can effortlessly create a polished personal email signature for yourself, team-wide signature for your team, and company-wide signature for the whole company - easy, consistent, and ready to impress!
Where are Outlook signatures stored?
Once you've created your beautiful email signatures, you may want to back them up or transfer them to another computer. To do this, you need to know where Outlook stores its signature files.
Normally, Outlook signatures are stored in the following locations:
- On Windows 11 - Windows 7:
C:\Users\%username%\AppData\Roaming\Microsoft\Signatures - On Windows XP:
C:\Documents and Settings\%username%\Application Data\Microsoft\Signatures
How to find Outlook signatures
To quickly find the Signature folder on your computer, open Outlook, go to File > Options > Mail, and while pressing the Ctrl key, click the Signatures… button. This will instantly open the folder where your signatures are stored.

This is how you create, add and change signatures in Outlook. And now, it's over to you! Have fun designing your new Outlook signature - just remember to keep fonts readable, colors balanced, and graphics simple. With these elements in place, you'll certainly leave a great lasting impression on all of your email recipients.
 by
by
9 comments
Where the signatures are stored for "New Outlook"? I do not see them in %appdata%\Microsoft\Signatures.
I'd like to replace signatures programmatically...
Hello Leon,
In the new Outlook, email signatures are stored on the cloud. For more details, please see Where are new Outlook signatures stored?
Hello, Svetlana.
I, too, came here because of Outlook (2023, "New Outlook") adding visible borders to a table in the signature whether you want them or not, and offering no way to remove them.
The easy way to fix it is to create the whole table and contents in Word, format the table with no borders, copy the borderless table to the clipboard, and then paste it into the signature editor in Outlook.
Kind of silly, but it works.
--Br. Bill
Hello!
You are right, the signature editor's options are quite limited in both the new and old Outlook. To design your signature, you can of course use Word. Or you can create a new message in Outlook as demonstrated in the article. To remove table borders in the new Outlook, go to the Table tab and click Borders > No borders.
Hi Svetlana,
Thank you for this article, it's been very helpful and has helped me solve an issue I've been wrecking my brain over all week. I have a follow-up question; I've created a three-column table signature in Outlook 2013. It looks good on desktops, using different email services and browsers. But on mobile the table gets condensed, and some lines get broken in to. How can I solve this?
Thanks again!
Roy
Hi Roy,
I cannot say for sure why this happens without seeing your signature. Most likely you just need to fix the columns' width (select the table, right-click, AutoFit > Fixed Column Width).
Hi Svetlana,
This article has been a great help! My only issue is that the table, even when I choose no border, or make it a white border, still shows up with black lines when I paste it into the Signatures tab. Any idea what might be happening? I'm on Outlook 2010 currently. Thanks!
HI Alejandro!
I do not know if you solved already this issue, if not, know that I have got the same exactly problem when inserting my new table signature in Outlook 2010. But after trying several times I accidentally found a way to make the border disappear: when inside the signature's editing box on Outlook [signatures & stationery],select the white colour on the edit bar and the black border disappears! Try also to do the same in the initial page [new message] where you have created your signature. This may prevent the black border to show out.
*This tutorial is really GREAT! It's detailed and a rich source of info. Thanks a lot Svetlana!
Hi Alejandro,
I've never had such an issue. It may sound obvious, but did you select the entire table before changing the borders?